As a lot of my blog readers probably know :-), I’m working a lot with Microsoft Endpoint Manager – Intune and testing a lot of things in the Modern Management approach with Windows 10. It is absolutely necessary to have a good lab setup to test all these new features in a save way. For this I will share my approach how to work in my lab setup. First of all you need a performant Hyper-V Server with enough memory to support your test server/devices. I’m using a Server with an Intel i7 processor with 4 Cores and 64 GB of memory. Make sure to have a good SSD to provide good throughput especially when testing all these enrollments this is the best way to speed things up. This post is not about choosing the best hardware setup. An important fact is to make sure to enable Data Deduplication on your VM data drive to store the VM data files (vhdx) efficiently. Several Windows 10 .vhdx files can be stored very efficiently, as they all have a large portion of the same data in it (around 80-95% space saving for this data type). The setup I described above, brings a fair amount of power and throughput to work with 10 devices in parallel.
Now when it comes to work with the VMs I follow a few simple rules and have a few support utilities and scripts always available. All scripts can be found on my GitHub account here:
https://github.com/okieselbach/Intune
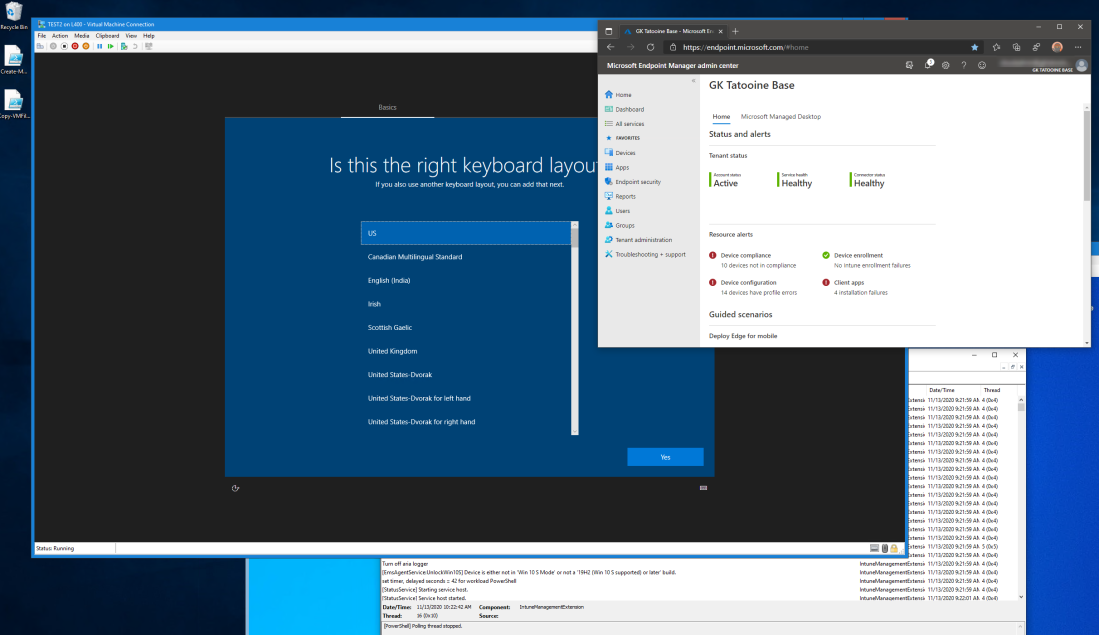
- I use Hyper-V native VM Connect and not the “Enhanced Session Mode“, as this blocks the capability to test Windows Hello for Business within my VM, I know I give up convenience in regards of copy paste, but I can easily live with that, as I have other options which are for me sufficient enough:

- I create my VMs by using a PowerShell script to speed up the process of deploying a new device. This script makes sure to start my VM via VM Connect right after creation and with a higher resolution from the beginning:

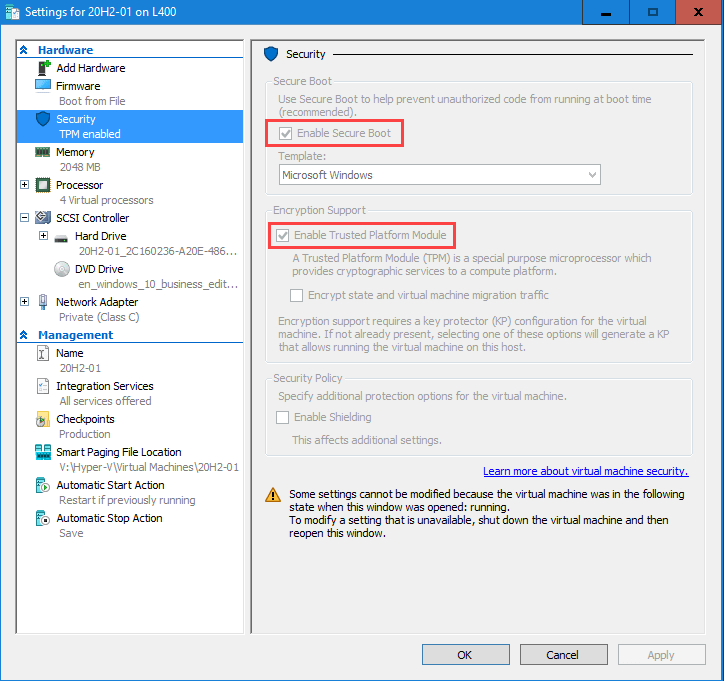
The Virtual TPM in Hyper-V is enabled to support features like BitLocker encryption and other security settings within the VM:
The script asks me if I want to use the latest Windows ISO or an Insider ISO file. Following the PowerShell script Create-MyVM.ps1 which I use on my Hyper-V host:
This is convenient enough for me to fire up VMs quickly, in a very clean state, as I let them run through the regular Windows Setup from the mounted ISO.
- I normally do not reset devices as the Windows Factory Reset aka Push Button Reset (PBR) re-creates the Windows files/folder from the side-by-side cache which takes a fairly long time. With a Hyper-V server and enough throughput I’m always faster in just mounting the ISO again and re-install the OS
- I use the Hyper-V VM integration services and a simple script to copy files into my VM if needed


Here the script used for coping into the VM Copy-VMFile.ps1:
$VMName = Read-Host -Prompt 'Enter VM name'
$FileName = Read-Host -Prompt 'Enter FileName'
Copy-VMFile $VMName -SourcePath "D:\$FileName" -DestinationPath "C:\Tools\$FileName" -CreateFullPath:$true -FileSource Host
- I use a simple network share from my Hyper-V host to provide the ability to transfer files out from the VM. For that I use a small PowerShell script to create the batches on the fly and deploy them to C:\Windows\System32 (System32 is used to have the batches included in the path variable) to support me executing them easily. This way I have a way to simply type connect (connect.cmd) and disconnect (disconnect.cmd) on the command line to establish the share connection:

The PowerShell script Create-TransferBatches.ps1 used in Intune to generate the two batches is that:
$content = "net use Z: \\192.168.1.1\Transfer$ /user:Administrator"
Out-File -FilePath "$env:windir\System32\connect.cmd" -Encoding ascii -InputObject $content -Force:$true
$content = "net use Z: /delete /y"
Out-File -FilePath "$env:windir\System32\disconnect.cmd"  -Encoding ascii -InputObject $content -Force:$true
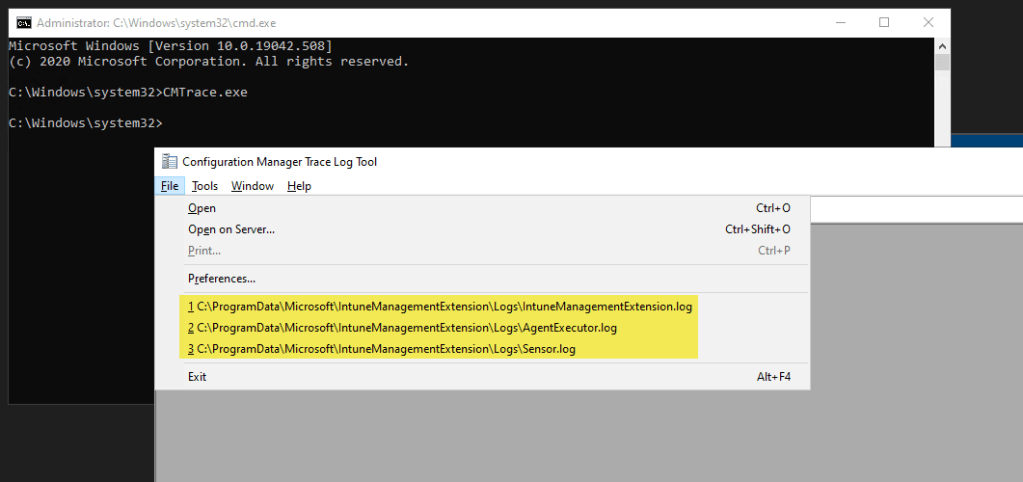
- I use the classic cmtrace utility from Microsoft (bundled in the ConfigMgr Toolkit) to support Intune Management Extension (IME) log file reading. I have a dedicated .intunewin package to deploy it to C:\Windows\System32. As a goodie it has set the most recent used file entries (MRU) for the common IME log files:
To install it I use this small install batch file. You need to be careful when copying it over to System32 from a 32-bit context (IME app installs run by default in 32-bit).
::we are running in a 32-bit process so copy to system32 is different!
cmd /c copy /y cmtrace.exe %windir%\Sysnative
powershell -ex bypass -file .\Create-CmtraceMRU.ps1
The Create-CmtraceMRU.ps1 modifies the Most Recently Used (MRU) registry entries to point to the Intune Management Extension (IME) log files for easy access:
- I use another simple batch file called imesync.cmd which I also distribute via Intune PowerShell script to C:\Windows\System32. It gives me easy access to sync the Intune Management Extension (IME) by just typing imesync in the command prompt:


To create the supporting batch file I deploy this small PowerShell script Create-ImeSyncBatch.ps1 via Intune which creates the imesyc.cmd:
$content = "powershell -Ex bypass -Command `"& {`$Shell = New-Object -ComObject Shell.Application ; `$Shell.open('intunemanagementextension://syncapp')}`""
Out-File -FilePath "$env:windir\System32\imesync.cmd" -Encoding ascii -InputObject $content -Force:$true
- I use a dedicated intunewin packages to populate the folder C:\Tools with the super helpful Sysinternals Suite tools within my VM:

My Sysinternals Suite .intunewin package has also a sudo.cmd which is also copied to C:\Windows\System32 for easy access to a system context command prompt by using the Sysinternals tool psexec. This is normally available very early, so I can even use it in OOBE and [Shift] + [F10] and just type in sudo to get an command prompt running in system context with the C:\Tools folder as working directory. I know in OOBE I‘m already System but I want to show how early everything is available:

This is my sudo.cmd file:
C:\Tools\Sysinternals\PsExec.exe -accepteula -sid cmd.exe "/k cd C:\Tools &&^
 echo current execution context: && echo. && whoami && title %computername%"
I use this simple install batch file for copying the Sysinternal Suite and the sudo file to C:\Windows\System32. You need to be careful when copying it over to System32 from a 32-bit context (IME app installs run by default in 32-bit).
xcopy /hericy * C:\Tools\Sysinternals\
::we are running in a 32-bit process so copy to system32 is different!
cmd /c copy /y sudo.cmd %windir%\Sysnative
- I have a SyncML Viewer intunewin package which copies the SyncML Viewer under C:\Tools to easily trace the MDM protocol:

A short note, the SyncML Viewer can also be run in OOBE even when I’m showing it here on the regular desktop. To learn more about the SyncML Viewer see my article here: Windows 10 MDM client activity monitoring with SyncML Viewer
- A tool which can’t be missed is the WMI Explorer to work easily with WMI:

Once again WMI Explorer can also be used during OOBE and [Shift] + [F10]. In my picture you can see I used my sudo.cmd to get my system command prompt to finally open WMI Explorer to get access to all WMI instances.
- As already seen several times in the screenshots, to easily identify my VMs I have a custom BGInfo background to print the most important parameters to the upper right of the background, VM hostname, Windows version info and if the user is Admin or Standard user:

To learn more about that see my article here: Deploying Win32 app BGInfo with Intune
Summary
I have shown my simple setup to work efficiently with VMs with a minimal amount of maintenance or preparation to setup all this. Currently I already live with this setup for a long time and very well. Once again here my tool set summary:
- Easy VM creation by using Create-MyVM.ps1
- Easy Copy into VMs by using Copy-VMFile.ps1
- cmtrace in C:\Windows\System32 for IME log files (link)
- imesync in C:\Windows\System32 for easy IME sync trigger (link)
- connect or disconnect to open network share to VM Host (link)
- sudo for easy elevation to System context via psexec
- under C:\Tools we have:
- Sysinternals Tools
- SyncML Viewer
- WMIExplorer
- Custom BGInfo to easily recognize my VM parameters (link)
These are not many things in total but they are giving me flexibility and a lab environment to work efficiently and test or troubleshoot the technology.
I hope I could inspire one or the other to organize his lab a bit or to post new ideas in the comment below.
Thanks for reading and maybe you got some new efficient ways to work 🙂

Fantastic- huge help to me!
Thanks, good to hear 👍
Great article as always. Some good tips and tricks are mentioned. Thanks.
I couldn’t resist commenting. Exceptionally well written!
Many thanks 😊
Great help to me! I changed it a little bit and added this instead of the insider iso:
function Show-Menu
{
param (
[string]$Title = ‘My Menu’
)
Clear-Host
Write-Host @”
+===============================================+
| Windows ISO |
+===============================================+
| |
| 1) ISO W10 Enterprise 21H2 19044 |
| 2) ISO W10 Enterprise 21H1 19043 |
| 3) ISO W10 Enterprise 20H2 19042 |
| 4) ISO W10 Enterprise 1909 18363 |
| 5) ISO W11 Enterprise 22H2 22621 |
+===============================================+
“@
}
Show-Menu –Title ‘My Menu’
$selection = Read-Host “Please make a selection”
switch ($selection)
{
‘1’ {
$IsoPath = “D:\ISO\Enterprise\Windows 10\21H2 19044\19044.1288.211006-0501.21h2_release_svc_refresh_CLIENTENTERPRISEEVAL_OEMRET_x64FRE_en-us.iso”
} ‘2’ {
$IsoPath = “D:\ISO\Enterprise\Windows 10\21H1 19043\19043.928.210409-1212.21h1_release_svc_refresh_CLIENTENTERPRISEEVAL_OEMRET_x64FRE_en-us.iso”
} ‘3’ {
$IsoPath = “D:\ISO\Enterprise\Windows 10\21H1 19042\19042.508.200927-1902.20h2_release_svc_refresh_CLIENTENTERPRISEEVAL_OEMRET_x64FRE_en-us.iso”
} ‘4’ {
$IsoPath = “D:\ISO\Enterprise\Windows 10\1909 18363\18363.418.191007-0143.19h2_release_svc_refresh_CLIENTENTERPRISEEVAL_OEMRET_x64FRE_en-us.iso”
} ‘5’ {
$IsoPath = “D:\ISO\Enterprise\Windows 11\22H2 22621\22621.525.220925-0207.ni_release_svc_refresh_CLIENTENTERPRISEEVAL_OEMRET_x64FRE_en-us.iso”
}
}
Great script for creating and staring VMs, one question, any way to avoid the Message “Press any Key to boot from CD-ROM”
I‘m not aware of a solution for that. Sorry
Huw ,
take a look at this link A Good ISO File is a Quiet ISO File – Deployment Research