
Maybe you have read the previous article How to configure certificate-based WiFi with Intune already and asked how to do the same with the freshly released Microsoft Cloud PKI. Then you don’t have to wait any longer, I promised to write about it and here is the setup with Microsoft Cloud PKI. I’ll dive into the architecture and the complete setup with a step-by-step guide. Let’s start again with the architecture and some general explanations about the setup. If you haven’t read the previous article, I’ll repeat some of the important facts and necessary background knowledge, so you don’t have to read the previous article to get started (even though I would recommend to still read the intro, as it is a good introduction to the general topic of WiFi and finally why certificate authentication is a good choice). Let’s jump right into it 👌
Table of content
Basic Setup
To build the infrastructure we need an Access Point with WPA-Enterprise Security Protocol support. The security protocol was designed to work with 802.1x servers for authentication. The most famous authentication server here is a RADIUS (Remote Authentication Dial-In User Service) server. There is also a RADIUS over TLS version which is called RadSec server. Typically, a RADIUS server is used with EAP-TLS (the most secure standard with EAP). The server checks incoming authentication requests for a valid client-side certificate. The RADIUS Server has configured a trusted issuer (in this case the Microsoft Cloud PKI) and uses the OCSP responder or the published Certificate Revocation List (CRL) of this trusted issuer to check incoming client-side certificates for their validity. As Microsoft Cloud PKI has no OCSP support at the moment, the setup checks the expiration date of the certificates and uses the CRL to check validity of the certificates. So, in total we need at min. three components, the Access Point to setup our Wi-Fi with WPA-Enterprise, the Certificate Authority (Microsoft Cloud PKI) which issues client certificates and a RADIUS Server (RADIUSaaS) which validates incoming authentication requests.
The setup of Microsoft Cloud PKI is very simple as you can see later in the step-by-step walkthrough. But as we learned the Cloud PKI is just one puzzle piece, so we need to set up the RADIUS server, in this guide the RADIUSaaS service, which is also very easy and doesn’t involve a lot of steps. RADIUSaaS is fully cloud based and available as a trial within minutes.
Our setup looks like this:

We use Microsoft Intune as MDM Server to deliver the profiles necessary for our clients to successfully use our new WiFi with certificate authentication. Microsoft Cloud PKI is our Cloud PKI to deliver the necessary certificates and RADIUSaaS provides us the authentication functionality for usage with the Access Points and WPA-Enterprise.
- First, we deploy the trusted root profiles for our Microsoft Cloud PKI and for RADIUSaaS. Both come with a Root Certificate which we need to deploy to our clients. RADIUSaaS has a Server Certificate which we will use to do a server validation against the RADIUSaaS instance. So, this guarantees we are talking to the right RADIUS server and not a fake one.
- SCEP device certificates are deployed via Intune profile and provided by the Microsoft Cloud PKI instance. We use device certificates as we want to have a working WiFi connection already established on the Logon Screen of Windows.
- WiFi profile is delivered by Microsoft Intune to the clients. This profile has all relevant information to connect to our WPA-Enterprise secured WiFi. This includes the SSID, WPA-Enterprise info, RADIUS server name validation, the reference to the Microsoft Cloud PKI Root certificate to build trust and to treat Microsoft Cloud PKI as trusted issuer of the client device certificates.
- The device will use the WiFi profile information to validate the RADIUS Server identity. In the WiFi profile we have defined the certificate server name (server name of RADIUSaaS) and the Root Certificate to finally perform the server validation. Then it uses the referenced Microsoft Cloud PKI Root certificate information to find a deployed device certificate issued by the Microsoft Cloud PKI via simple certificate selection (certificate listed for “Client Authentication”). Finally, it uses the selected certificate to generate the authentication request for the RADIUS server.
- The Access Point is configured to use RADIUS and will route the request to our RADIUSaaS instance to process the authentication request.
- Our RADIUSaaS instance has a trust relationship with the issuing CA – Microsoft Cloud PKI. The RADIUS server will therefore not validate any other certificate which is not from this trusted issuer and will instantly deny authentication requests. When the RADIUS server receives a certificate issued from the trusted issuer it will use the certificate information to validate the certificate, expiry date and validity against the CRL of the trusted issuer (Microsoft Cloud PKI). It would be possible to use OCSP as well but currently Microsoft Cloud PKI does not support OCSP. The result of this certificate validation (revoked or not) will generate the reply to the Access Point with an allow or deny for this authentication request.
To get everything up and running we have a small chicken and egg problem. We need some internet connectivity to download profiles from Microsoft Intune to set up everything on our client to finally connect to our secured WiFi with certificate authentication. This is the typical enrollment problem which many solve by utilizing a dedicated enrollment WiFi, which is completely separated from your corporate network. It will only allow Internet connectivity to enroll and on the final reboot the device will automatically switch to the newly provisioned corporate WiFi and has access to your corporate resources.
The complete setup can be built in a short amount of time as you will see in the step-by-step guide below. It requires an Access Point with WPA-Enterprise support to configure a RADIUS server. I’m using a UniFi AccessPoint U6+ and a self-hosted UniFi Network Server (Download) to configure the RADIUS profile on the UniFi Access Point. A real-world setup would use a UniFi gateway for this task. The Microsoft Cloud PKI and RADIUSaaS are provisioned in minutes as both are pure cloud applications. Even an enterprise setup with more high availability options wouldn’t need much more effort to be set up.
Even though I’m showcasing everything with a Windows client it is possible to do the same with iOS, macOS, and Android as well.
Step-by-step walkthrough
Microsoft Cloud PKI
Let’s start with the Microsoft Cloud PKI setup as we need some of the Microsoft Cloud PKI details later for the RADIUSaaS setup. The setup of the Microsoft Cloud PKI is really simple. With a few clicks we are ready to go. Within Microsoft Intune navigate to Tenant administration > Cloud PKI and click on Create:

Root CA Creation
On the creation wizard fill in the name of the new Microsoft Cloud PKI. As we are always going to create a 2-tier Cloud PKI we start with the Root CA. We give it a name and proceed with next.

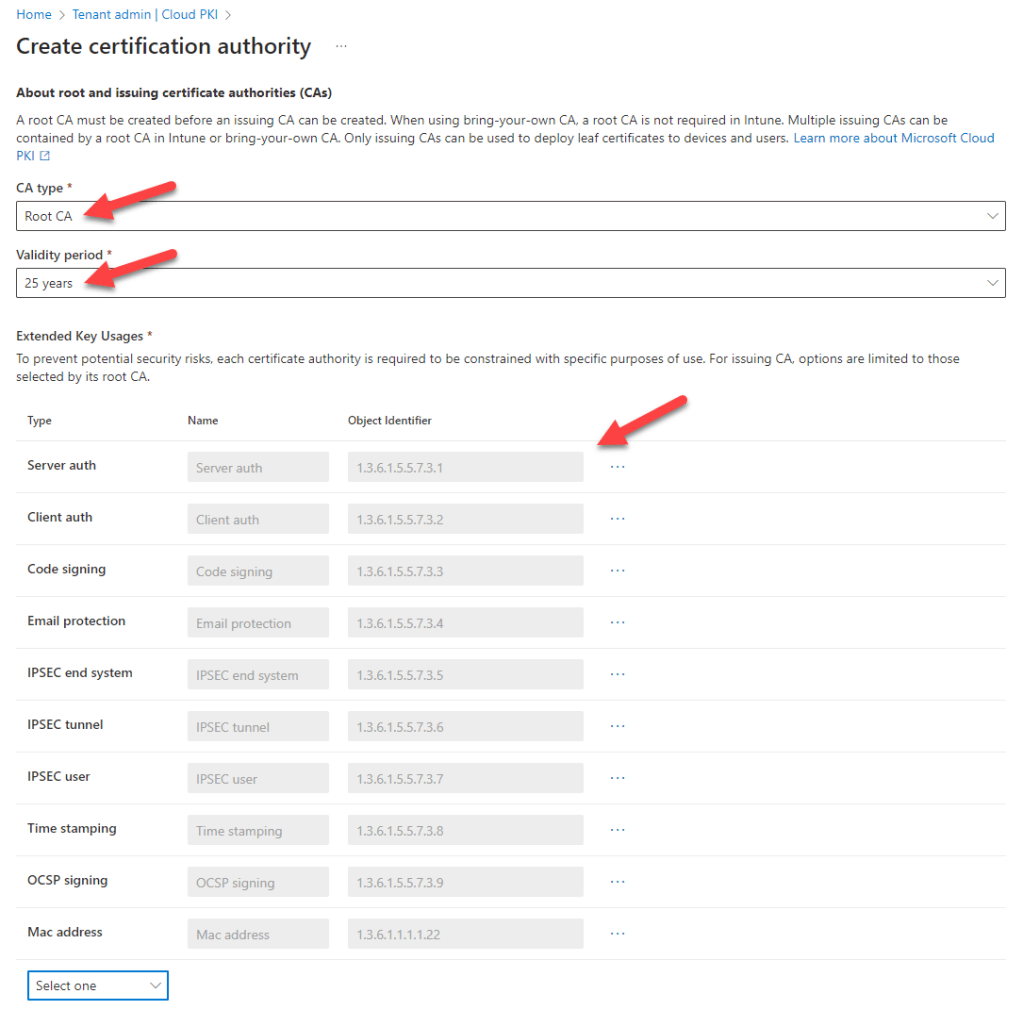
Next, we select the CA type: Root CA with a Validity period: 25 years. In my opinion that’s a good choice as I don’t want to take care of creating a new Root in just 5 years and all the hassle coming with it (replacing root certs on the devices and other services like RADIUS etc.). For Extended Key Usages I decided to use all predefined key usages available, as they are then available as options for my Issuing CA, and I’m not able to add additional ones later. The Root CA can’t be edited later on! This prevents the issue that I’m maybe later missing a key usage and have to build another CA just for the additional requirement then:
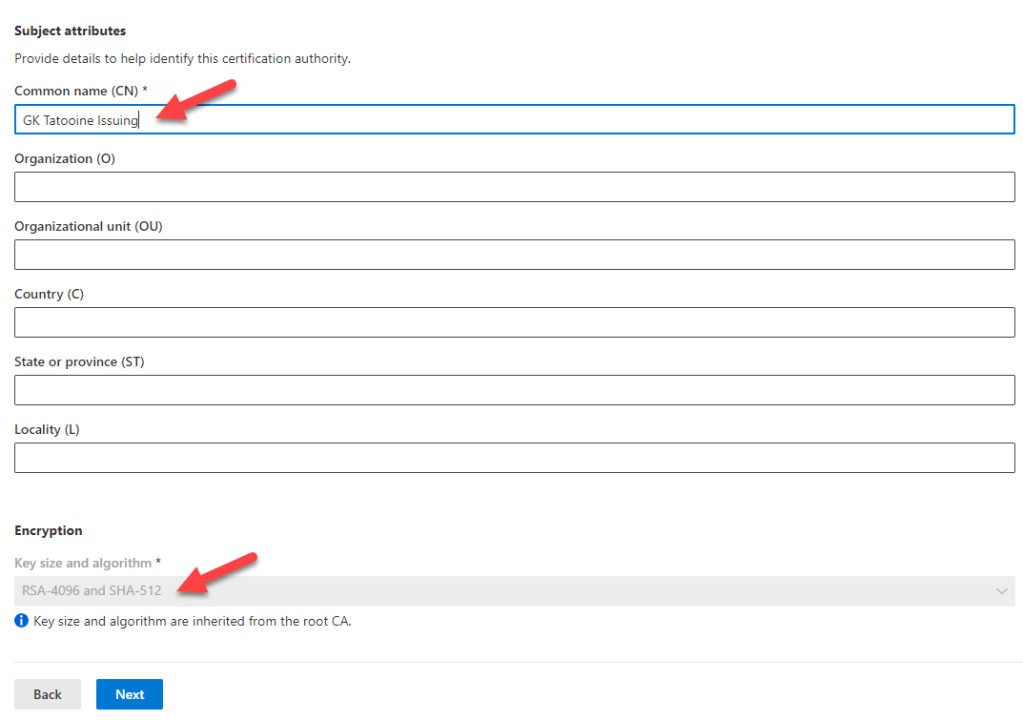
The subject attributes should be provided in alignment with your enterprise. I’m using everything in a lab environment for this demo setup, so I skipped the majority of attributes for this setup. In general it is a good idea to fill the Country (C) with the two-letter code like US. For the key size and algorithm, I’ve chosen the strongest one RSA-4096 and SHA-512 as it is not known to be broken and for my use case compatible:

The final config looks like shown in the summary wizard page where we click Create. You will not be able to edit the Root CA afterwards, no additional EKU can be added etc.

Perfect we have created a fully functional Root CA in minutes:


The Root CA is now listed under Cloud PKI in Microsoft Intune.
Issuing CA Creation
Let’s proceed with the Issuing CA by doing basically the same again and using CA type Issuing CA. We start with the name of the Issuing CA:

The next wizard page will allow us to choose the CA type Issuing CA which is anchored to our newly created Intune based Root CA. Technically you could also create an Issuing CA which is anchored to an existing Root CA of your enterprise. For the validity period I chose the maximum of 10 years, again to have lower maintenance. These needs may be aligned to internal requirements. The Extended Key Usages (EKU) can be chosen based on the ones I’ve added to the Root CA. In my demo environment I selected all of the allowed EKUs by the Root CA for the Issuing CA:

Fill in the Subject attributes accordingly and the key size and algorithm is chosen automatically as it is inherited from the Root CA:
Finally on the summary page, click on Create:

The result is a 2-Tier Microsoft Cloud PKI created in minutes 💪

Now we are going to download the CA certificates, the Root CA and Issuing CA certificate, as we want to deploy them later to our devices. Also, the RADIUSaaS instance needs them to create the trusted issuer relationship. In addition, we copy the CRL distribution point URL as we will need this information in RADIUSaaS as well. To accomplish this task, we simply click on the Root CA and then click on the Button Download to download the certificate and we copy the CRL distribution point URL of the Root CA:


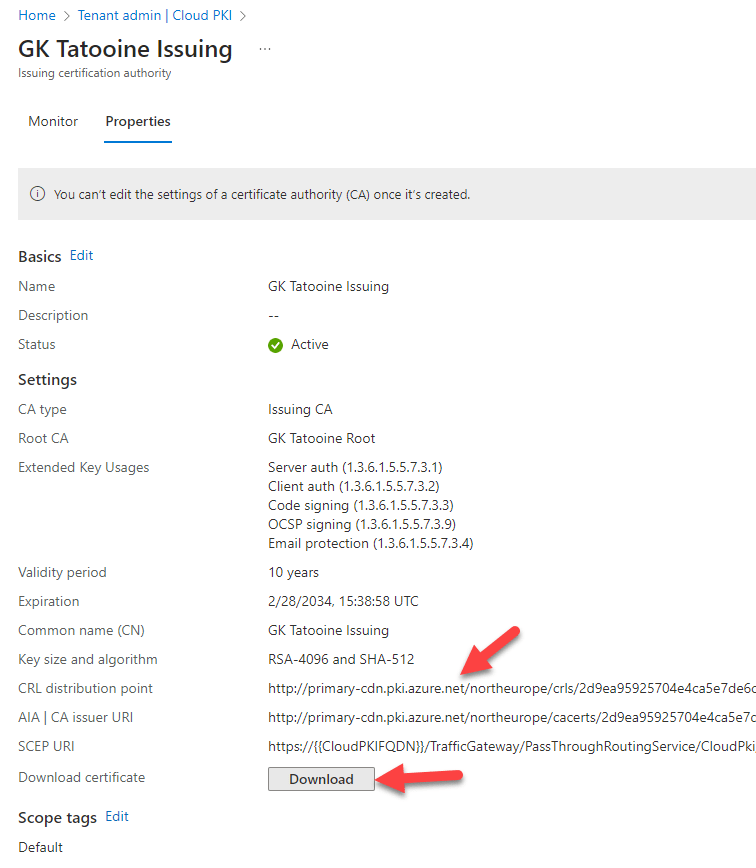
Repeat the step for the Issuing CA by clicking on it and then clicking on Properties:

On the next page we click again on the Download button and also copy the CRL distribution point URL of the Issuing CA:

That’s it for now, we completed the 2-Tier Microsoft Cloud PKI Setup and downloaded the necessary CA certificates and copied the CRL distribution point URLs for later usage.
Tip
Playing around may result in CAs you don’t want to use later on. But there is a known limitation at the moment: Delete or disable a CA from your Intune tenant. Until these actions become available, we recommend making an Intune support request to delete a CA.
!! But as we know everything is Graph nowadays 👍, you can simply use Graph Explorer in the meanwhile or a PowerShell script to delete a CA via a DELETE request:
https://graph.microsoft.com/beta/deviceManagement/cloudCertificationAuthority/ID-OF-YOUR-CA
We can easily obtain the ID via the URL if we navigate in Intune to the CA:

Finally, the Graph call via Graph Explorer and the CA is delete:

UPDATE: No recommendation to delete the CA via graph as it will delete the CA in the UI, but in the background it is not fully deprovisioned. So, ensure to create a support request to delete the CA
RADIUSaaS
Let’s setup the RADIUSaaS instance now. You can request a trial by following this Start Now form on the official website. If you’re not playing around on a weekend 😉 you should get your access to the trial instance a few hours later. We need to use the RADIUS protocol for the UniFi Access Point as this Access Point does not have RadSec support. To add RADIUS UDP traffic support to the RADIUSaaS instance we set up a proxy to allow the RADIUS UDP traffic. The RADIUSaaS default is RadSec over TCP. Luckily this is very easy to accomplish by adding a proxy in a region near your location via the RADIUSaaS portal Settings > Proxy Settings:

The proxy setup finishes in a few minutes and then we can get the relevant information about the IP endpoints, ports, shared secrets and the RADIUSaaS Root Certificate. We navigate therefore to Settings > Server Settings and there are the details:

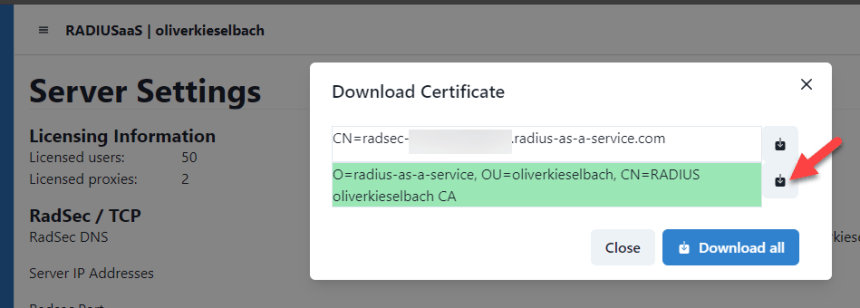
As described in the beginning we need the RADIUSaaS Root Certificate as we need to deploy this later to our devices into the trusted root store to get the trust relationship, which is necessary for the server name validation of the RADIUSaaS instance which we will configure in the WiFi profile. To download the RADIUSaaS Root Certificate click on the download button (shown in the image above) and then click on the green entry in the upcoming dialog (the entry ending with CA in the image below):
For a successful server name validation, we need the server name address which is listed in the Customer-CA certificate Subject Alternative Name (SAN) field. Under Server Certificates expand the certificate information and copy the SAN address value as shown below. We will use this information later in the WiFi profile to configure the server name validation:

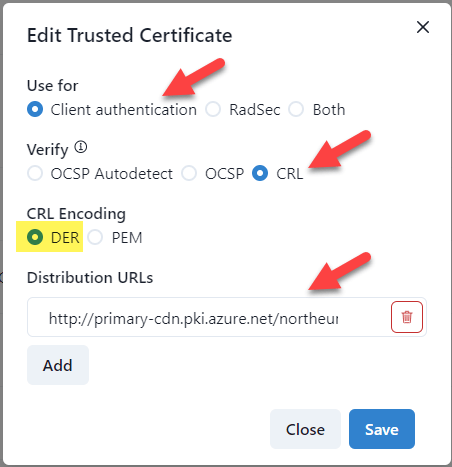
The final step is the configuration of the Trusted Issuer, the Microsoft Cloud PKI via the trusted Root Certificate in the RADIUSaaS Portal. To do this, navigate to Settings > Trusted Certificates and click Add > Upload PEM or DER file:

The upcoming dialog can now be used to add our trust chain to create the trusted issuer definition for our RADIUSaaS instance. First, we upload the Root CA certificate with the following properties (use the copied CRL distribution point URL of the Root CA in the Distribution URLs input field):

Then repeat this step for the Issuing CA certificate with the following properties (this time use the copied CRL distribution point URL of the Issuing CA in the Distribution URLs input field):
You will end up with both certificates listed under Trusted Certificates. This is our trusted issuer definition in RADIUSaaS:

If you have read the article How to configure certificate-based WiFi with Intune, which is using the SCEPman instance as Cloud PKI you will recognize that nothing is really different from RADIUS implementation perspective. In my opinion a very straight forward process. Next, we will set up the UniFi Access Point.
UniFi Access Point
Setting up the UniFi Access Point is also pretty straight forward. In my case I need the additional Self-hosting UniFi Network Server otherwise I can’t configure the RADIUS profile on the Access Point. In an enterprise setup you probably have a UniFi Gateway for this. After Self-hosting UniFi Network Server installation, the Access Point can be added to the console:

Then we need to create a RADIUS profile by following Settings > Profiles > RADIUS > Create New

Now fill in the gathered RADIUS settings IP address, Ports (Authentication 1812, Accounting 1813) and Shared Secrets and save the changes:

Finally, we create a new WPA3 Enterprise WiFi with our Radius Profile (Radius-Lab) and assign the Access Point to it:

That’s all we have to do for the Access Point. Our authentication requests are now forwarded to the RADIUSaaS instance 👌.
Tip: If you want to simulate a enrollment WiFi as well, maybe add an additional username/password WiFi which you can use for the initial connect to the Internet to download the profiles from Intune.
Microsoft Intune
This is the final piece of the deployment; we are going to deploy 5 profiles. The RADIUSaaS Root certificate (used for Server Validation), the MS Cloud PKI Root CA certificate and Issuing CA certificate, and the MS Cloud PKI device certificate (SCEP) used in the WiFi Profile. Finally, the WiFi profile is configured for EAP-TLS using the MS Cloud PKI device certificate. In the end you must have the following profiles:

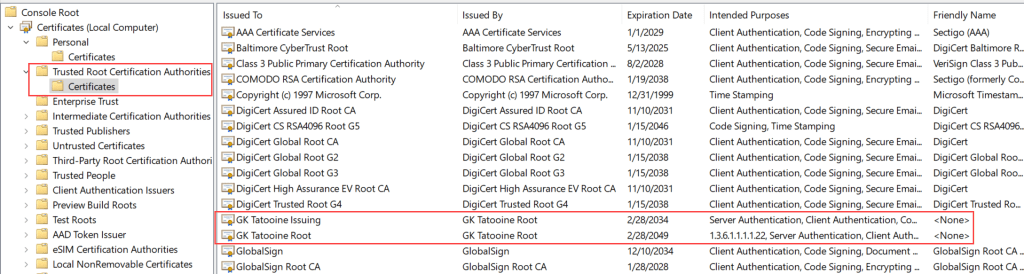
Import the Root Certificates (RADIUSaaS and both MS Cloud PKI certificates) and deploy them via Trusted Certificate profile to All Devices. The Root Certificates will be added to the Trusted Root certificates store for each client. This is fairly simple, so I skipped the screenshots for that (for assistance use the Trusted Certificate profile link).
Before we proceed, we go back to the MS Cloud PKI Issuing CA and we copy the SCEP Server URL as we need the URL for the SCEP profile we are going to deploy. On the Issuing Cloud PKI click on Properties > Click on the small copy icon to copy the SCEP URL:

We will use this SCEP URL in the SCEP profile for the device certificates.
Tip: Don’t worry about the https://{{CloudPKIFQDN}}/…, it’s a variable which Intune replaces accordingly. This is the same as the CN={{AAD_Device_ID}} in the SCEP profile (compare docs here). As soon as Intune deploys the profile the variable will be replaced with the correct value. So, copy the URL as shown there. (see also later in the article: Where can I find details about the deployed SCEP certificate?)
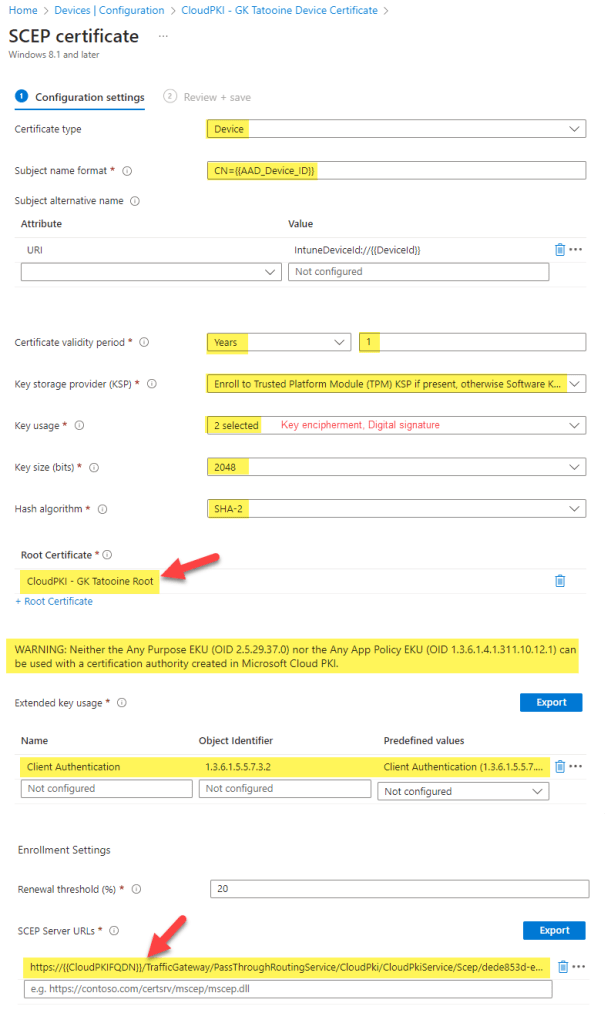
The MS Cloud PKI device certificate needs to be deployed via SCEP profile with the following settings. Not all settings are required to be set like I have done in my demo environment and can be adjusted to your needs, but a few are important to set equally. This is the certificate type as device, the Root Certificate from the deployed Trusted Certificate for the MS Cloud PKI, the EKU as Client Authentication and the SCEP Server URL:
Important: My test device is an older Surface Book and this is equipped with a TPM which has a firmware bug which invalidates some signatures created with TPM-backed private keys. This leads to malfunctioning EAP authentications used in WiFi and VPN connections! Known affected TPM firmware versions are (this list is most likely incomplete!):
- STMicroelectronics: 71.12, 73.4.17568.4452, 71.12.17568.4100
- Intel: 11.8.50.3399, 2.0.0.2060
- Infineon: 7.63.3353.0
- IFX: Version 3.19 / Specification 1.2
Richard Hicks documented a workaround to fix this issue on his blog here. And the workaround is working for my device as well. Basically, we have to remove support for a specific cipher suite (RSA-PSS) via a registry key. Go and check it out so you can benefit from TPM KSP on older devices as well.
If your device(s) are not affected you should choose TPM KSP as the most secure storage for private keys. Keep in mind TPM KSP only supports 2048-bit key size. Only software KSP can be used with 4096 key size. So, deploy the profile with 2048 bit key as shown in my example above.
Finally, deploy the SCEP profile for the device certificate to your devices. I highly recommend deploying the certificate to the same group as the MS Cloud PKI Root CA certificate! They reference each other, if Intune is unable to evaluate that the Root Certificate is in the same scope of the assignment, the SCEP profile may fail to deploy finally (reference docs article: Create and assign SCEP certificate profiles in Intune).
If the assignments are made you should get the Root Certificates on the device(s):
and also, the device certificate issued by the MS Cloud PKI:

The last step is to configure the WiFi profile. As we have all certificates deployed and the RADIUSaaS server address, it is straight forward to create the profile, but be careful to not miss a setting. Look at the example below:

Look carefully when picking the certificate references to not mess up the selection. Server validation needs the RADIUSaaS Root certificate and client certificate needs the Cloud PKI device certificate!
Windows Client WiFi Authentication
After successful deployment of the profiles to your device(s) using an enrollment WiFi, they should see the new WiFi profile, in my case CloudPKI Lab-Radius-Cert. When rebooting or just manually connecting, the devices should start authenticating against the Access Point using their device certificate from MS Cloud PKI. The Access Point will validate the request and respond with Login OK when the certificate is valid.
Your client should simply connect:

On the RADIUSaaS side you should see an allowed authentication in the Rule Engine logs:

If we expand the details with the small arrows in front of the log entry we can view more details:

These details explicitly tell us the AAD device ID (user-name) as configured in the SCEP profile and also the certificate validation details. A certificate with serial beginning with 863b… was presented and checked for expiry and against the configured CRL (see also Tell me more about the validation process with the CRL) of the trusted issuer. The verify-result of true means it is not revoked. The certificate is therefore allowed for authentication.
Well, done 💪 we have setup a whole wireless infrastructure with WiFi certificate authentication using Intune, the MS Cloud PKI, and a Cloud RADIUS in a short amount of time.
Additional insights
Where can I find details about the deployed SCEP certificate?
The easiest way is to look into the registry under:
HKLM\SOFTWARE\Microsoft\SCEP\MS DM Server\...

Keep an eye on the ServerURL, you can see easily the replaced SCEP URL. We copied the https://{{CloudPKIFQDN}}/… URL with the variable in Intune and it was correctly replaced.
If you have traced the communication with SyncML Viewer you will find also the SCEP SyncML commands containing the correct URL:

If you look closely on the URL you will see it reflects your Azure Scale Unit (ASU) where your Intune Tenant is hosted. My tenant location is Europe 0301

And the URL is starting with https://fef.msub03.manage.microsoft.com/… I guess the 03 correlates to the tenant location 👌which makes totally sense as my new MS Cloud PKI SCEP endpoint is certainly hosted in the same scale unit as my tenant.
Tell me more about the validation process with the CRL
Certificate validity checks with a CRL are really different compared to OCSP validation. OCSP as the name already tells us Online Certificate Status Protocol (OCSP) will directly tell us the validity of the certificate, no delay is involved here. OCSP is increasingly used (which is good) but CRLs are still widely used as well. The CRL in contrast is just a list of certificates which have been revoked.

Obviously, the list will grow over time and it needs to be highly available and updates frequently. If seriously implemented a non-reachable CRL should result in rejected certificate validations. But even with frequent updates it is not a direct online response like OCSP with less data to parse. It’s just a snapshot of the validity of certificates in a published list. So typically, CRLs are cached and used for a period of time (caching time) until the CRL is downloaded again. A CRL has a next update datetime so the consumer can evaluate when to download the next update.

Microsoft describes in their documentation; they are publishing and refreshing every 3.5 days. The CRL is updated with every certificate revocation. This means a RADIUS server for example will initially download the CRL and cache the CRL to prevent download for every incoming request. After evaluation of the next update field, it could simply download the updated version after 3,5 days. The issue with this approach is that a revoked certificate will not be reflected in the cached CRL until the next download happens, which might be in 3 days. In case of RADIUSaaS the CRL is checked every 3h to mitigate long caches with missing records. You will also find the CRL last Checked status on the Trusted Certificates in RADIUSaaS:

As you can see CRLs are in general cached and bound to the problem that they may not reflect the actual state of all the certificates (already revoked ones may not be there). Validation via cached CRLs are by nature not as acurate as OCSP validations.
What about revoking certificates?
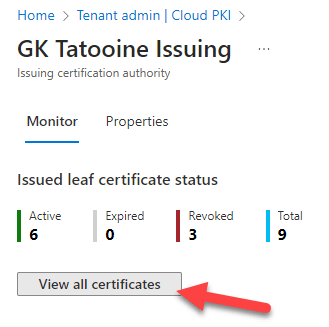
Certificates are revoked when users or devices are disabled or deleted. In the case of devices, they can also be retired or wiped. If you want to manually revoke certificates this can be done by opening the Issuing CA in Intune and clicking on View all certificates:
Then on the list of certificates pick the certificate you want and click on it:

On the details page click on Revoke:

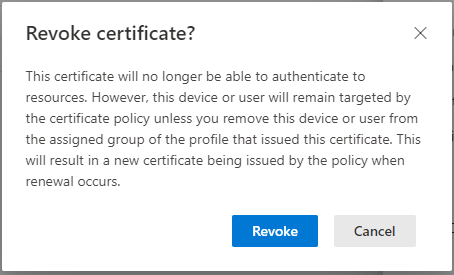
The result is reflected instantly in the CRL as the revoke will trigger a rebuild of the CRL. But the UI will need some time to reflect this change. So don’t be bothered by the UI, check the CRL and the UI will show it accordingly after some time 👍

Remember: Even when the CRL is updated immediately, the RADIUSaaS server will cache a CRL download for 3h. So, it might take up to 3h to be reflected in your WiFi authentications.
Final thoughts
I hope you have all the details to start implementing and working with Microsoft Cloud PKI and the RADIUSaaS service. I really like the simplicity of both cloud solutions. If I compare this to the regular on-premises implementations it is at least for me the way forward. I hope I could demonstrate enough to deepen the understanding.
Happy for feedback and hopefully more of you start using certificate-based WiFi authentication, maybe with the Microsoft Cloud PKI and RADIUSaaS ✌️
Further information
- Microsoft Cloud PKI
- RADIUSaaS
- Trial RADIUSaaS – Click here
- SyncML Viewer
- TPM issue fix by Richard Hicks – Click Here

Thank you very much for this great tutorial!
Worked like a charm with the brand new U7 AP’s from UI too. 🙂
thanks heaps for this article, it’s really concise. i’m hoping to test this out but any idea how MS cloud PKI would work with existing on-prem CAs and RADIUS servers? or are we looking at spinning up a new cloud env. just to leverage this?
Yes, you can follow the guide to implement a Bring your own CA from MS to accomplish your goal.
https://learn.microsoft.com/en-us/mem/intune/protect/microsoft-cloud-pki-configure-byoca?WT.mc_id=EM-MVP-5003177
Hi Oliver and thank you very much for this nice step by step guide! It worked everything so far, but I had to figure out, that the Access Points itself (at least with UniFi devices) are connecting directly to the RADIUSaaS Proxy for authentication and not the UniFi Controller.
So I had to open the firewall for the RADIUS Ports UDP 1812 and UDP 1813 directly from the IP addresses of the Access Points to the IP of the cloud RADIUS server of the RADIUSaaS
(IP in Settings > Server Settings below RADIUS / UDP in the RADIUSaaS Portal, Europe (Frankfurt) in your and our case).
I believe it would help some people, if you mention this in your guide.
Have a nice day.
Thank you very much for this great tutorial, would we able to use a on-prem radius servers instead of the cloud env
Yes, sure you could also use a Cisco ISE or whatever else you have.