
TL;DR
Autopilot Manager simplifies Windows Autopilot imports by using a small client program and an Azure app service. The client program has visual user feedback and the app service acts as a proxy to allow approval scenarios before importing. Click here to take me to directly to the deployment section. For my German readers I’ve talked (in German) about the tool with my friends Hairless in the Cloud here.
Table of content
- A brief introduction
- The break and fix scenario
- The common solution
- The solution Autopilot Manager
- The approval options
- Viewing import jobs
- Deployment
- Configurations
- Download Links
- Final remark
A brief introduction
Windows Autopilot is a great technology to simplify device provisioning to get them ready for productive use. It saves a lot of labor preparing OS images which has already been done by the OEM vendor. We utilize these ready-built devices and configure them for our needs to start working with them. In fact, this is only possible because Microsoft introduced a while ago the concept called “Windows 10 signature edition PCs”. This is the description for a device installed with a clean Windows 10 version, no bulk ware, trial software etc. This was the decisive factor in my opinion. OEMs followed and offer now similar installs, calling these editions “ready-to-provision” or something else. Except for the name they follow the same principle, no annoying trial software etc. is installed, more or less a plain vanilla Windows 10.
The ready-to-provision device with a “clean” Windows 10 image, can now utilize Windows Autopilot to enhance the enrollment user experience to be simple and enterprise ready. Simple means you just need a few simple clicks, a username and password and the rest is done fully automatic. With enterprise ready, I think especially of the ability to provision the device, resulting in a standard user instead of an administrative user. In a non-Windows Autopilot enrollment scenario, the first user will always be an Administrator as there is no enterprise management on top. In the enterprise enrollment scenario, we enroll the device into a management system which can configure or install software to support the user, even when he is a standard user to protect his working context. The standard user permissions limit the user to install software on his own. This is because a typical software setup needs elevated permission for the setup process. In addition, and this is an important fact, we can now limit the enrollment to known devices, our provisioned Windows Autopilot devices. This is the Windows enrollment restrictions for personal Windows devices. This way we can keep the tenant clean and tidy to allow only our defined corporate hardware. End users are not allowed to enroll some no-name personal hardware, which might not even have all the security technology available, to support secure storage of BitLocker keys (TPM), support Hypervisor for Credential Guard and so on.
To utilize the great concept, we have to upload device provisioning information into our tenant. This way the device is assigned to our tenant and gets a Windows Autopilot profile, telling what settings to use during the enrollment process. The device provisioning information can be published directly by the OEM vendor to our tenant, or we upload the info by yourself. Okay, perfect we order now devices and they are directly assigned to our tenant. That’s great! But how about the break and fix scenarios?
The break and fix scenario
A typical break and fix scenario means something is broken on the device or software and it needs to be fixed. Not every break and fix scenario is hardware related and involves hardware change or repair. It may also just be a Windows factory reset necessary, as Windows was affected by a non-recoverable issue. If your data is stored in the cloud and you face software issues there is always the question if you invest 4h of troubleshooting or simply give up after 1h and reset the device which takes maybe 1h, resulting in 2h after the device is ready to be used again, instead of investing 4h troubleshooting with maybe no resolution.
In the case of software break and fix, most of the time a factory reset is possible and the device will still be recognized by your tenant as the device provisioning information relies on several hardware parameters to build a unique hash for identification. When it comes to hardware break and fix scenario and a replacement of motherboard for example you end up in a broken relationship as the hardware hash does not match anymore. What to do then? Especially when we have limited the enrollment to Windows Autopilot registered devices only. Or another situation where the device breaks and a replacement device need to be bought, but this device is not purchased via the corporate ordering process (with direct tenant assignment), instead the user gets the replacement device from a local store nearby? No automatic device provisioning (hardware hash) upload into our tenant then. How to onboard these new devices?
The common solution
The common solution to this problem is fairly simple. Someone gathers the new hardware info (hash) manually from the device and manually uploads it to the tenant. There is a script snippet available (see code below) to download the Autopilot script and gather the Autopilot info as a .csv file to upload it via Intune portal, or even upload it directly to the tenant (use parameter -online with Get-WindowsAutopilotInfo.ps1) if you have credentials with enough permissions to do so.
md c:\HWID
Set-Location c:\HWID
Set-ExecutionPolicy -Scope Process -ExecutionPolicy Unrestricted -Force
Install-Script -Name Get-WindowsAutopilotInfo -Force
Get-WindowsAutopilotInfo.ps1 -OutputFile AutopilotHWID.csv
Sounds very simple and absolutely no issue for an Administrator, right?! But what about the end user with a hardware break and fix scenario, working from home, bought a replacement device from a store nearby? First, you won’t give him credentials for uploading the information on his own, right? Second, the complete process of harvesting the Windows Autopilot hash information is way too complicated and can’t be reliably executed by an end user. Imagine the situation where the end user has to start PowerShell, type in several commands (shown above), gather a .csv file dump it on a USB stick, move to his private PC and send it via private mail over to you? You upload the device provisioning information and then wait for X minutes and constantly verify when the information is successfully processed and the Autopilot profile is actually assigned. After this, calling the user again to tell him, he can now proceed. Guess what, the user already proceeded and faced an error telling him “This user is not authorized to enroll. You can try to do this again or contact your system administrator with the error code 801c0003.“

This is really not a good user experience and introduces a lot of possible things to go wrong. Now we have to tell the user, he needs to reboot the device, only then the assigned Autopilot information is processed again and then the enrollment will succeed. All in all, it would have been a lot of time to guide the user through the process and the experience is really not perfect. How can we improve this?
The solution Autopilot Manager
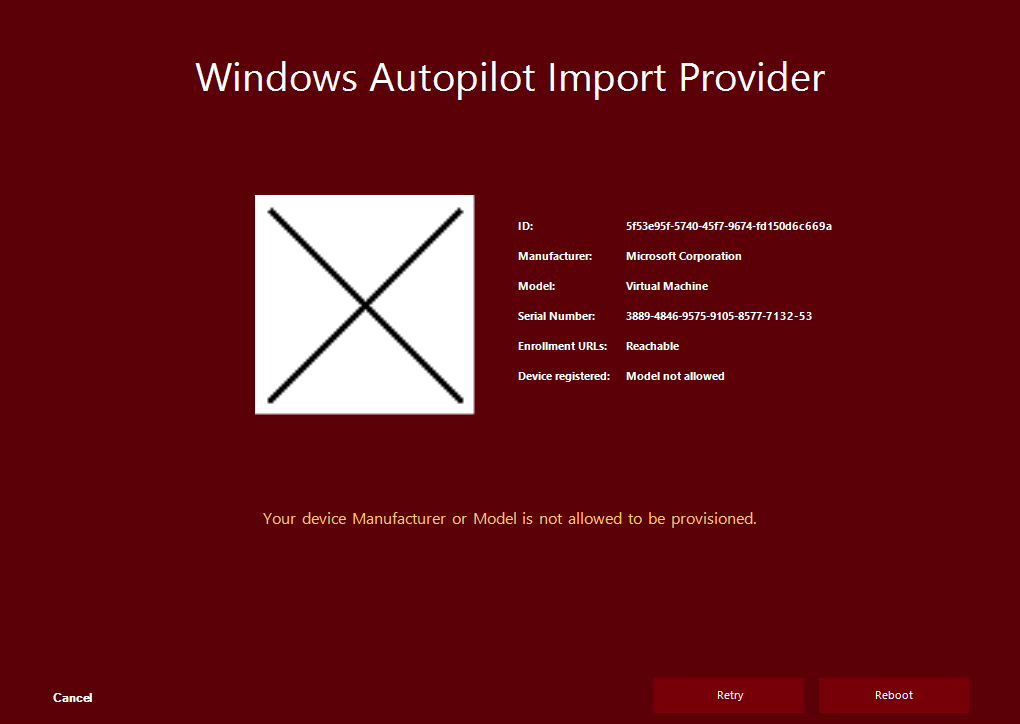
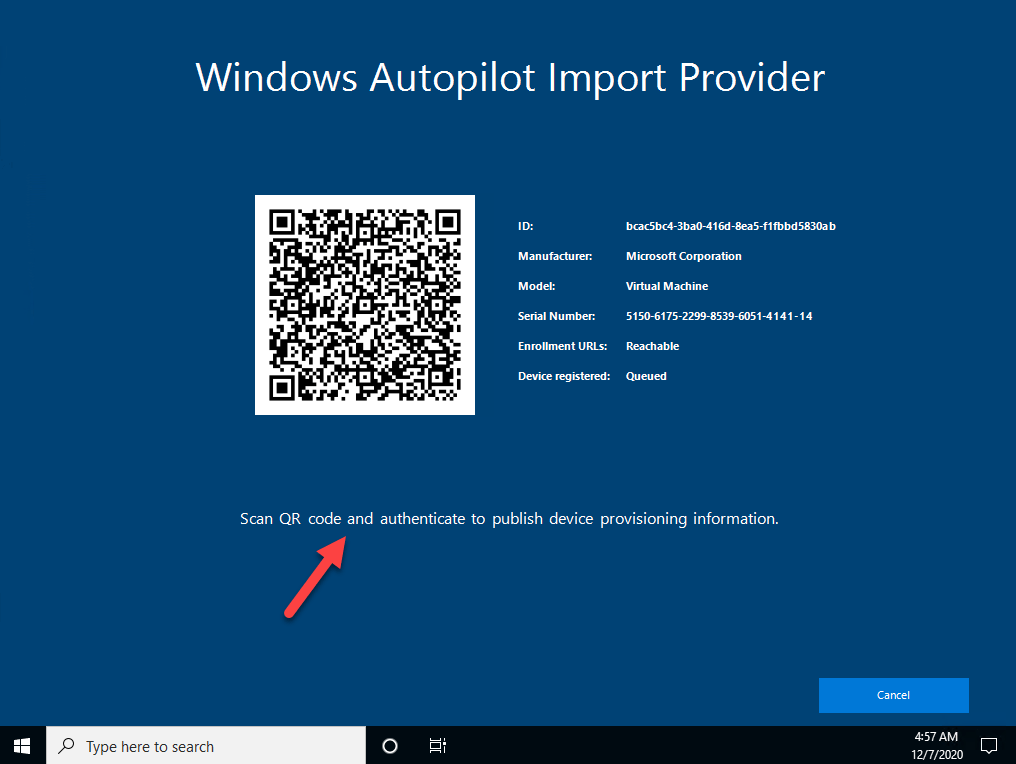
Knowing the scenarios described above, and these are not all scenarios where we want to re-register or register unknown devices, I developed a helper called Autopilot Manager. It consists of a small client program and an Azure App Service (web application). The idea is to provide a small tool, simple to download and to execute. This tool does some prerequisite checks (checks if the system time is correct and checks reachability of important enrollment URLs), and finally gathers all necessary device information and publishes them to the Azure App Service. On the client it shows an info screen, designed to look like the one we used to know from the Windows Autopilot for pre-provisioned deployment approach (former known as White Glove), with a QR code, device information (Manufacturer/Model/Serial Number) and an import job id.
This is the typical enrollment screen at the first boot into the Out of box experience (OOBE):

Here we are going to press [Shift] + [F10] to open a command prompt (the black additional window) and type in:
cd %temp% (otherwise the client program can’t be written to the disk)
curl -o ap.exe <YourAutopilotMangerClientUrl> & ap <YourAutopilotManagerAppServiceUrl>
The command shown below downloads a client program (Windows Autopilot Import Provider – ap.exe) from ap.gktatooine.net and runs the program with a defined server URL as parameter. This is all done by this concated command:
curl -o ap.exe ap.gktatooine.net & ap AutopilotManagerUrl

In the screenshot I used my Autopilot Manager Lab environment URLs. The client is hosted on a Azure blob storage as static website with a custom domain. The Autopilot Manager app service address is shortened by a URL shortener t1p.de. I’m actively resolving the shortened URLs and use the resolved URL for further requests.
The downloaded client program ap.exe does some pre-checks, verifies if important enrollment URLs are reachable, checks the system time does not have a difference of more than 15 min. and fetches the Autopilot information:

Finally, it sends the info to the app service (AutopilotManagerUrl) and displays the status screen about the processing and how to proceed:

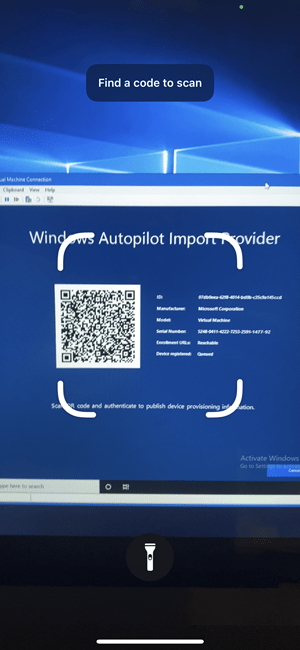
The app service is a kind of proxy and holds this information for the fixed defined amount of time (60 min.) to be approved. The approval can be accomplished by scanning the shown QR code and authenticating via Azure AD for the approval. After the self-approval, the app service will use the information and import it to our tenant, the same way like the Autopilot PowerShell script solution WindowsAutoPilotInfo PowerShell script does it. The app service uses Microsoft Graph APIs to import the device information and provides success or failure information to the client.

The big difference in that approach is, the end user needs to execute a slightly simpler command (not several PowerShell commands), and does not need to gather the .csv file, can approve the request by his own, and gets clear visual feedback about the process until everything is finished to start the actual Windows Autopilot enrollment process. To allow only corporate defined hardware manufacturers and models, there is an option to filter for allowed manufacturers and models (whitelist).
If you want to see more about the client processing you can specify –verbose or -v to get a detailed output about the client processing. In addition, check the –help or -h to see all available options. There are options to skip pre-requirement checks or ignore already assigned Autopilot profiles as well.

The approval options
The approval can be done in three different ways. As described already we could allow the user to approve his own request – self-service mode (of course after successful authentication against our Azure AD). There is a general access AAD group membership necessary to use the tool (see deployment section later). In this mode the user could also be directly assigned to the Autopilot device as the primary user is clear due to self-approval.
Using a mobile phone and scanning the QR Code:
Sign in with a user allowed to approve the request:

Finally validating the information and start the import

Receiving success of failure message about the import request

The second option is, we could also allow only a specific group of people to approve requests, instead of adding all users to the general access group (then you should configure that no user is assigned to the Autopilot device upfront). Imagine field service technicians running the client program on unknown Autopilot devices to register them and approving the requests by scanning the QR codes. This would end up all devices registered to the field service technicians (see Deployment or Configuration section for config).
The last option is to run the program in a general approval mode, meaning no end user or field service technician can approve requests by using the QR code. Instead, a special website needs to be used to approve pending requests (identified by a unique import job id, which is also shown on the client side). This mode is exclusive, it will disable the self-service options from above. This mode is particularly helpful if the helpdesk or any other servicing personnel is responsible for approving the requests. In this case self-servicing, even in the form of field service technicians, is not allowed at all. In approval mode, a helpdesk would also have the chance to ask some security questions to verify that the user calling is actually a valid employee from the company, before approving an import job. An approver has the chance to choose a predefined Autopilot Group Tag and also to leave a comment (like ticket number).

After calling the helpdesk, a support user with permission can open the Approval page (autopilot/approve-requests) and can choose the correct import job id and open the request. The website can only be accessed if the accessing user has an AAD group membership for the Approver AAD security group (see deployment section later).

It will open a similar page to what we have seen in the self-service scenario, but with the additional option to choose an Autopilot Group Tag and add a comment to the import job. Both is shown only here, as helpdesk personas are personas from IT (tech savvy) and not general users, so they get the option to choose a predefined Group Tag from the dropdown list and they typically want to add a short comment about the delegated import for an end user, like see ticket number ref#…

Viewing import jobs
To get some insights about current or finished import jobs, there is a special page (autopilot/view-imports) to get this info.

The website can only be accessed if the accessing user has an AAD group membership for the Viewer AAD security group (see deployment section later). The information is cached for min. 3h. The cleanup is processed only when new requests come in, by comparing timestamps and deleting entries older than 3h. At the import job status, the current backend task of several steps is shown, like importing Autopilot object, waiting for sync to Intune etc.

When the solution is running in general approval mode you will find also the additional used “group tag” and comments there.

Deployment
To deploy Autopilot Manager, you need the following things:
- Several Azure AD security groups (4 groups in total) to control permissions and Autopilot profile assignment
- Azure AD app registration
- Azure AD subscription to deploy the App Service to
- Azure blob storage to host the client program
Step 1. Creating Azure AD Security Groups
First of all, you need an Azure AD security group which is used for Autopilot profile assignment. I named it “sec – Autopilot Manager – Profile Assignment” here in my example. Create it and copy the Object Id of the group, we need it later during deployment. Then assign the Azure AD group to your Autopilot profile. Why do we do this? It is very simple to speed up the process of Autopilot profile assignment. With a direct assignment, the profile assignment process can start immediately and does not need to wait on any dynamic group membership evaluation (which also takes a long time sometimes). This would only extend the assignment process. Even with the direct assignment, the process takes mostly up to 15 min. until completion and it may also take even more time. As this is an end user experience, we minimize the wait time for the user to the max. The processing speed in general depends on the Microsoft back-end load, which varies very often. Here you can see I just added the Azure AD group to my existing profile.

For the role-based access we need an additional 3 Azure AD security groups. One for “general access” to the tool. Everyone working with the tool must be a member here, regardless of which additional role they will have. I named it “sec – Autopilot Manager – General Access” in my example. If you want to provide a general self-service you should add all users, or scope it to your technicians.
Another one for “viewer” access to the view the imports page, I named it “sec – Autopilot Manager – Viewer“
The last one for the “approver” role, I named it “sec – Autopilot Manager – Approver“. Copy all Object Ids, as we need them in step 3 during deployment of the Autopilot Manager App Service to your Azure subscription.

Step 2. Creating the Azure AD App Registration
Go to the Azure Portal and open your Azure Active Directory, then click > App registration > New registration

Create a single tenant app registration and give it a meaningful name and click Register

Copy the newly generated Application Id of the app registration as we need it in the deployment step later:

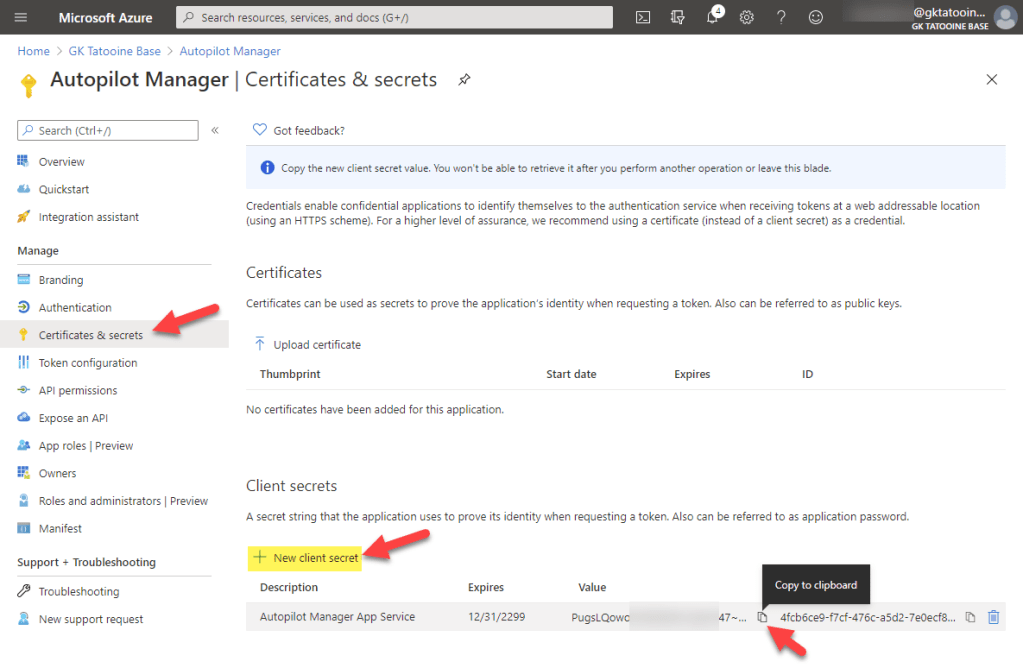
Next create a secret by clicking on Certificates & secrets > New client secret provide a name and an expiry and also copy the value for later usage:
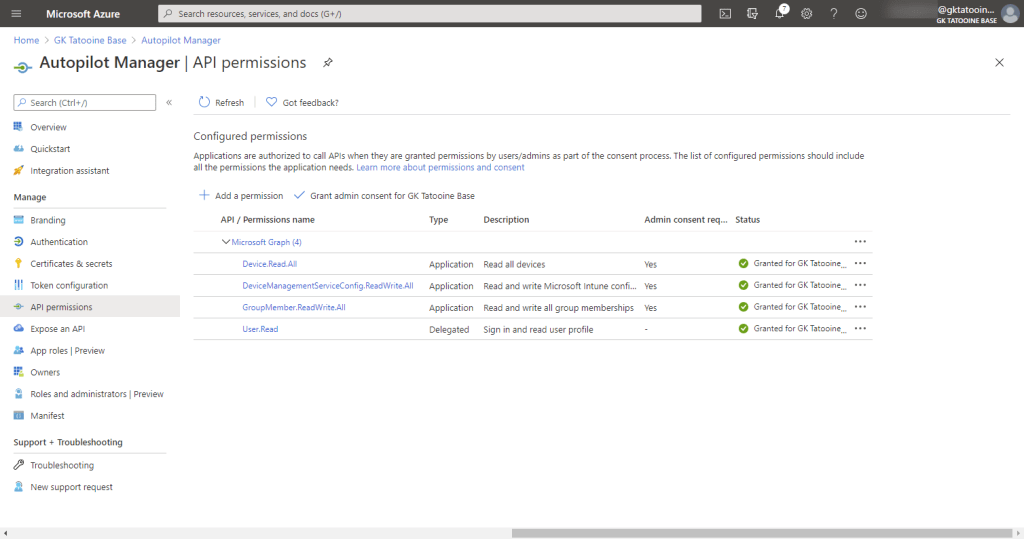
Next, we need to configure the Microsoft Graph permissions to import the Autopilot device and add the generated Azure AD stub device object to our Azure AD Autopilot profile assignment group. Therefore, click on API permissions > Add a permission > Microsoft Graph

Click on Application permissions > type DeviceManagementService > click on DeviceManagementServiceConfig.ReadWrite.All > Add permissions

Repeat this step to add the additional API permissions for Device.Read.All

and finally, for GroupMember.ReadWrite.All

The final API permissions should look like this and then you need to grant the admin consent:

When everything is granted, you must have permissions like this and the green checkmarks for the grant status:
Step 3. Deploying the Autopilot Manager App Service
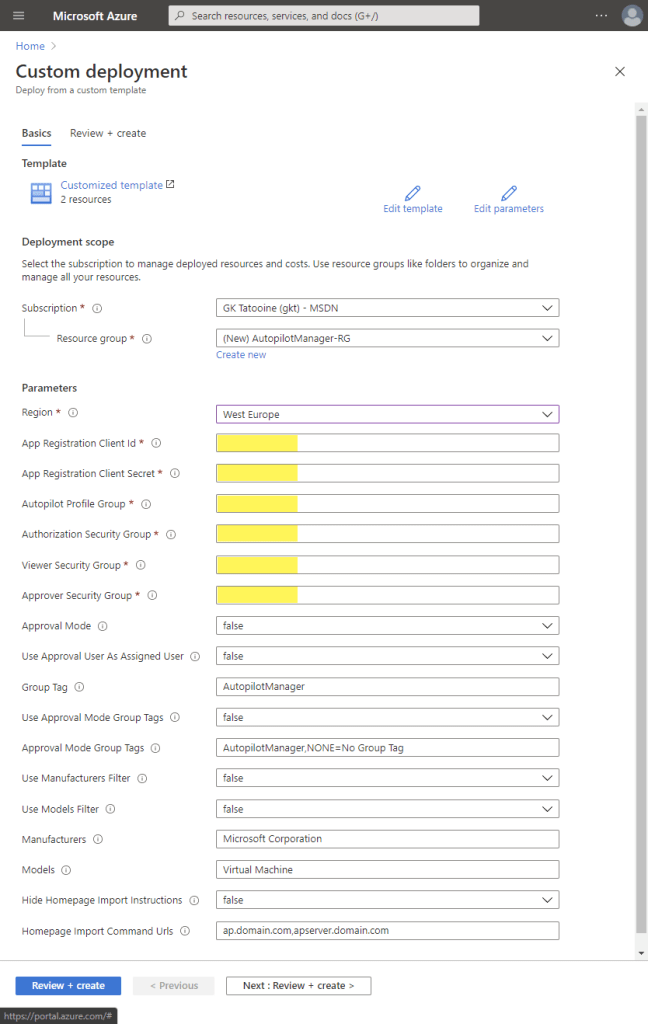
Now you can start deploying the solution to your Azure subscription. Go to my GitHub repository https://github.com/okieselbach/Autopilot-Manager and click on the blue Deploy to Azure button on the front page of the GitHub solution.

Important! Make sure you are using a browser which is signed in to your Azure subscription. Otherwise, you are not able to deploy the solution.
Create a dedicated resource group, choose a region and fill in the required information which we copied earlier, Application ID = Client ID, Client Secret and all 4 Azure AD Group object Ids. Use the (i) tooltips to get more information about the parameters and what they control. Modify them to your needs. Then click Review + create wait for the “Validation passed” and click again Create
The Azure deployment will be processed and finally end up in a screen like this. Wait until you see four successful deployments. Now click on the Go to resource group button

In the Resource Group view click on the new AutopilotManager App Service:

Now you can verify if the app service is running correctly by clicking on the URL (copy the URL as well as we need it in the next step):

You should end up on a web page like this:

Congratulations the app service is running. It is still not usable as we need to configure very important Authentication details on the App registration in Azure AD. Please proceed with Step 4.
Step 4. Configuring App Registration authentication settings
For a successful authentication against the App service, we need to configure the Authentication on the Azure App Service for our needs. Open the App registration again and click on Authentication > Add a platform > Web

Now paste in the Azure App service URL and append /signin-oidc for the Redirect URI and append /signout-callback-oidc for the Logout URL

The last step for the complete Azure AD app registration is to add groups claim information to the tokens (see UPDATE from 27.03.2023 below first) by clicking on Token configuration > Add groups claim > Security groups > leave the Group ID selected and click Add

Your app registration for Autopilot Manager is now complete and the Azure app service should be fully functional.
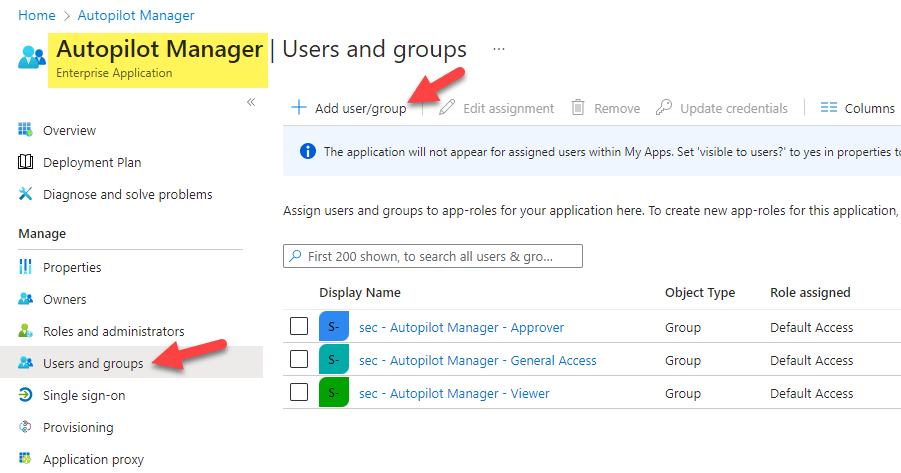
UPDATE – 27.03.2023 – groupMembershipClaims – ApplicationGroup
With larger Organizations you may face the issue that a JWT token can have max 200 group membership claims (see also here: Configure group claims for applications by using Azure Active Directory) including nested groups. To solve this issue, you can configure the App to restrict the groups emitted in claims to the relevant groups for the application. To do this you can choose to use the group claim “Groups assigned to the application” instead of “Security groups“. To assign the three groups to the application you need to open up the Azure AD > Enterprise Applications > search your Enterprise App > Users and groups > add all 3 security groups:
- sec – Autopilot Manager – General Access
- sec – Autopilot Manager – Viewer
- sec – Autopilot Manager – Approver
finally, the Enterprise Application (in my case named “Autopilot Manager”) should have these groups assigned to it:
If you need to modify this after you deployed the App already, you can switch the App registration easily by going to Azure AD > App Registrations > your App registration name for Autopilot Manager > Manifest

Don’t forget to “save” the updated Manifest :-). Now the JWT auth token will be filtered to the groups you assigned to the app.
Step 5. Hosting the client program on an Azure blob storage (optional)
The compiled client binary is hosted on the project GitHub repository https://github.com/okieselbach/Autopilot-Manager-Client. It is possible to download it directly from there or copy it to any storage location you like to for easy download via curl.
Option 1 – use the official GitHub repo
curl -o ap.exe https://raw.githubusercontent.com/okieselbach/Autopilot-Manager-Client/master/dist/ap.exe
Option 2 – copy the client program to an Azure blob storage account
curl -o ap.exe https://yourblobstorageaccount.blob.core.windows.net/yourcontainer/ap.exe
Option 3 – use the “Static website” feature of the storage account
Crate a Azure storage account and click on Static website > set to Enabled and type the index document name > ap.exe
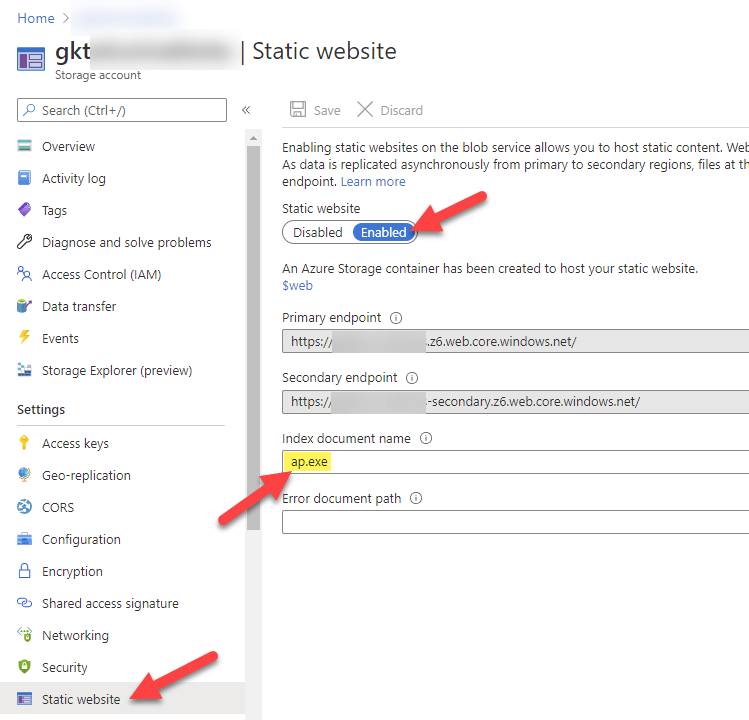
You will get a container created $web. There you upload the client program ap.exe. Next, we map a subdomain to the static website. You need to follow the instructions on the right and create a CNAME record for yourblobcontainer.z6.web.core.windows.net

As last step you should not enforce https to simply use the subdomain without https:// prefix in front of it:

If you updated your DNS, you are now able to use this command to download the client:
curl -o ap.exe ap.yourcustomdomain.com
I really recommend using option 3 to have a subdomain ap.yourdomain.tld, this way it is easy to remember and easy for end users to type. Be as short as possible. I configured ap.gktatooine.net for my lab environment.
Configurations
If you have read the configuration tooltips during deployment and want to change something afterwards, like adding additional Manufacturers or Models, or switching to Approval Mode, you can easily re-configure the App service by navigating to Settings > Configuration > Application settings

The setting WEBSITE_RUN_FROM_PACKAGE points to:
https://raw.githubusercontent.com/okieselbach/Autopilot-Manager/master/dist/Artifacts.zip
With this configuration the app does have a look at the GitHub repo to check if there is a new version of the archive available. If yes, it will automatically download the latest version and use it. The whole process does only start when the App service is stopped and started again. It will never happen when the app service is running.
If the ApprovalMode is set to true you should set UseApprovalUserAsAssignedUser to false! UseApprovalUserAsAssignedUser makes only sense to use with you allow general self-service, meaning every user can approve his own request. Technically you would add all your users to the General Access AAD security group, in my example the “sec – Autopilot Manager – General Access”. As soon as delegation comes into play, when other users approving requests for end users the UseApprovalUserAsAssignedUser should be set to false!
If you like to learn about the latest addition read the follow up posts (really recommended!):
Download Links
The Azure app service can be found on the GitHub project Autopilot-Manager here:
https://github.com/okieselbach/Autopilot-Manager
The client program can be found on the GitHub project Autopilot-Manager-Client here:
https://github.com/okieselbach/Autopilot-Manager-Client
Final remark
You finally made it after this exhausting long post :-), congratulations! I hope the solution helps you when dealing with Autopilot imports.
This project is a community release and based on my voluntary work, I appreciate any constructive feedback. Just open a GitHub issue, use GitHub Discussions, or leave a comment here. I will support the solution as best effort and as time allows. I’ll look into bugs and help to get it up and running. On GitHub Discussions I may already have answered specific questions you have, it’s worth a visit. But it is not a commercial product and therefore no support guarantee can be given. There is a high chance that the company I work for will provide this solution in the context of RealmJoin (Endpoint Manager Companion) as commercial solution with professional product support in future. So, if you are looking for an enterprise level solution you might want to leave a comment and express your needs or get in touch with me.
Until then, happy Windows Autopilot importing!

Hi,
Does this have provisions for group tags ?
Hi Appbrown,
I do have 2 configurations. a general group tag you can set: AppConfig:AutopilotManagerConfig:GroupTag used for every import. Fixed and no option to change.
Or in approval mode you can have a list of group tags you can choose from AppConfig:AutopilotManagerConfig:ApprovalModeGroupTags
best,
Oliver
Hi you are totally right, it was downloading a 0KB file, its fixed now, thanks!
I have several deployment profiles and the same number of group tags. Is it possible to choose a group tag when using the QR Code to import a device?
Thanks in advance.
Regards
This option is only available if Autopilot Manager is in Helpdesk mode. Nothing implemented in the QR scenario
I’m testing the approval mode to “true”, but for some reason the the option Group Tag is not showing in the web page. Do i need to add all the tags to the “sec – Autopilot Manager – Profile Assignment” group?
You have to add your GroupTags to the variable: AppConfig:AutopilotManagerConfig:ApprovalModeGroupTags, these will be shown as an option then. Don’t forget to set also AppConfig:AutopilotManagerConfig:UseApprovalModeGroupTags to true.
Very cool thanks
Hi Oliver,
Great tool, I made it work with general access, but trying to use approval mode I find that the job goes to the ./autopilot/approve-requests website but when clicking a job ID I get following error:
Error.
An error occurred while processing your request.
Request ID:
Development Mode
Swapping to Development environment will display more detailed information about the error that occurred.
The Development environment shouldn’t be enabled for deployed applications. It can result in displaying sensitive information from exceptions to end users. For local debugging, enable the Development environment by setting the ASPNETCORE_ENVIRONMENT environment variable to Development and restarting the app.
Hi Mikkel,
I released a new version right now. v1.4 maybe first try this new version and if that is not fixing it, we can dive into the log files. To get the new version just stop the app service and start it again. It will to a package copy form the GitHub of the latest version and will run the new version as a package.
best,
Oliver
Hi Oliver,
I just tried to stop and start the service, but sadly the same error occurs.
Regards
Mikkel
Hello Oliver,
Nice tool.
I used the option 2 for running the Autopilot manager with -v option but did not got any result after that.
Hello Oliver,
The Autopilot Manager has worked from me and i see the QR code. Sorry i used incorrect command.
Awesme tool.
Thanks
Hello Oliver,
I have added the user to 3 AD groups Approver, Viewer and General Access. As i tried adding via various combinations.
But i get the error message as “Access denied” once i scan the QR code.
Thanks for helping in advance.
Hello Oliver, Trust you are doing good. I have implemented your Autopilot Manager companio tool. The problem I am facing is that when I scan the QR code thorugh my mobile I get the message as “Access Denied”, Kindly can you help me here.
In the App service configuration I have the value false for ApprovalMode and true for AssignedAsUserAprroval true.
Have populated the general access AD group with user who will be self provisioning the device.
Thanks in advance.
Is there a way to bypass the connectivity check for time.windows.com? Our company blocks it.
Hey Mike,
Yes the source code is available on GitHub, so you can simply comment the line (it’s an array definition of multiple URLs) and compile the project again. If you have some issues with this you can gat back to me again and I will provide you a version without the check. But keep in mind these URL‘s are the required ones for Autopilot. You might get unexpected results if you block the required Autopilot URLs.
Thanks! Any way to get this to launch in a WinPE environment?
Hi Oliver, thanks for all your hard work on this. How hard would it be to add additional AAD group membership based on which group tag was chosen? I know I could use Dynamic Groups but it takes too long for the membership rules to refresh. I’ve had a look through the “Artifacts.zip” source to try and find where I could add this logic and then compile again, but I couldn’t see it. I am familiar with Graph API so I don’t think it would be too difficult to implement. I need this option for targeting specific domain profiles and apps. Thanks very much, Dave
Hey Dave,
It’s actually not that difficult. If you are still interested in it, we can talk a little deeper about it, exploring what might be the best approach for you.
best,
Oliver
Hi Oliver, sorry for the very late response, Christmas was a bit manic! Any insight into where to make these changes would be greatly appreciated and gladly received. As always, thanks very much, Dave
Hi Oliver, great article.
I have question. How can I add two additional fields (like Group Tag), one with the computer name and second with assigned user name.
Thx for your support 🙂
Regards,
Lukasz
Hi,
currently there is no support for these fields. there is an implicit option to assign the approver as assigned user name. But this makes only sense if you use the self-service scenario. In your case if you like to fill it by your own I have no support in the tool.
Hi,
I’m having an issue when running the curl command line. The ap.exe file downloads but then when executing it say is not supported in 64-bit environment. The file was downloaded from your GitHub repository.
Can you help?
This typically occurs when the download does not correctly happen. Have a look at the file size it needs to be something about 300KB. If this happens you get the message about not supported etc. So, check your download again.
Hi,
Is it possible to redirect the QR Code scan to the approver url instead? This would be perfect for allowing the IT techs to work with multiple Group Tags, and reducing the need for manually opening the url (approve-request url) in a phone/computer.
Thanks!
This would need some work to realize that, I’ll keep this in my backlog
Hi Oliver,
Thanks for a wonderful app, it saves a lot of time.
Is the source code for the Autopilot Manager app available anywhere, I only find the source code for the client app?
Best regards,
Thomas
Only the source code of the Client App is available, the Autopilot Manager is published as compiled application only.