I think everyone agrees about the fact that most users are working with a laptop nowadays. This means a majority of their time they are using WiFi connections to do their work. So, in a cloud era where we don’t have many on-premises services anymore, the connectivity to get internet access is absolutely crucial. This internet access is normally provided via a wired or wireless infrastructure. In an ideal cloud-only powered world, all laptops would have mobile broadband support with unlimited traffic contract and therefore would get internet access independently from the given infrastructure in any location and could access all necessary cloud services. Right now, this is not the reality. For the time being we need to make sure that reliable and easy to use WiFi connectivity is provided in our company locations to support some on-premises services and reliable internet access.
In summary there are 3 typical ways to connect to a WiFi. One is a captive portal WiFi, which supports more or less an open WiFi and when you connect to such a WiFi network, you’re redirected to a webpage known as a captive portal. There you are typically agreeing to some terms and conditions, then logging in with some credentials and you’re online. This type is typically used for public areas or guest access. The second option is to use a so-called Pre-Shared Key (PSK). This is straight forward as you setup a WiFi and for connection you need this PSK or “password”. This is the typical home user setup, but this can also be configured via Management Software like Intune. You set up a WiFi profile with WPA-Personal (PSK) and distribute it to your clients. The downside is a password which is stored on every client in your enterprise. This password can also be easily retrieved again after the WiFi profile is setup on the device (e.g. netsh command). The last option is the defacto standard on how to implement secure corporate WiFi authentication. It is the certificate-based WiFi authentication which offers a lot of advantages:
- Better security, each client has a unique certificate which is difficult to spoof, it is treated as a strong authentication
- No PSK (password) involved
- Automatic authentication, no need to login manually
- Granular access controls, dynamic VLAN assignments
- Granular audit, in case of troubleshooting and other audit requirements (incident)
The outcome is clear, certificate-based authentication for corporate WiFi’s is common practice and the ideal way to set up a corporate WiFi. How can we achieve this in a modern managed environment with minimal hardware dependencies? In fact, we don’t want to use any on-premises software nowadays for commodity tasks. So, what do we need?
Basic Setup
First of all, we need Access Points which are able to support the WPA-Enterprise Security Protocol. This is the security protocol which was designed to work with 802.1x server for authentication. A typical authentication server is a RADIUS (Remote Authentication Dial-In User Service) server or RadSec Server (RADIUS over TLS). The RADIUS server, when used with EAP-TLS (which is the most secure standard with EAP), basically checks the incoming authentication request for a valid client-side certificate. The certificate validation can be done by telling the RADIUS server which Certificate Authority (CA) is a trusted issuer and then using the OCSP responder or published Certificate Revocation List (CRL) to check the certificate for validity. In total we need a Certificate Authority which issues client certificates and a RADIUS server which validates incoming authentication requests.
It is very simple to setup a Cloud PKI nowadays. Microsoft will also release a Cloud PKI offering in the upcoming Intune release. For now, I will use the SCEPman Community Edition to issue my client certificates and will do a follow up on how to do the same with Microsoft Cloud PKI (here is my follow up How to configure Cloud PKI certificate-based WiFi with Intune). A Cloud PKI alone is not enough, we need a RADIUS server as well. I will use a Cloud RADIUS called RADIUSaaS which is obviously fully cloud based and available as trial within minutes.
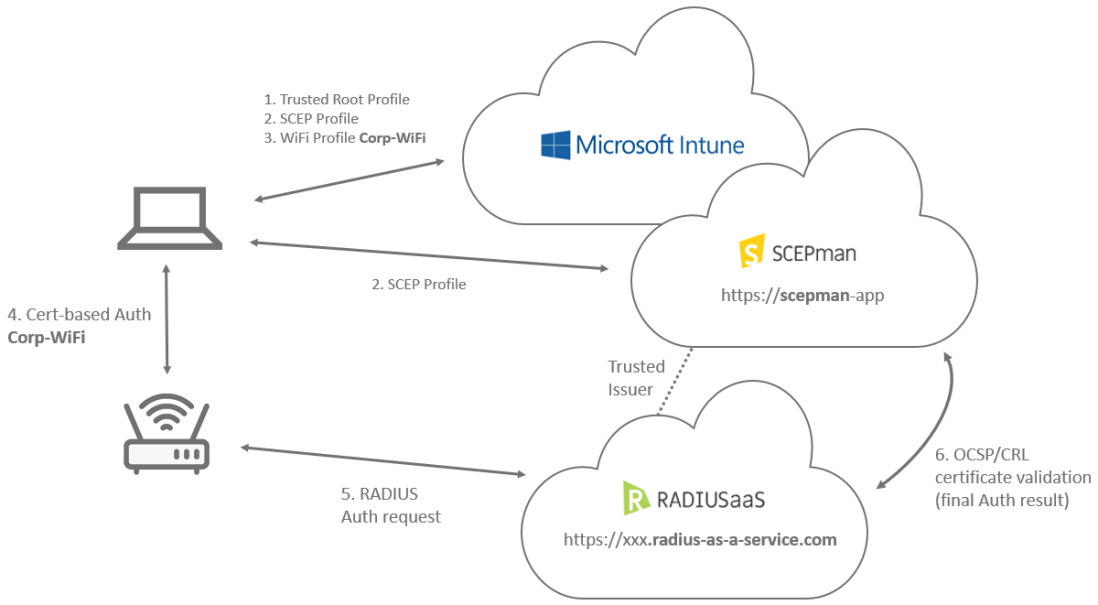
The final setup looks like this:

Microsoft Intune is our MDM Server to deliver the profiles, SCEPman Community Edition is the Cloud PKI (follow up article with MS Cloud PKI comes later) and RADIUSaaS provides the RADIUS server authentication functionality.
- First, we deploy the trusted root profiles for our Cloud PKI and for RADIUSaaS. RADIUSaaS is equipped with a Root Certificate and Server Certificate which allows us to do Server validation against the RADIUSaaS instance on our clients.
- SCEP device certificates are deployed via Intune profile and provided by the SCEPman Cloud PKI instance.
- WiFi profile is delivered by Intune to the clients. This profile does have all relevant information like SSID, WPA-Enterprise, RADIUS Server name validation and the reference to the SCEPman Root Certificate as trusted issuer for device certificates.
- The device uses the WiFi profile and the information to validate the RADIUS Server identity defined by name and Root CA to verify the issuer. Then uses the SCEPman Root CA information to find a deployed machine certificate listed for “Client Authentication” and uses this certificate to generate the authentication request for the RADIUS Server.
- The Access Point configured to use RADIUS will route the request to our RADIUSaaS instance for authentication processing.
- RADIUS Server has a trust relationship with the issuing CA, in this case the SCEPman Cloud PKI. It will not validate any other certificate which is not from this trusted issuer. The RADIUS Server will use the certificate information to validate the certificate via either OCSP or CRL. In this case SCEPman uses OCSP for validation. The result is the final reply to the Access Point with an allowed authentication or denied authentication, based on the certificate validation result.
The complete setup can be built in a short amount of time. In my case it only requires one hardware device, an Access Point capable of using RADIUS (WPA-Enterprise). I’m using a UniFi AccessPoint U6+ and I’m self-hosting a UniFi Network Server (Download) to configure the RADIUS profiles on the Access Point. SCEPman and RADIUS can be provisioned in minutes as they are cloud applications. The effort to setup SCEPman and RADIUSaaS isn’t very much and wouldn’t be much more for an enterprise setup. Sure, in a large enterprise, we may consider a high availability setup which is only slightly more effort.
Step-by-step walkthrough
RADIUSaaS
First, we need a RADIUSaaS instance. I got my trail by following this Start Now form on the official website. A few hours later I had access to my instance. As we are going to use the RADIUS protocol and not RadSec (my UniFi AP does only support RADIUS) we are going to look into our RADIUSaaS instance and setup a Proxy to allow RADIUS UDP traffic, otherwise the instance would talk RadSec over TCP by default. This is a very simple step. Just adding the proxy in a region near your location in the RADIUSaaS portal:

When setup is finished in a few minutes, we are going to get our IP endpoints, ports and shared secrets and also the RADIUSaaS Root Certificate. Navigating to Settings > Server Settings and we get the details:

Remember to download the generated RADIUSaaS Root Certificate as we want to deploy this later to our clients (trusted root store) to have a trust relationship during server name validation of the RADIUSaaS instance. Click on the green entry, the one ending with CA, to download:

If you expand the details on the Server Certificates section for your Customer-CA entry copy the SAN address as we use it later in the WiFi profile for server name validation:

The final step is to configure the Trusted Issuer via a Trusted Root Certificate in RADIUSaaS. In this case I’m using the SCEPman Cloud PKI which can be imported just by providing the URL to the SCEPman instance, otherwise we would upload the root certificate as PEM or DER file. In case you don’t have a Cloud PKI come back to this step later after setup of your Cloud PKI. I will remind on this later in the article:

Great our RADIUSaaS instance is ready. For our simple setup that’s all we have to do 👌!
UniFi Access Point
I’m now setting up the UniFi Access Point. Therefore, we need to install the Self-hosting UniFi Network Server otherwise we can’t configure the RADIUS profile on the Access Point. After installation the Access Point can be added to the console:

After this we need to create a RADIUS profile by following Settings > Profiles > RADIUS > Create New

Fill in the gathered RADIUS settings IP address, Ports (Authentication 1812, Accounting 1813) and Shared Secrets and save the changes:

Finally, create a new WPA3 Enterprise WiFi with our Radius Profile (Radius-Lab) and assign the Access Point to it:

That’s all we have to do for the Access Point to forward our requests now to the RADIUSaaS instance 👌.
SCEPman
In the Azure Portal you can use the top search bar to search for SCEPman. Have a look for the SCEPman – Certificates Simplified (Deployment) version as shown below:

Then follow the wizard and leave the License Key blank for the Community Edition which is totally fine for this test setup:

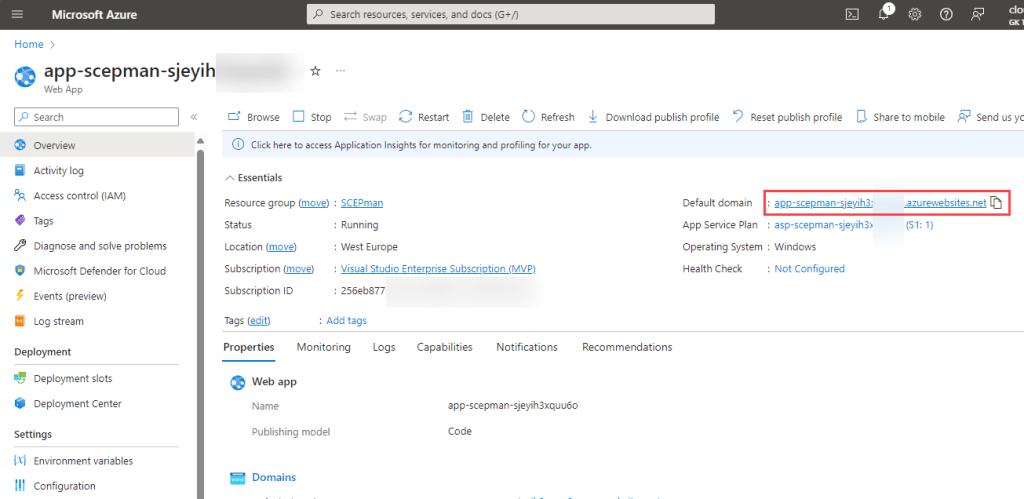
After the deployment you should find your instance URL on the SCEPman App Service within the created Resource Group (do not use the URL from the app service with “-cm-” in the name, this is the Certificate Master instance), the URL should look something like this app-scepman-abcdefg.azurewebsites.net, like shown below:
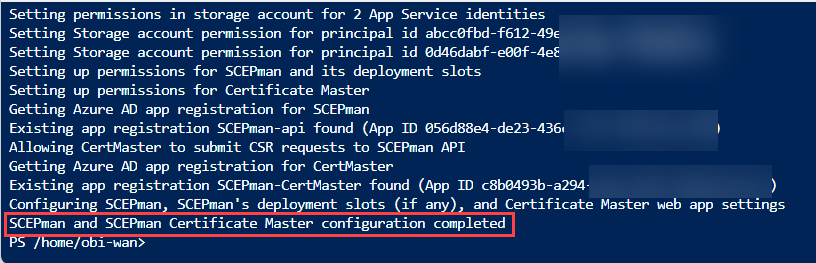
On your SCEPman instance finalize the setup with instruction 1. by executing the PowerShell in an Azure Cloud Shell and then create the SCEPman Root Certificate with a click on the link on 2.

The Finalize Setup executed in the Azure Cloud Shell must result in a successful configuration:
Then on the SCEPman instance website you should create the Root Certificate and see the final webpage:

REMEMBER: Don’t forget to take this URL and configure the Trusted Issuer via a Trusted Root Certificate in RADIUSaaS. Click here to jump back to the section.
That’s it, your instance is ready to use for certificate deployment with Intune. Copy the URL and click on Get CA Certificate to get the SCEPman Root Certificate which we deploy later in the process to our clients.
Intune
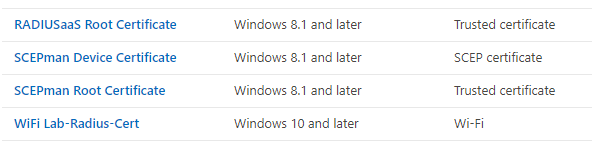
In total we are going to deploy 4 profiles. The RADIUSaaS Root Certificate (used for Server Validation) the SCEPman Root Certificate and SCEPman device certificate used in the WiFi Profile. Finally, the WiFi profile is configured for EAP-TLS using the SCEPman device certificate. In the end you must have the following profiles:
Import the Root Certificates (RADIUSaaS and SCEPman) and deploy them via Trusted Certificate profile to All Devices. The Root Certificates will be added to the Trusted Root certificates store for each client.
The SCEPman device certificate needs to be deployed via SCEP profile with the following settings:

Important: Keep an eye on all the settings. If you look closely, you can see I’ve chosen the Software KSP as key storage provider for the device certificate. This has a reason! My test device is an older Surface Book and this is equipped with a TPM which has a firmware bug which invalidates some signatures created with TPM-backed private keys. This leads to malfunctioning EAP authentications used in WiFi and VPN connections! Known affected TPM firmware versions are (this list is most likely incomplete!):
- STMicroelectronics: 71.12, 73.4.17568.4452, 71.12.17568.4100
- Intel: 11.8.50.3399, 2.0.0.2060
- Infineon: 7.63.3353.0
- IFX: Version 3.19 / Specification 1.2
Update: After releasing the blog post I got the hint from Richard Hicks (many thanks!) about a workaround to fix this issue, he has documented it on his blog here. And the workaround is working for my device as well. Go and check it out so you can benefit from TPM KSP on these devices as well.
If your device(s) are not affected you should choose TPM KSP as the most secure storage for private keys.
Finally, deploy the SCEP profile for the device certificate to your devices. I highly recommend deploying the certificate to the same group as the SCEPman Root Certificate! They reference each other, if Intune is unable to evaluate that the Root Certificate is in the same scope of the assignment, the SCEP profile may fail to deploy finally (reference docs article: Create and assign SCEP certificate profiles in Intune).
If the assignments are made you should get the Root Certificates on the device(s):
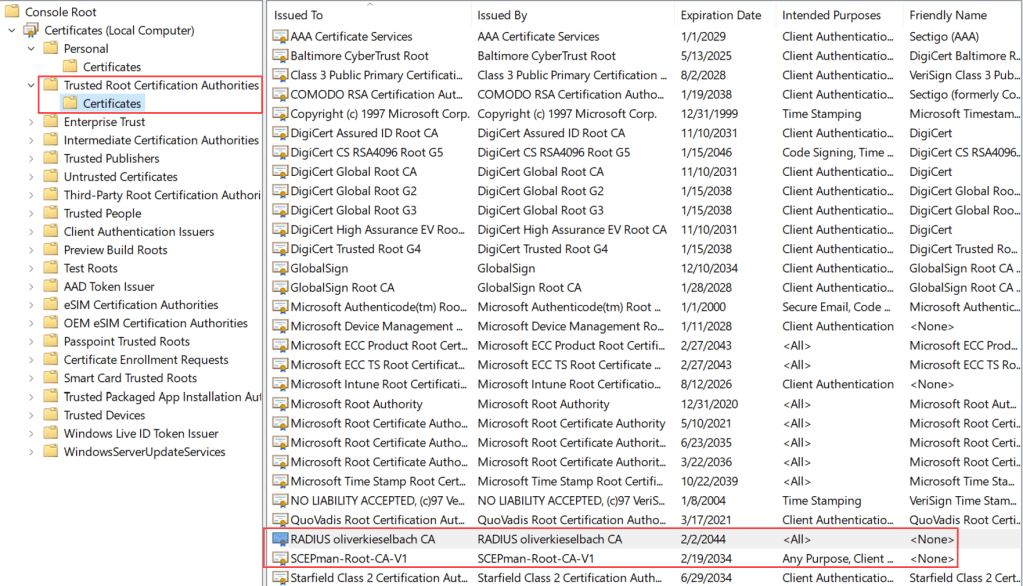
and also, the device certificate issued by the SCEPman Cloud PKI:

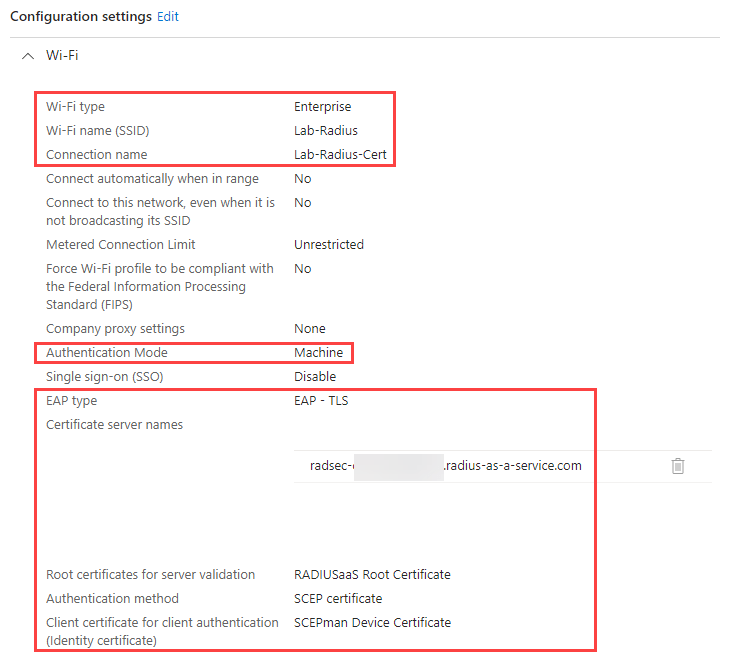
The last step is to configure the WiFi profile. As we have all certificates deployed and the RADIUSaaS server address, it is straight forward to create the profile, but be careful to not miss a setting. Look at the example below:
After successful deployment of the profiles to your device(s), they should start authenticating against the Access Point using their device certificate from SCEPman. The Access Point will validate the request and respond with Login OK when the certificate is valid.
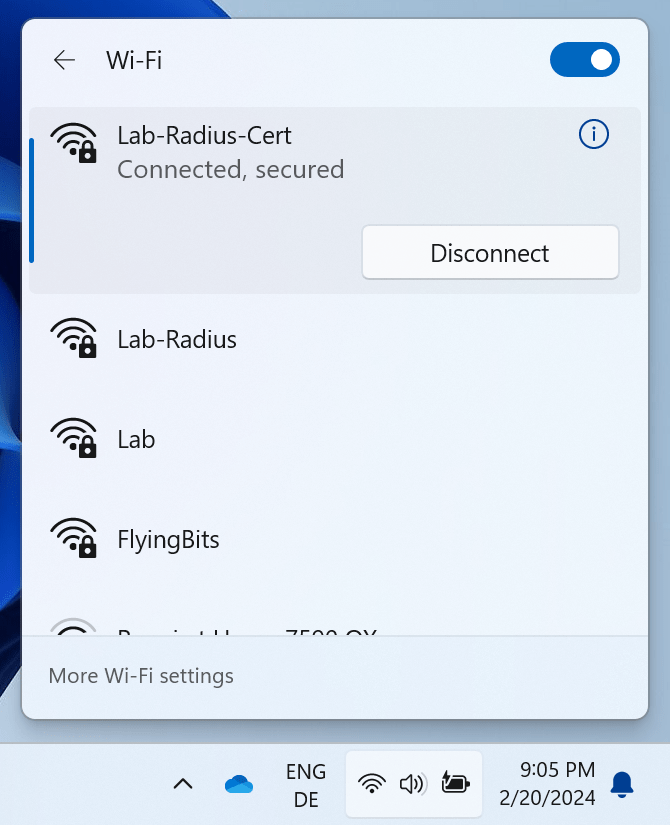
Your client should simply connect:
On the RADIUSaaS side you should see the Login OK in the Logs:

Well, done 💪 we have setup a whole wireless infrastructure with WiFi certificate authentication using Intune, a Cloud PKI, and a Cloud RADIUS in a short amount of time.
Additional insights
To see a little more on the client side I’ve used the latest SyncML Viewer (latest version is published here: Enhancing usability of SyncML Viewer) to trace the communication between Intune and the client. There I can observe the delivery of the trusted certificates and we can decode the selected information via Ctrl+N:

Also, the transferred definition for our WiFi profile in XML form can be seen and formatted via Ctrl+H:

The stored WiFi profile on the device is also visible and can be deleted for troubleshooting purposes in the tool:

Final thoughts
I hope I could encourage you to try out a certificate-based WiFi authentication with Intune. I have created a follow up guide for the Microsoft Cloud PKI here:
How to configure Cloud PKI certificate-based WiFi with Intune
Further information
- Docs RADIUSaaS – https://docs.radiusaas.com
- Trial RADIUSaaS – Click here
- Docs SCEPman – https://docs.scepman.com
- SyncML Viewer – https://github.com/okieselbach/SyncMLViewer
- TPM issue fix by Richard Hicks – Click Here

For TPM – there might be also another reason related to the key lenght itself – TPM supports only 2048 Bits, whereas BSI stated out or recommends for several services up to 3072/4096 bit length. this is often the reason to choose sometimes Software KSP instead of TPM – fun fact: Pluton provides the same capabilities as like as TPM 2.0 – fully. means: 2048bits key length
I’ve updated the blog with a hint from Richard Hicks, basically, it’s an issue with some ciphers on these affected TPM firmware versions. There is a registry key you can modify, check his blog post: https://directaccess.richardhicks.com/2023/02/13/always-on-vpn-authentication-failed-reason-code-16/
is the community version of scepman enough for a prod environment for a school
From technical perspective absolutely. But you won‘t have support access which comes with the enterprise. But I would ask for a quote as schools are often treated differently 👌
Great post! Look forward to the follow-up on Intune Cloud PKI (though can’t see it being financially viable for many compared with SCEPman). I wrote about this subject recently with user-and-device certs; would be interested in your thoughts on that since I haven’t seen much documentation around it to date: (Combining user and device certificates for wifi authentication in Intune | The Tech Beat (chrisbt.me)
What a great article. How will one combine Cisco ISE into the mix and instead of using RADIUS server for authentication we use Azure AD. I am keen to see how this will change the above presented architecture.
Not too different but ISE has its challenges when not using the latest OS. ISE does not support HTTP 1.1 then, which is a problem for OSCP validation and needed host headers to reach an Azure App Service. But SCEPman has an article how to deal with that 👌
Oh, 🙂 the article btw is here: https://docs.scepman.com/other/troubleshooting/cisco-ise-host-header-limitation