

On one of my previous blog post Gather Windows 10 Autopilot info in azure blob storage during wipe and reload, I described the gathering of Autopilot information during operating system deployment in a wipe and reload scenario with MDT. Just a short recap of the problem and my initial solution:
If we purchase a new device, the OEM vendor takes care of installing Windows 10 with a signature edition or provisioning ready installation including all necessary drivers. If we buy new hardware the information for Autopilot can be synced into our tenant from the OEM vendor (Lenovo is already capable of doing that and others will follow). We will get the device information in Intune and we can start to assign an Autopilot Deployment Profile and start to enroll the devices.
What if we have a bunch of Windows 7 devices in the environment?
A way to handle this is that we are playing the role of the OEM vendor and do the install of a Windows 10 signature edition on the existing Windows 7 devices, gathering Autopilot information, and let Windows 10 start in the Out of Box Experience (OOBE) again for user enrollment. Depending what is available we can use ConfigMgr or MDT for this. My example uses MDT.
Now imagine a situation where a rollout team is preparing a lot of machines. We would end up in a lot of .csv files on different devices. To make this a little easier for IT to import the hardware information of new devices into the Autopilot service, we build up the following logic:
- Gather hardware information via PowerShell Script Get-WindowsAutoPilotInfo during wipe and reload
- Upload .csv file via AzCopy to an Azure Blob Storage
- Gather .csv files from Azure Blob Storage and combine them into a single combined.csv file
This was a manual step in my previous solution - Upload combined .csv file to Autopilot and assign Deployment Profiles
This was a manual step in my previous solution - Device can be delivered to the end user like it where shipped by the OEM vendor
You can read more about the initial solution here: Gather Windows 10 Autopilot info in azure blob storage during wipe and reload
This blog post is all about automating these two steps – gathering and upload of Autopilot information to Intune.
Architecture
First, I will explain the architecture and how it works and then I’m going to describe the way to implement it. The overall architecture is based on an Azure Automation Runbook and looks like this:
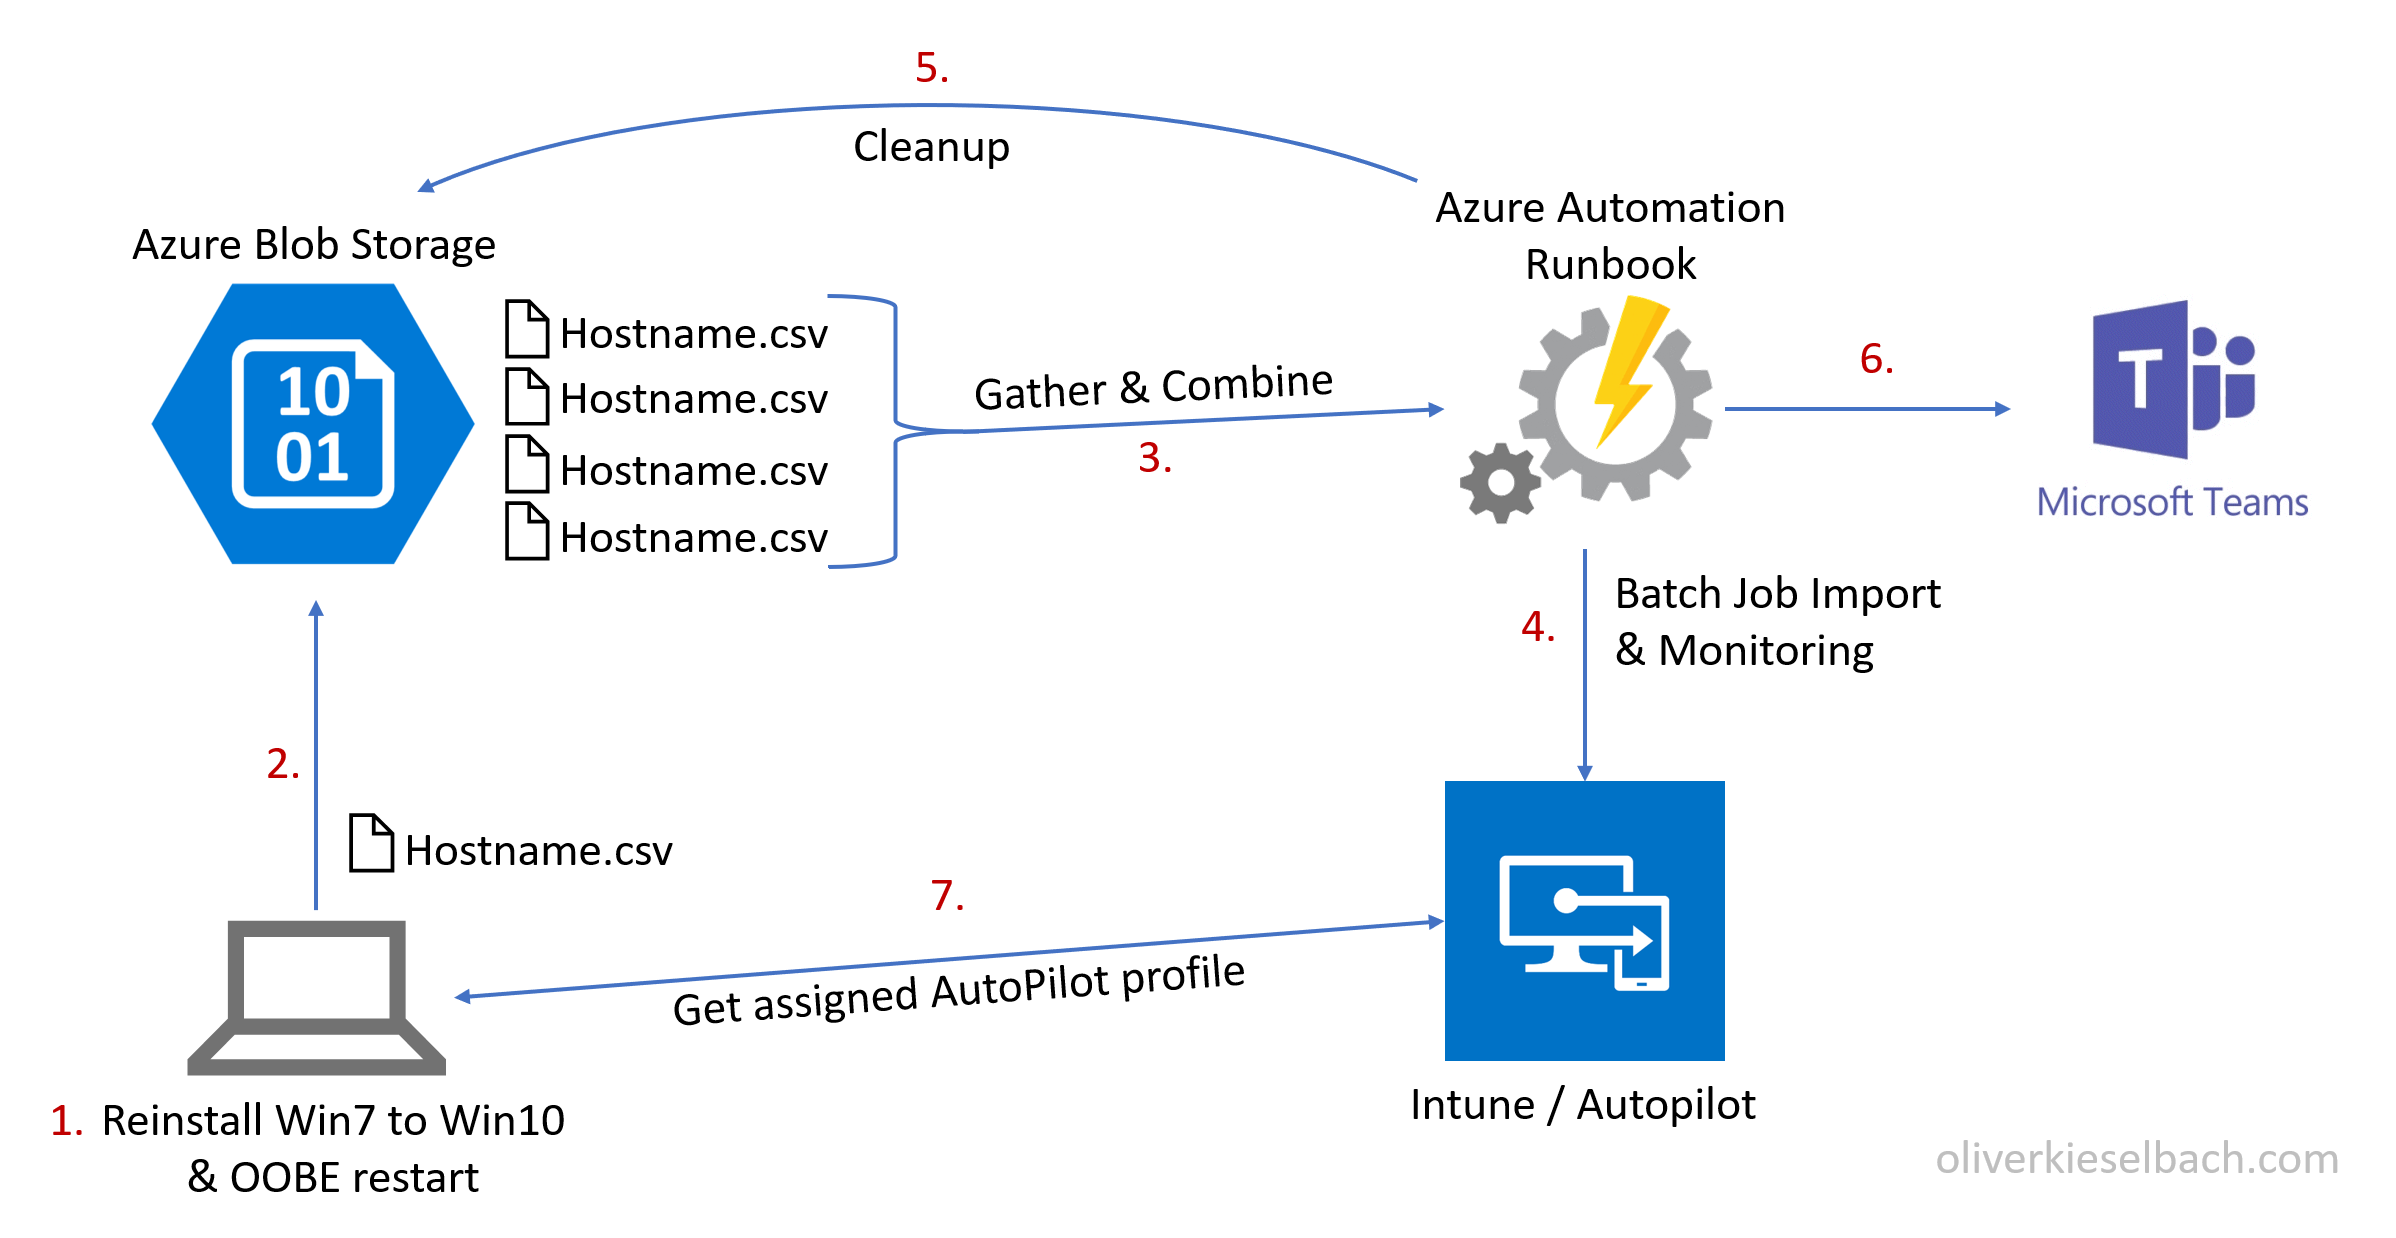
The new procedure including the enhanced logic for a complete automation of the import is now as follows (modified steps for complete automation):
- Gather hardware information via PowerShell Script Get-WindowsAutoPilotInfo during wipe and reload scenario
- Upload .csv file via AzCopy to an Azure Blob Storage
- Gather .csv files from Azure Blob Storage and combine them into a single .csv file with the help of a scheduled Azure Runbook
- Upload combined .csv file information to Windows Autopilot Service via PowerShell Script WindowsAutoPilotIntune running in an Azure Automation Runbook
- Cleanup Azure Blob Storage (delete all .csv files of successfully imported devices and delete all .csv files of already imported devices)
- Generate import notification and summary and post it to a Microsoft Teams channel
- Autopilot information is available for the OOBE user enrollment scenario with Autopilot. The Autopilot profile gets automatically assigned by a dynamic AzureAD device group membership.
- Device can be delivered to the end user like it where shipped by the OEM vendor
I’ve still chosen the copy via AzCopy of individual .csv files to the Azure Blob Storage approach as we can then limit the access quite well via shared access signature and we can easily limit permission to write blob objects only. No need to provide credentials or Blob Storage keys on the client side. Sure, we could build up a more advanced HTTP endpoint to gather device information, but this approach is quick and simple. I’m pretty sure that the complete solution of this automation task is something which we do not need in future when devices are Windows 10 migrated and we then buy Autopilot ready hardware only.
Guide to build the new solution
The Autopilot Graph API is an API with focus on batch processing. This means we import new device information into a kind of staging area and Windows Autopilot service will pick up the new device information and starts importing it. This process varies in the amount of time it takes and we have to check the status of all devices to get the import result. As soon as the devices are processed we can clean up the staging area and the import is done. Normally we would do this by wrapping the Graph API calls (REST) into some PowerShell functions and build the logic for the described process. Luckily Microsoft released a new PowerShell Module WindowsAutoPilotIntune (thx to @mniehaus) based on the Graph API to import new AutoPilot information into Intune.
In my previous blog post about Process automation for Intune and Azure AD with Azure Automation, I created a Runbook to delete old devices from Intune via Graph API and demonstrated how to do an unattended authentication within the Runbook. All the details how this can be achieved are explained there. Please follow the guide to setup the Azure Automation account. I use the same unattended authentication technique to utilize the PowerShell Module WindowsAutoPilotIntune to import the device information into Autopilot service in the following Runbook. Additionally, the Runbook is built to protect concurrent execution (thx to Tao Yang, I used his implementation for it) to ensure a sequential processing and to keep track of current running imports. If we would design this as a concurrent solution it would get much harder in terms of monitoring and reporting in the end. In addition, there is a max import of 175 devices into the staging area of the API which we are taking care of by limiting the Runbook import to 175 devices during one run.
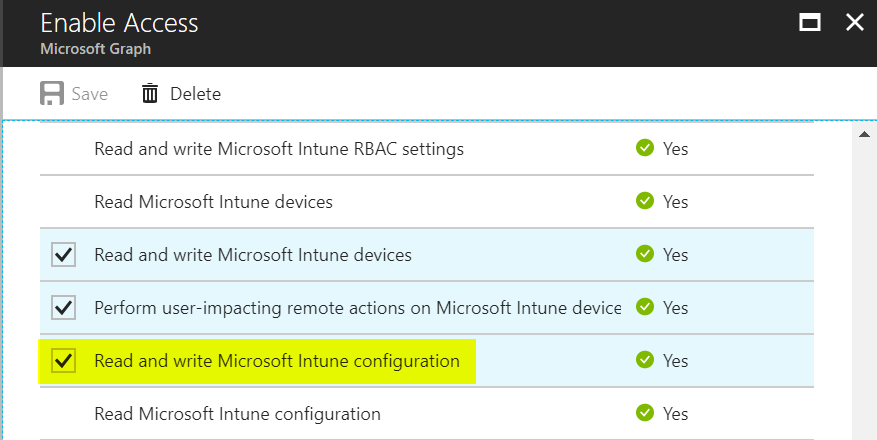
If the requirements are implemented based on the previous blog post (especially the Intune native app and the automation service account) we simply need to extend the permissions to “Read and write Microsoft Intune configuration” of the automation account which was created during the setup of Process automation for Intune and Azure AD with Azure Automation in section Building the solution.
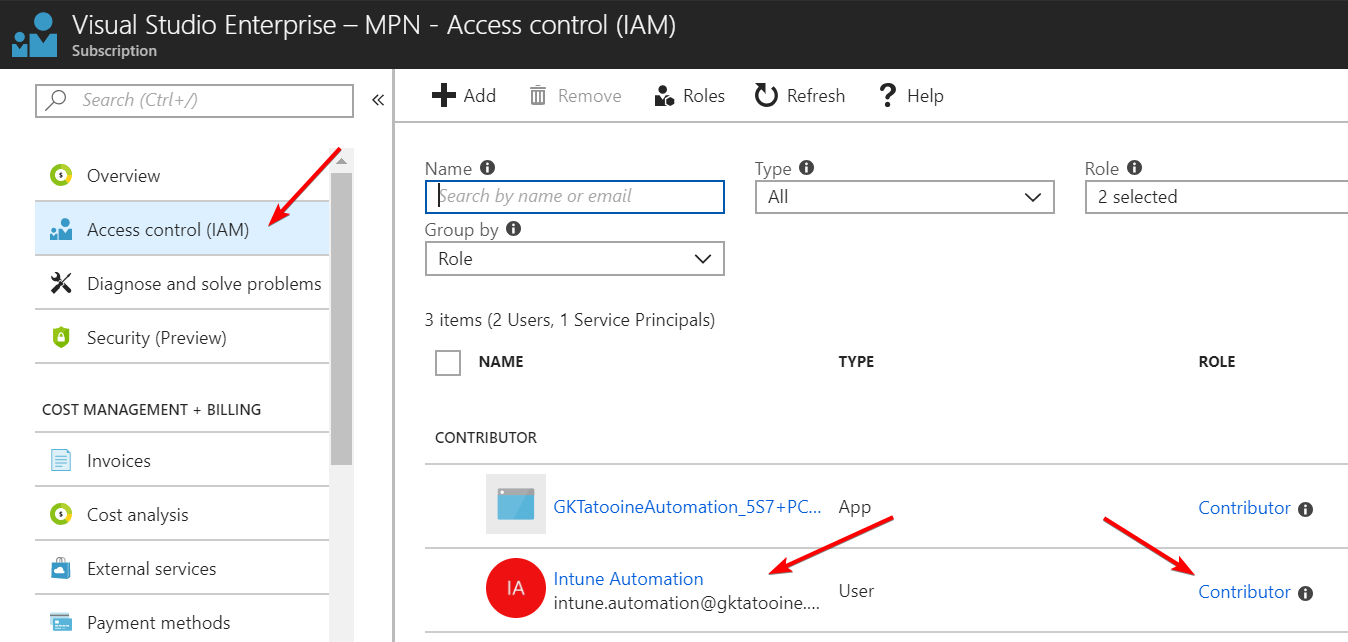
For the concurrent execution protection, we need our automation credential to have Reader permission and for Blob Storage access we need Contributor permissions on the subscription. As the result we grant Contributor permission to the automation account:
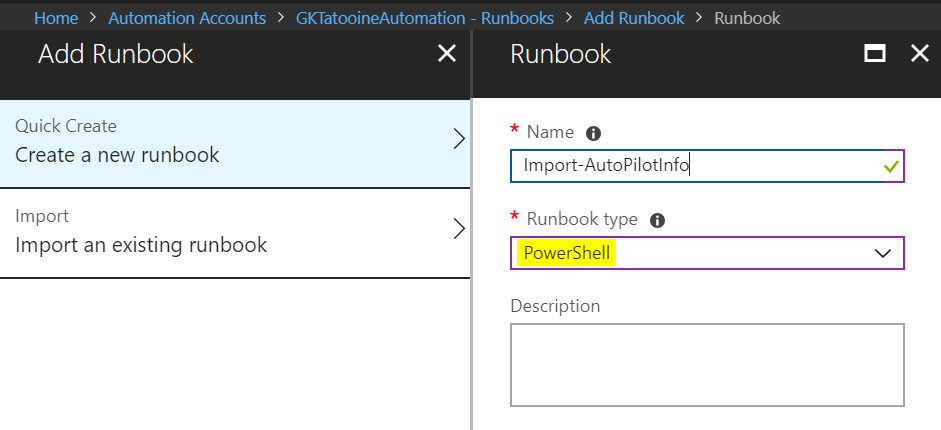
Finally, we can implement the complete Runbook which can be found on my GitHub account here:
The Runbook is written in PowerShell and follows the logic described in the beginning of this post – section architecture.
Create a PowerShell Runbook and paste-in the code.
To make sure the Runbook successfully runs we need to define some additional variables. I assume that the IntuneClientId and Tenant variable are defined as described in the previous blog post.
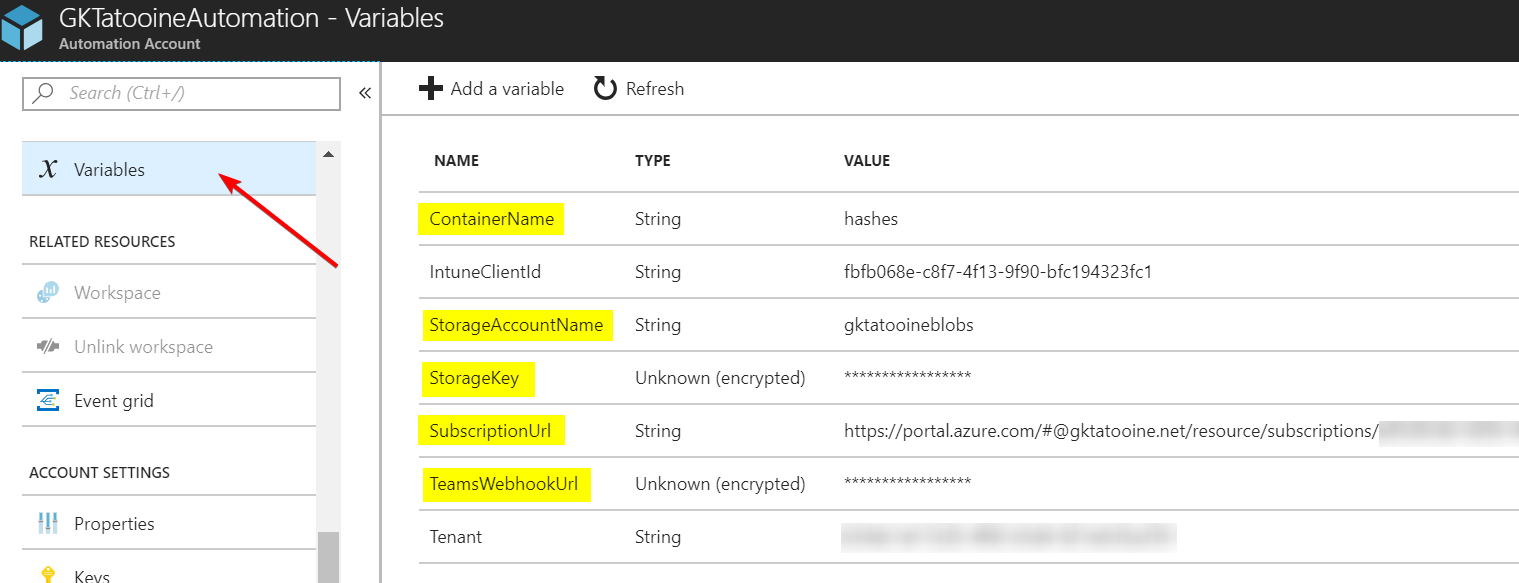
Additional variables needed for Azure Blob Storage access:
ContainerName: <your-blob-storage-containername>
StorageAccountName: <your-blob-storage-account>
StorageKey: <your-blob-storage-secret-key> * as encrypted variable
Additional variables needed for Microsoft Teams Channel notification:
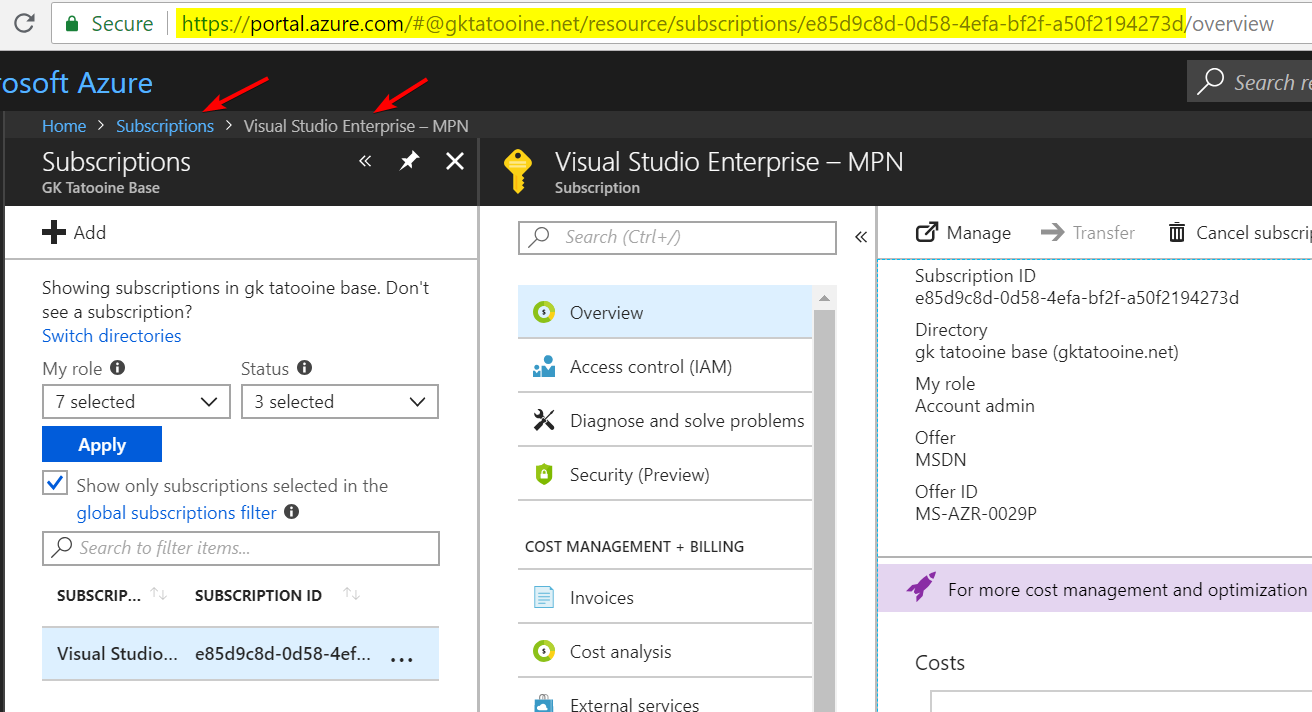
SubscriptionUrl: <your-subscription-url>
The subscription URL can be found as shown below. Please do not copy the /overview end of the URL. The URL should end with the subscription GUID only (like highlighted):
TeamsWebHookUrl: <your-ms-teams-webhook-url>
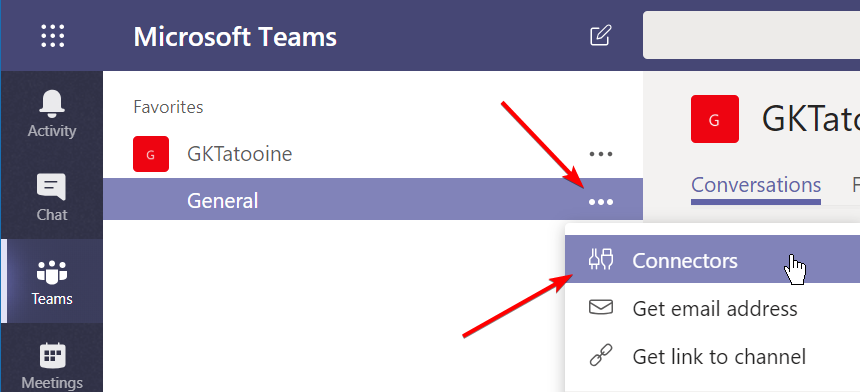
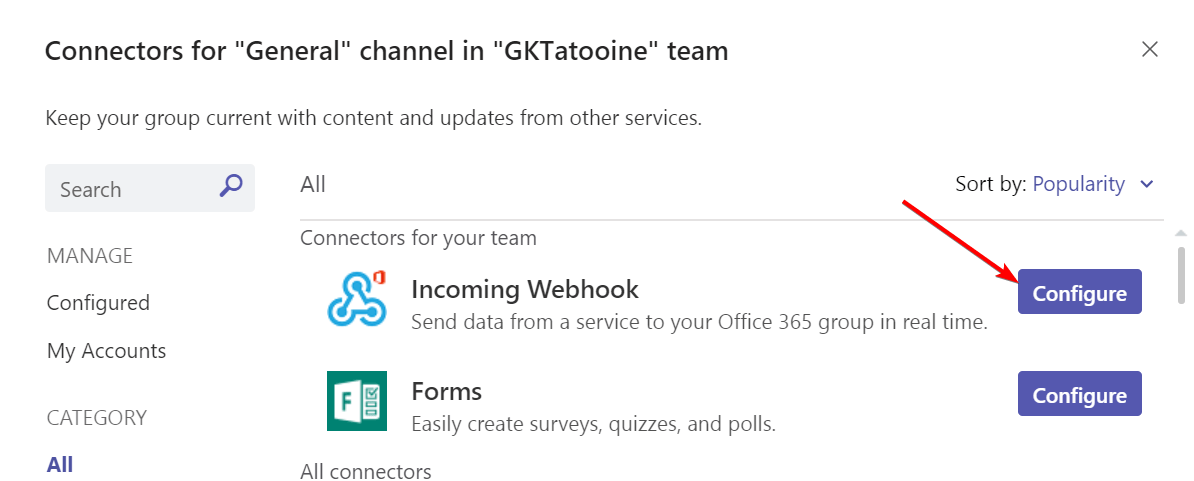
Open MS Teams and choose a Channel where the Autopilot notification from the Azure Runbook should be displayed. Click on the three dots and choose Connectors:
Look for Incoming Webhook and click Configure
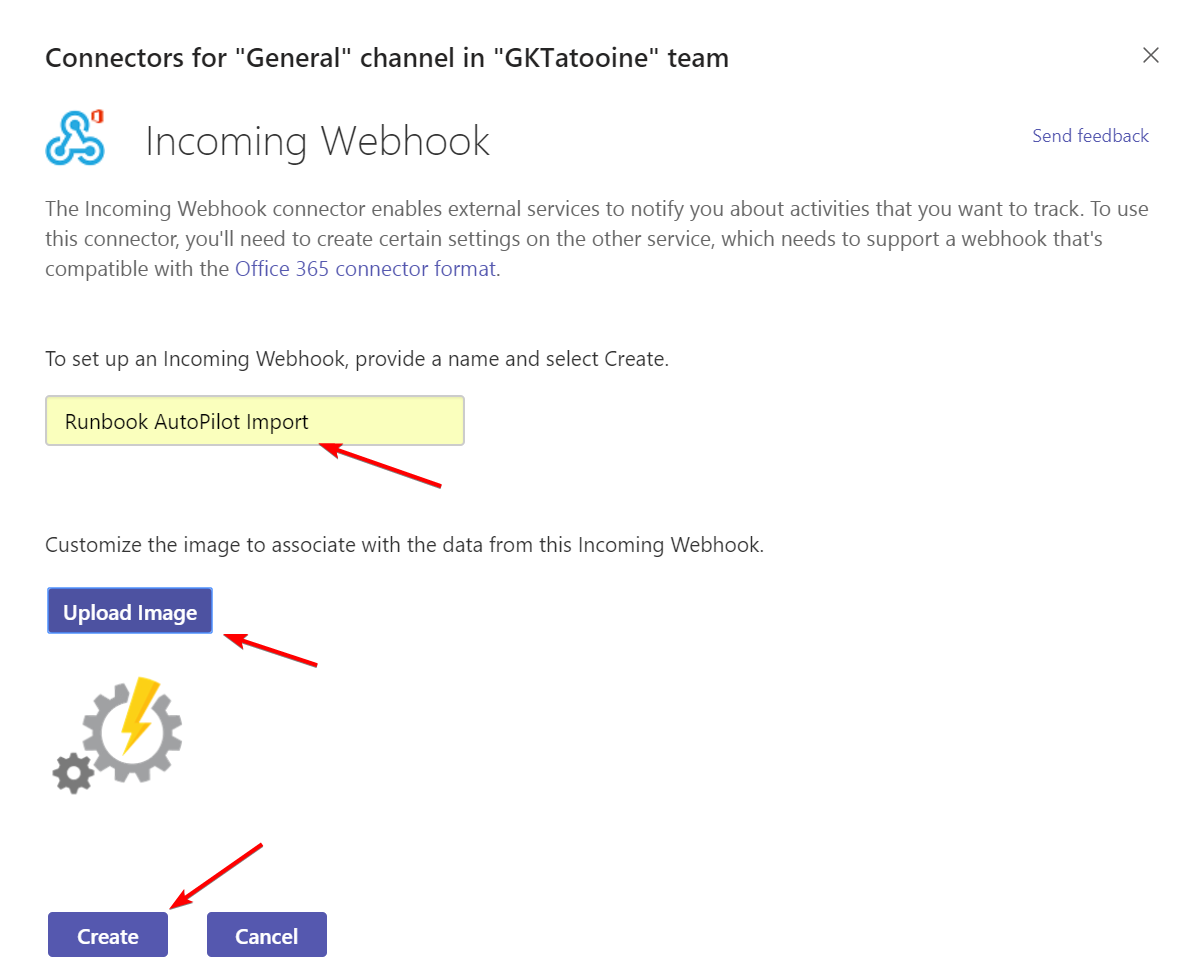
Type in the details and upload a icon and click Create
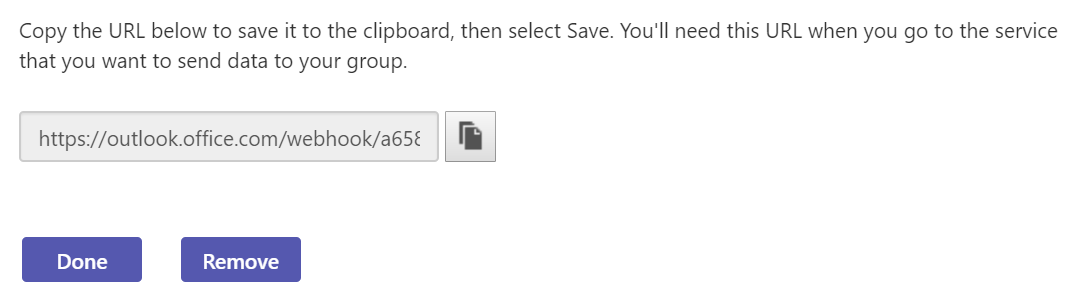
Finally copy the Webhook URL:
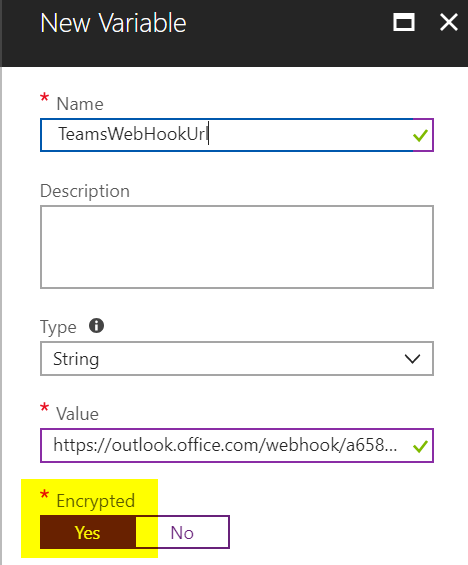
Paste it into the Azure Automation variable TeamsWebHookUrl and set encrypted value to Yes
This is necessary to get Microsoft Teams notifications with some statistics and information to troubleshoot errors. Below is an example of an import notification in Microsoft Teams:
We have some statistics, detailed error list with device information and a link to the Runbook itself in Azure. All based on Adaptive Cards JSON code. This can be easily modified to fulfill personal needs. Have a look at the Adaptive Cards Designer (https://acdesignerbeta.azurewebsites.net) for experimenting with layouts and adjust the Runbook code.
Enhanced client-side script part
I my previous blog post about Gather Windows 10 Autopilot info in azure blob storage during wipe and reload I have described how to setup the Azure Blob Storage to gather the “<hostname>.csv” files during MDT operating system installation. Please follow the previous guide to setup the Azure Blob Storage and the integration in MDT.
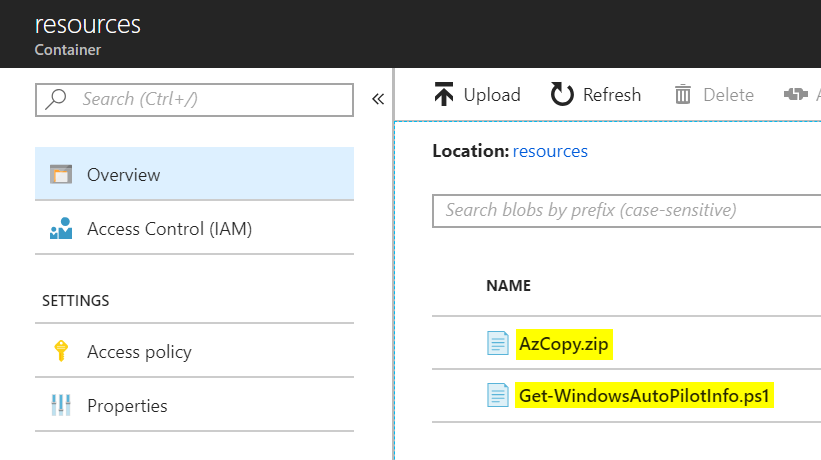
I have an enhanced version of the gather script now which can be found on my GitHub account and is also shown below. The enhanced version does not have the dependency on AzCopy.exe (incl. dependency files) and Get-WindowsAutoPilotInfo.ps1 in the script directory. If they are not available, they are downloaded from an additional Blob Storage container named resources. The additional container resources must be created and the AzCopy.zip and Get-WindowsAutoPilotInfo.ps1 must be uploaded there to successfully run the script:

The enhanced Get-WindowsAutoPilotInfoAndUpload.ps1 version:
Replace ZZZZ with your Blob Storage account name and ZZZZ with your SAS signature in the script above. See here Delegating Access with a Shared Access Signature for more SAS signature details.
This version can also be used to be executed via Microsoft Intune Management Extension to run it on existing Windows 10 devices. It is possible to collect all targeted device information and the Runbook will import the device information. Already imported devices will be skipped. This way we can make sure every device is imported to the Autopilot service.
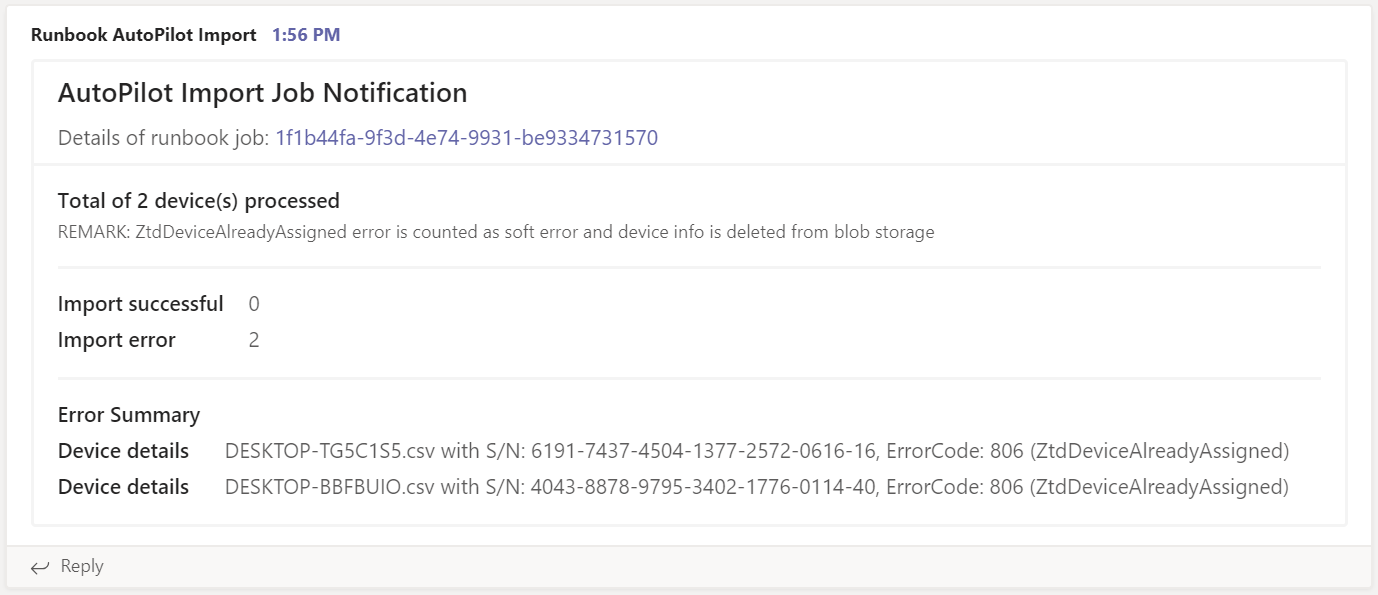
Sample output of the Runbook
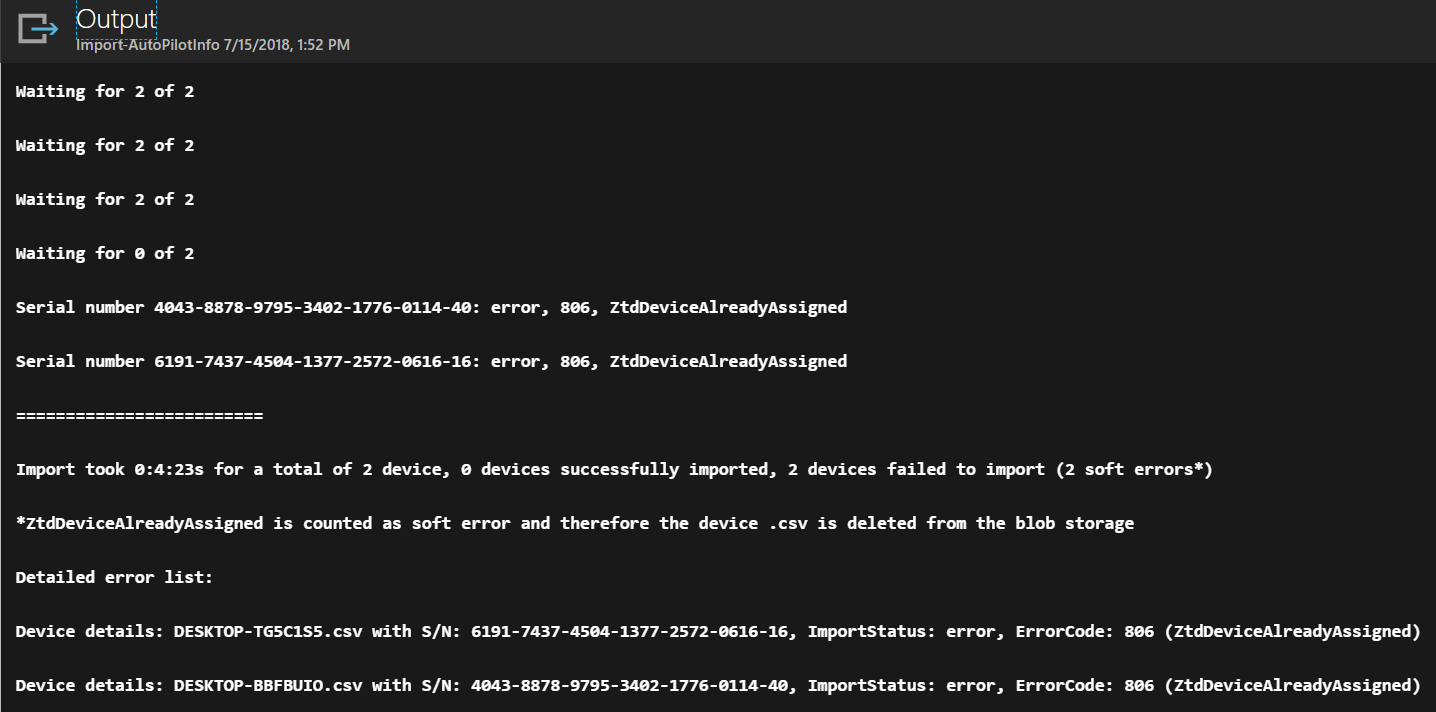
If a device information <hostname>.csv is successfully imported the .csv files will be deleted from the Azure Blob Storage. In case of an error it will be left there untouched but reported via Runbook output and Teams notification. There is one case where the Runbook will delete the .csv file from the Azure Blob Storage also. This is if the Runbook detects an error 806 – ZtdDeviceAlreadyAssigned. In that case we can delete the .csv as it has no consequences. In every other error situation someone needs to resolve the error manually. The Teams notification is only generated if there is some device information in the Azure Blob Storage. The normal procedure would be if operations gets an import notification it should check and in case of errors they should be resolved manually.
Important observations during testing
The Autopilot import via Graph API takes some time and it may also timeout. So, it is not a typical request response REST API in this case. Remember all device information is staged and then the devices are monitored for their success or error state. This led to situations where I had to wait up to 1 hour to get a successful import, even when the UI in Intune tells us it takes up to 15 min. So be prepared that it might take longer or fails during the run. I chose this approach as it is the same procedure as the Azure Portal does the import. In fact, we really automated the import process in Intune but did not invent a complete different process which might cause different problems of device tracking or concurrency and so on. Depending on the use case you can run the Runbook on a recurring schedule. My normal use case for this scenario is to support people who are preparing older devices when they are getting reinstalled from Windows 7 to Windows 10. If someone expects immediate availability of Autopilot information after such a reinstall this might be problematic as the API is not designed for this. Another fact is that the Autopilot Deployment Profile assignment using Intune does take some time also at the moment. I observed that it took several hours sometimes. I suggest to re-arrange the operational processes and hand out reinstalled Windows 10 devices after some additional time and not directly after reinstalling, as this increases the possibility that the Autopilot information is not imported and profile assigned yet.
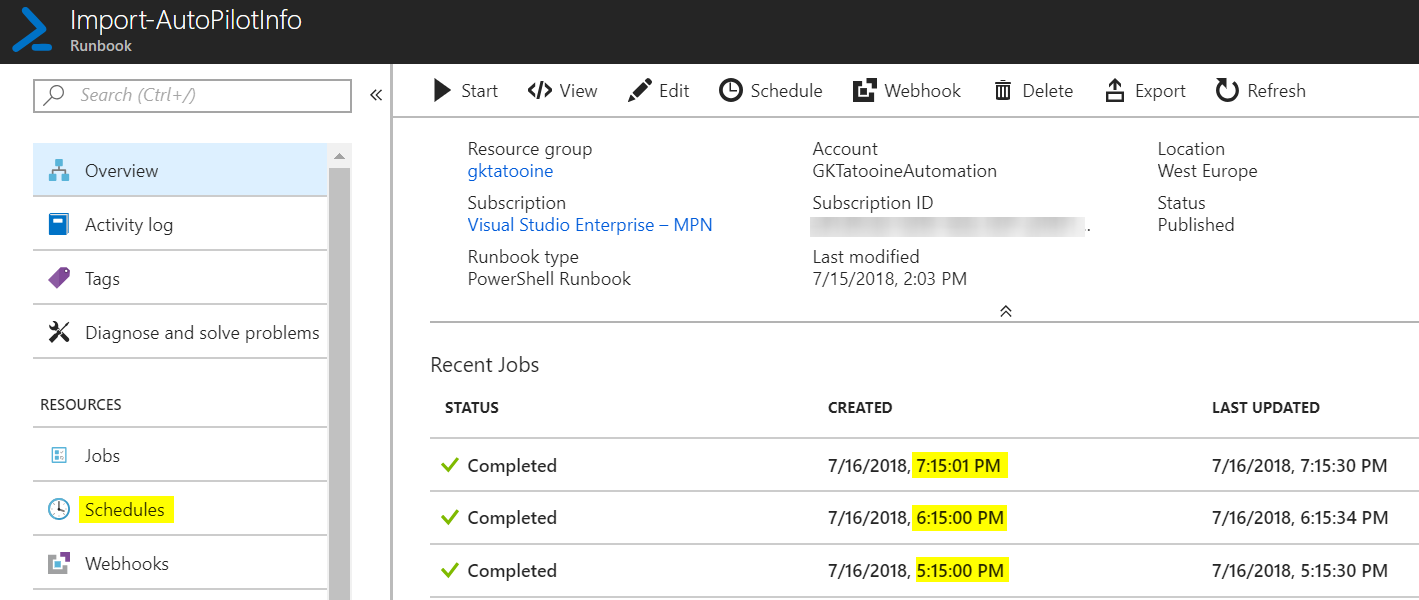
To run the Runbook on a recurring schedule just go to the Runbook and add a schedule. The max recurrence is limited to every hour.
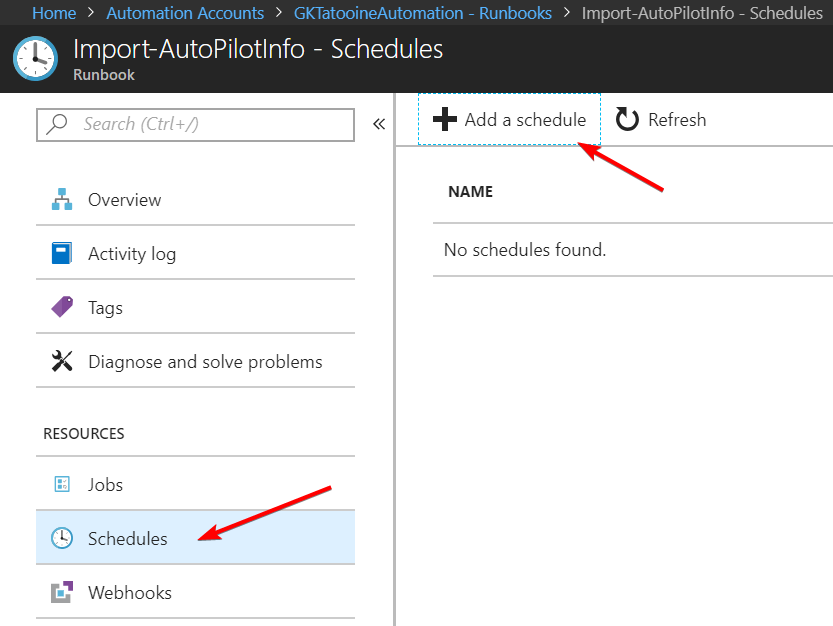
Just define a schedule (max once per hour) and monitor the recent job overview if it works:
The schedule can even be enhanced by using a simple Logic App and not using the Azure Automation Runbook schedule at all:
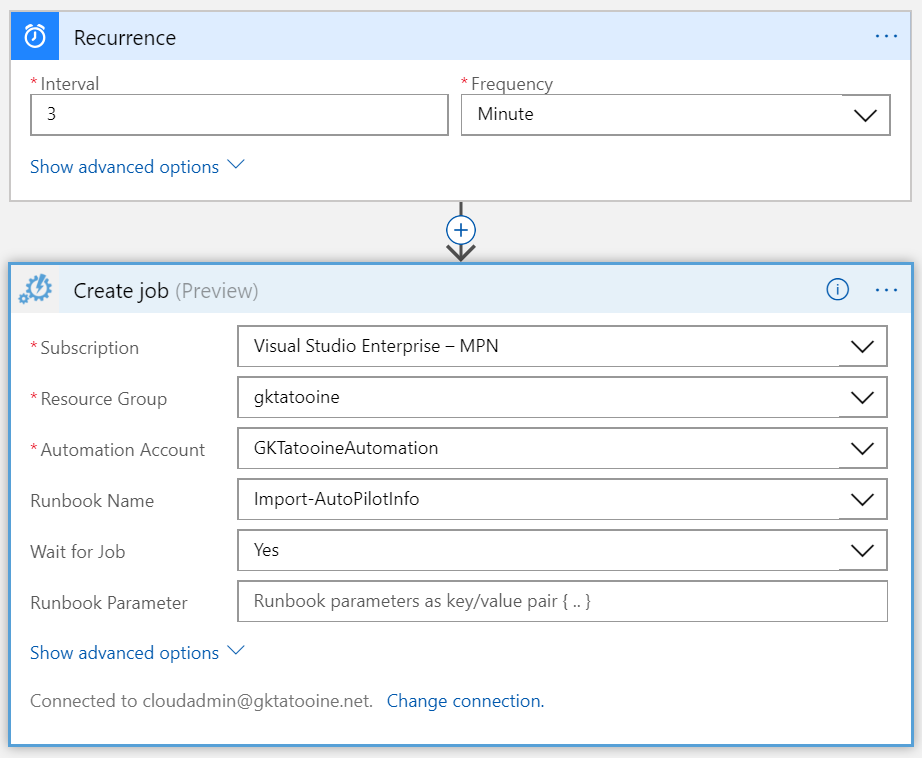
Please see Stefan Strangers post for detailed instructions how to implement a simple Logic App to trigger an Azure Automation Runbook:
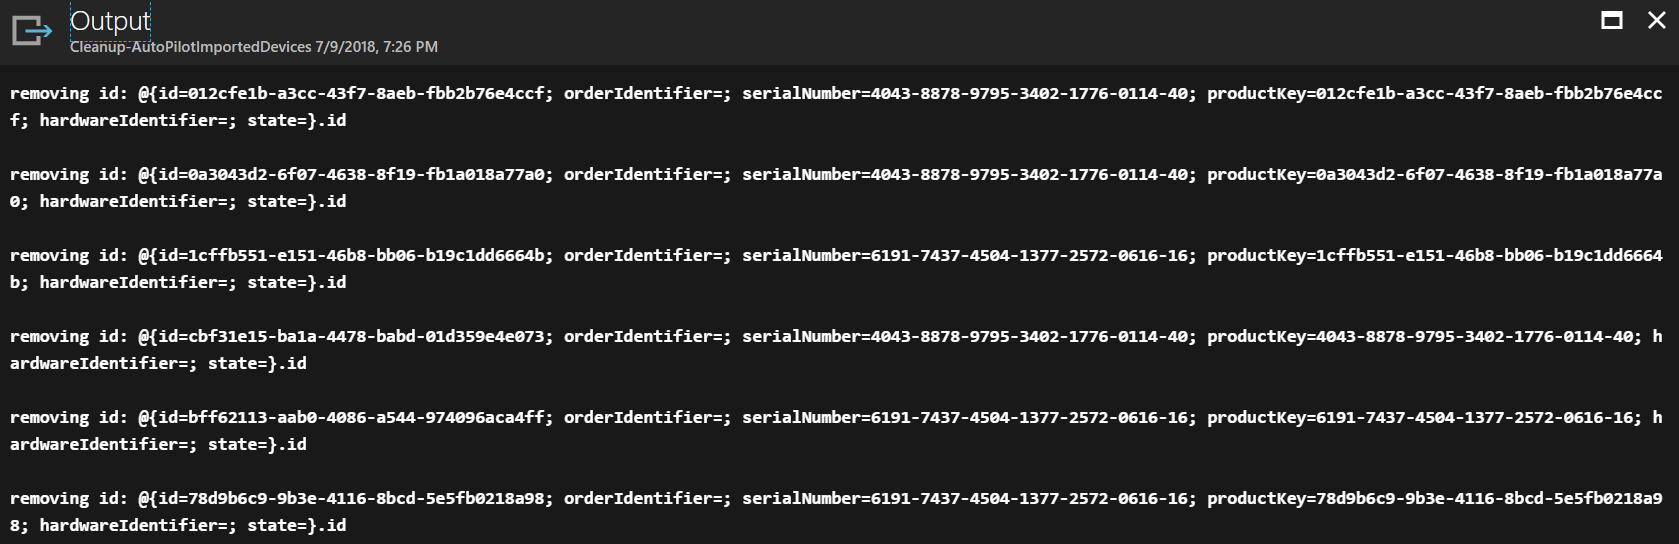
In case something goes wrong I have created a second Runbook to clean up the staging area of the Autopilot Graph API. Get it from my GitHub account and run it in case of fatal errors where you might want to clean up the staging area:
Here is a sample output of the Cleanup Runbook:
UPDATE:
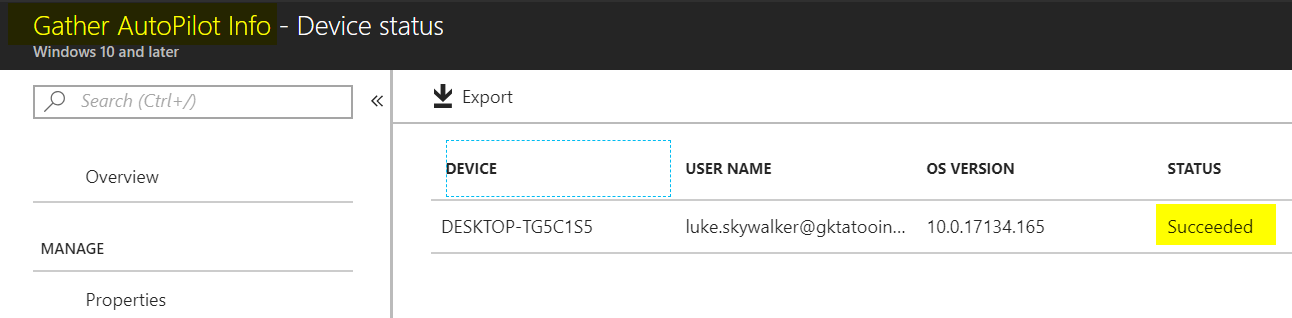
There is a way to gather AutoPilot profiles for existing devices in the meantime (see screenshot below), but this would not give you the AutoPilot Experience during initial setup.
For the initial AutoPilot experience without true registering upfront via this automation or via the OEM vendor you can deploy a AutoPilotConfiguration.json file to C:\windows\provisioning\Autopilot. See a more detailed docs article here: https://docs.microsoft.com/en-us/windows/deployment/windows-autopilot/existing-devices
Further information
Azure Logic Apps – Schedule your Runbooks more often than every hour
https://blogs.technet.microsoft.com/stefan_stranger/2017/06/23/azur-logic-apps-schedule-your-runbooks-more-often-than-every-hour
Preventing Azure Automation Concurrent Jobs In the Runbook
https://blog.tyang.org/2017/07/03/preventing-azure-automation-concurrent-jobs-in-the-runbook
Post notifications to Microsoft Teams using PowerShell
https://blogs.technet.microsoft.com/privatecloud/2016/11/02/post-notifications-to-microsoft-teams-using-powershell
importedWindowsAutopilotDeviceIdentity resource type
https://developer.microsoft.com/en-us/graph/docs/api-reference/beta/resources/intune_enrollment_importedwindowsautopilotdeviceidentity
Autopilot profile assignment using Intune
https://blogs.technet.microsoft.com/mniehaus/2018/06/13/autopilot-profile-assignment-using-intune
Adaptive Cards Designer
https://acdesignerbeta.azurewebsites.net
I published the same article on SCConfigMgr in a more step-by-step guide version, meaning there are not so many cross references to my other articles:
Automation of gathering and importing Windows Autopilot information
http://www.scconfigmgr.com/2018/07/23/automation-of-gathering-and-importing-windows-autopilot-information
I hope this can increase your throughput on the way to an Autopilot Windows 10 modern management environment.
When someone finds bugs or problems with the solution let me know and leave a comment. I will do my best to fix them as it should be a reliable part during preparing old devices with Windows 10.

Hello,
I’m trying to use the solution, but it seems the Start-command function executes multiple times on my test device. (I have about a hundred powershell.exe running when it start’s at those parts, )
Any idea what could be wrong with that function?
Hi Nicolas,
this is strange as the script itself does not have any loop inside. So I guess there is something wrong with the execution of the script itself. How do you execute the script? Did you try manually and did you get the same results then?
best,
Oliver
Hello Oliver,
yes i tried manually with powershell prompt or ISE, same results as I got the problem when using the intune extension.
I’ll continue to check why that function it behaving strangly.
Thanks,
Nicolas.
I run the script in system context in my test environment via Intune Management Extension and it is working well. When you are using ISE does it throw any error during execution?
Yes i throwed me an error… it couldn’t download the Get-WindowsAutoPilotInfo.ps1 because I made a stupid case error in the name.
Thanks for your help.
Nicolas.
You’re welcome!
I still have the problem, and no clue for the moment. I have copied the content of the function inside the code, and then it’s working. I’ll use that workaround for the moment.
Thank you for a great article, your advice will be very helpful for me.
Great 👍 good to hear.
Hey Oliver,
Thanks for this, setting it up as I write.
For others that might have the same issue:
Noticed Find-AzureRMResource is not a part of AzureRM.Resources anymore, but part of .NET core, which fails when trying to import the module to my Automation account. The runbook will fail since it can’t find the cmdlet.
Anyways, Get-AzureRMResource is the new cmdlet.
Oh good to know, I need to have a look into this, thanks for the info!
Hello Oliver,
Thanks for the great article. All your articles are of top notch quality.
Just wanted to see if we can build a solution probably an Azure runbook or a powershell, which will help us to figure out the machines that went through Autopilot and not through manual setup. Is there any attributes we can check in Graph API autopilot endpoint to figure out this. I know that there is registry entries to see per machine. Trying to figure out if any automation is possible.
Thnx,
Noble
Hi Noble,
I would go for an approach like this: http://rzander.azurewebsites.net/bitlocker-management-with-azure-storage-table/
Write a PowerShell script to run this on the devices and gather all needed information from the clients and calculate your result about Autopilot. Then upload the result to a table storage in Azure. If you like to use these results further, then you could easily write a Azure PowerShell Runbook to query the table storage and do whatever you like. That would be my approach here 👍
best,
Oliver
Thanks Oliver. I’ll definitely build this and update you.
Hi Oliver, Thanks for the script it is good stuff. When I am testing this script on a local machine before I push this out via Intune, it runs but looks to never compelte I have to manually stop PS ISE and go back in . When I stepped through the code it seems to be having trouble on $scriptPath = [System.IO.Path]::GetDirectoryName($MyInvocation.MyCommand.Path).
This produces an error as below:
Exception calling “GetDirectoryName” with “1” argument(s): “The path is not of a legal form.”
At line:6 char:1
+ $scriptPath = [System.IO.Path]::GetDirectoryName($MyInvocation.MyComm …
+ ~~~~~~~~~~~~~~~~~~~~~~~~~~~~~~~~~~~~~~~~~~~~~~~~~~~~~~~~~~~~~~~~~~~~~
+ CategoryInfo : NotSpecified: (:) [], MethodInvocationException
+ FullyQualifiedErrorId : ArgumentException
Any ideas?
Hi Gavin,
🙂 yup this is by design. $MyInvocation will only work if you run the PowerShell as a script or function. Meaning you have to save it as e.g. test.ps1 and run it. Just copying it into ISE and click run will produce this error. $MyInvocation is populated only for scripts, function, and script blocks.
Reference: https://docs.microsoft.com/en-us/powershell/module/microsoft.powershell.core/about/about_automatic_variables
best,
Oliver
Ok I understnad however when I run this in an administrator PS shell window on a local machine the script also never completes and there is no error produced. I am wondering if you have a solution to test this first before deploying via intune management extension. I have also tried using PSEXEC to run this script (as a .ps1) and still I get the same result… The script never finishes. I noticed that actually it gets the “Get-WindowsAutoPilotInfo from the blob storage I configured but never gets the AzCopy.Zip, which means to me that its getting stuck “Start-Command” bit. I have created a test config profile now in Itune to see what happens as well.
This is awesome but for me I am not sure what happens after you upload the hardware hashes. Doesn’t the device need to be wiped again so that the device will start using the hash? There is no mention of that in the article
Hey Ivor,
the initial idea of the blog post was for a migration project of Windows 7 to Windows 10. I used MDT to create a Deployment USB media (removable drive) for that and built up a Standard Task Sequence to deploy Windows 10 for this. We took care of the right drivers and in the end we let the device start the OOBE again (sysprep.exe /oobe /reboot|shutdown). Now this device was ready for OOBE and was delivered to the user. In the meantime the import was done in the backend and everything is registered. Downside if you migrate a device directly in front of the user and want to start directly into Autopilot it may be not registered. For this situation I suggest to look at the new -online switch in the Get-WindowsAutopilot.ps1 script. For an ad hoc migration you could then fire up Shift + F10 open the command, use the script with -online and wait until registered and then proceed with the OOBE.
best,
Oliver
Oliver how about resetting the device at the end. Lets say you have all the hashes you need on the blob and then imported into Autopilot. Doesn’t the device need to be reset for autopilot to kick in?
Hey mcnamai,
I used a Standard MDT Task Sequence and added sysprep.exe /oobe /reboot|shutdown to the end. This way the device started into OOBE again an the user could run through the regular OOBE without an Reset. We actually did the wipe and reload before so we just want to start into OOBE. With MDT I sued the command above with ConfigMgr have a look here: https://docs.microsoft.com/en-us/archive/blogs/mniehaus/speeding-up-windows-autopilot-for-existing-devices
best,
Oliver
Hi Oliver,
It looks like the script needs an update? I tried with the runbook, but got this error: ( The request body must contain the following parameter: ‘client_assertion’ or ‘client_secret’)
An error occured getting access token: Microsoft.IdentityModel.Clients.ActiveDirectory.AdalServiceException: AADSTS7000218: The request body must contain the following parameter: ‘client_assertion’ or ‘client_secret’. Trace ID: ad9ceb91-9dd5-48de-a44b-69d4eb6f7200 Correlation ID: df83bb72-af21-4448-b34e-b5cc96a59689 Timestamp: 2021-07-14 22:06:36Z —> System.Net.Http.HttpRequestException: Response status code does not indicate success: 401 (Unauthorized).
Thanks!
You are right! It‘s a rather old post. I‘ve seen you have worked out a solution in the meantime. Very good work 👍
yes, the fix for that issue is to edit the manifest to set “allowPublicClients” to true. thanks for your original post so I can get this sorted out 🙂 love your blogs!
Thanks for the nice words!
Hello Oliver,
first of all, thank you. I can start from here to build my own solution. Basically I need to collect device hash information from devices already enrolled (manually – no AutoPilot) in Intune. So I was thinking to use Intune for deploying a PowerShell scripts for gathering hashes and save them to Azure Blob Storage. Then I can download these hashes (CSV) and import them to Intune, manually. What about ?
Hi,
The article is quite old, so now I would do it a little simpler with your requirement. Just read the AP hash and publish it. Have a look at the ScheduleAndUploadBitLockerKeyProtectorType.ps1 script in my Intune GitHub repo. There is a script sample included how to push something to an azure storage table. You don’t need the scheduled task of it, just the inline script to write to the storage table. It should be a simple script in the end.
best,
Oliver
Hello Oliver,
We have 1000 windows10 workgroup devices. There are not connected on domain or cloud.
We want to get hardware hashes from these devices to process autopilot.
Is it a good idea to push this PS mention above and share with users on email.
Is this script can be run by a standard user?
or any better idea?
Thanks,
Mr Intune
Hi Mr.Intune,
The Autopilot script needs to run in an administrative context. Otherwise, it will not receive the Hardware Hash details. So, you need to find a way to execute it on the devices in system or admin context.
best,
Oliver