Cloud managed environments benefit from the idea of software as a service, you don’t have to think about upgrading or maintenance of the infrastructure itself. But often we need to automate the tools itself. A very good example here is when an employee quits his job, than we need to trigger a lot of processes like disabling the account, retire of the device(s), wiping of the devices, sending some notes to various people and so on. Another example might be the cleanup of devices within Intune and Azure AD as they get stale over time and they are not used by users anymore.
Introduction
In the following blog post I like to show how to automate the process to delete old devices from Intune and Azure AD without the help of services from on-premises like servers running scheduled scripts. The established cloud workflow can be used by the service desk to quickly delete a device in both involved services Intune and AAD. After seeing a lot of environments where devices are being cleaned up in Intune and left in AAD, I thought its beneficial to show how to easily automate this with the Microsoft cloud solution Azure Automation. If the basics are built it’s just a matter of combining new tasks within a Runbook to build other workflows which are worthwhile in your environment.
I will show how to setup the Azure environment and create the first Runbook. A Runbook is the actual workflow which runs the PowerShell script. The Runbook will do an unattended authentication against the Inunte API via Microsoft Graph to manage Intune. We do not have a PowerShell module for Intune at the time of writing therefore we use the Intune API in Microsoft Graph. For the AAD operations we use the AzureAD module to perform the management tasks.
How to do unattended authentication with the Intune API?
The problem with the Intune API and Microsoft Graph is, that we can’t authenticate as an application as this is not supported at the time of writing. (UPDATE 22 July 2019: Intune PowerShell SDK – works with Azure Automation now and supports app-only auth read operations!) See section here Intune Device Management permissions > Application permissions: None.
https://developer.microsoft.com/en-us/graph/docs/concepts/permissions_reference#intune-device-management-permissions.
We need to authenticate as an user (service account). This requires additional credentials and a secure storage of them to automate. Microsoft has a good guide how to set up an Azure application to support this scenario: How to use Azure AD to access the Intune APIs in Microsoft Graph. One aspect is that the Microsoft How-To guide will end up in a scenario which still prompts for credentials with a input form. This is because of the usage of:
AuthenticationContext.AcquireTokenAsync
For Azure Automation we need to change this behavior a bit to support credentials within our code:
AuthenticationContextIntegratedAuthExtensions.AcquireTokenAsync
We can use the How-To guide or the official GitHub Intune sample scripts which have the following lines of code:
$authContext = New-Object "Microsoft.IdentityModel.Clients.ActiveDirectory.AuthenticationContext" -ArgumentList $authority
$platformParameters = New-Object "Microsoft.IdentityModel.Clients.ActiveDirectory.PlatformParameters" -ArgumentList "Auto"
$userId = New-Object "Microsoft.IdentityModel.Clients.ActiveDirectory.UserIdentifier" -ArgumentList ($User, "OptionalDisplayableId")
$authResult = $authContext.AcquireTokenAsync($resourceAppIdURI, $clientId, $redirectUri, $platformParameters, $userId).Result
they need to be changed to support our new AcquireTokenAsync call with support to specify UserPasswordCredentials as additional parameter:
$intuneAutomationCredential = Get-AutomationPSCredential -Name automation

$authContext = New-Object "Microsoft.IdentityModel.Clients.ActiveDirectory.AuthenticationContext" -ArgumentList $authority
$platformParameters = New-Object "Microsoft.IdentityModel.Clients.ActiveDirectory.PlatformParameters" -ArgumentList "Auto"
$userId = New-Object "Microsoft.IdentityModel.Clients.ActiveDirectory.UserIdentifier" -ArgumentList ($intuneAutomationCredential.Username, "OptionalDisplayableId")
$userCredentials = New-Object Microsoft.IdentityModel.Clients.ActiveDirectory.UserPasswordCredential -ArgumentList $intuneAutomationCredential.Username, $intuneAutomationCredential.Password
$authResult = [Microsoft.IdentityModel.Clients.ActiveDirectory.AuthenticationContextIntegratedAuthExtensions]::AcquireTokenAsync($authContext, $resourceAppIdURI, $intuneAutomationAppId, $userCredentials);
The credentials will be received from the Azure Automation account in PowerShell via Get-AutomationPSCredential. We will provision the service account credentials securely for the Azure Automation account via Credential assets.
Building the solution
The following steps must be followed to build the solution:
- Creation of a native application in Azure AD
- Assigning permissions to the registered application
- Grant permissions (administrator consent)
- Create Azure Automation Account
- Add Azure AD module to the Azure Automation Account
- Add credentials to the Azure Automation account
- Add variables to the Azure Automation account
- Add Runbook to the Azure Automation account
- Edit Runbook
- Start and test Runbook
- Add Automation Operator
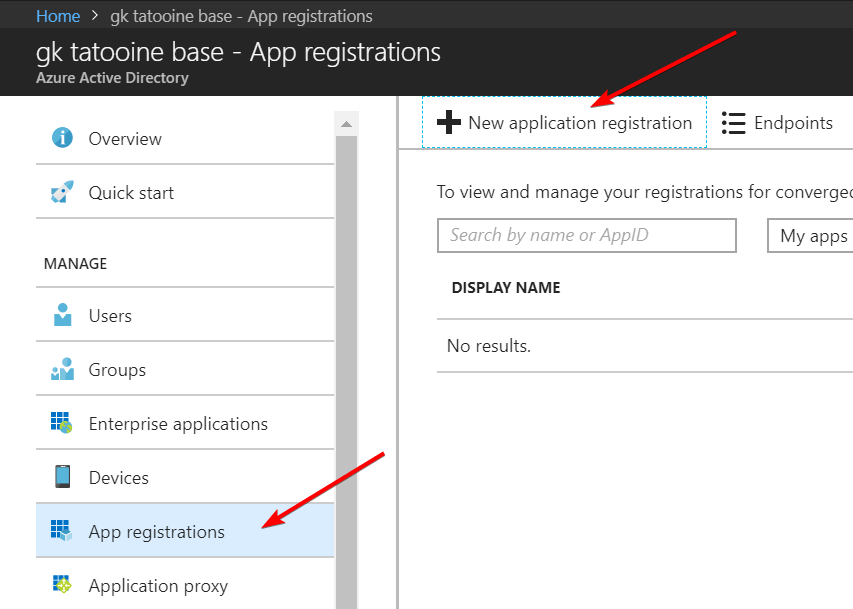
1. Creation of a native application in Azure AD
The best description for a native application is found in the Intune documentation for the Intune API here: How to use Azure AD to access the Intune APIs in Microsoft Graph. I will outline the necessary steps to setup the environment.
New application registration
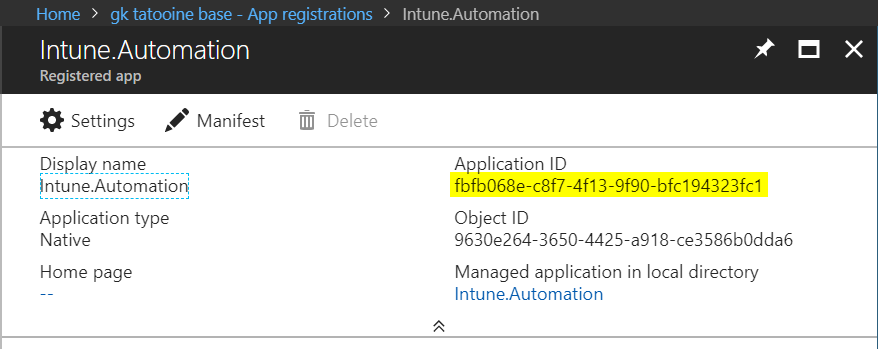
fill out the details and give it a name, create a native application with redirect URI: urn:ietf:wg:oauth:2.0:oob

in the end a new registered application is available. Important is to copy the application id as we need it in our PowerShell script Runbook later.
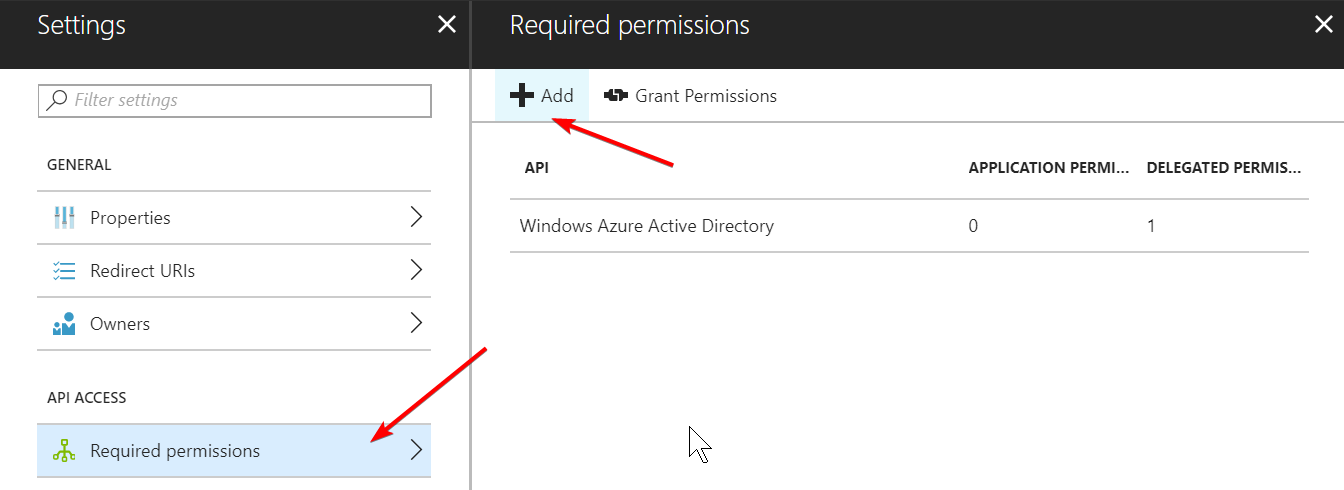
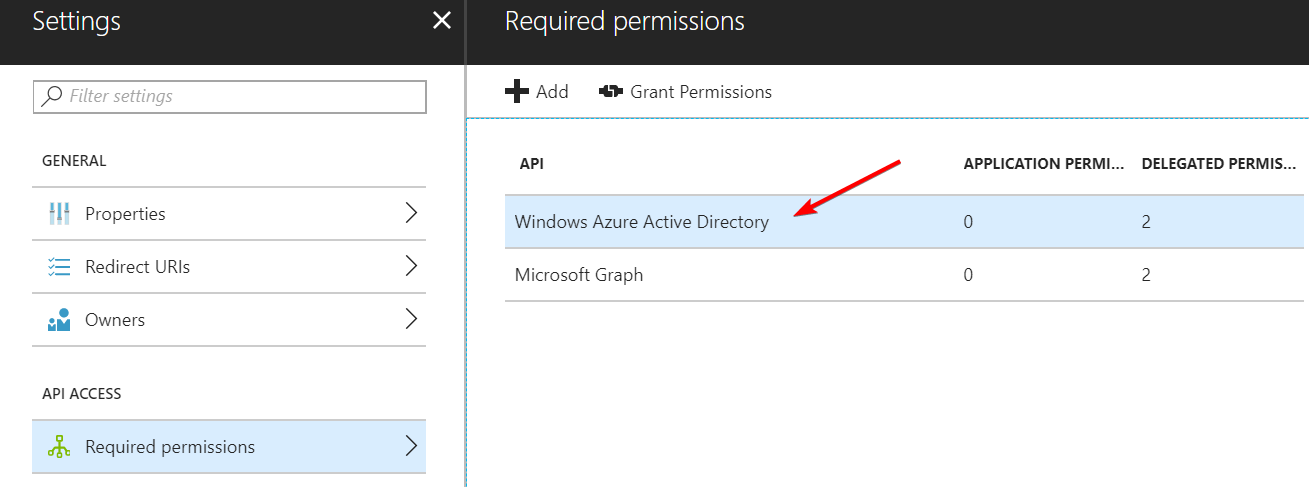
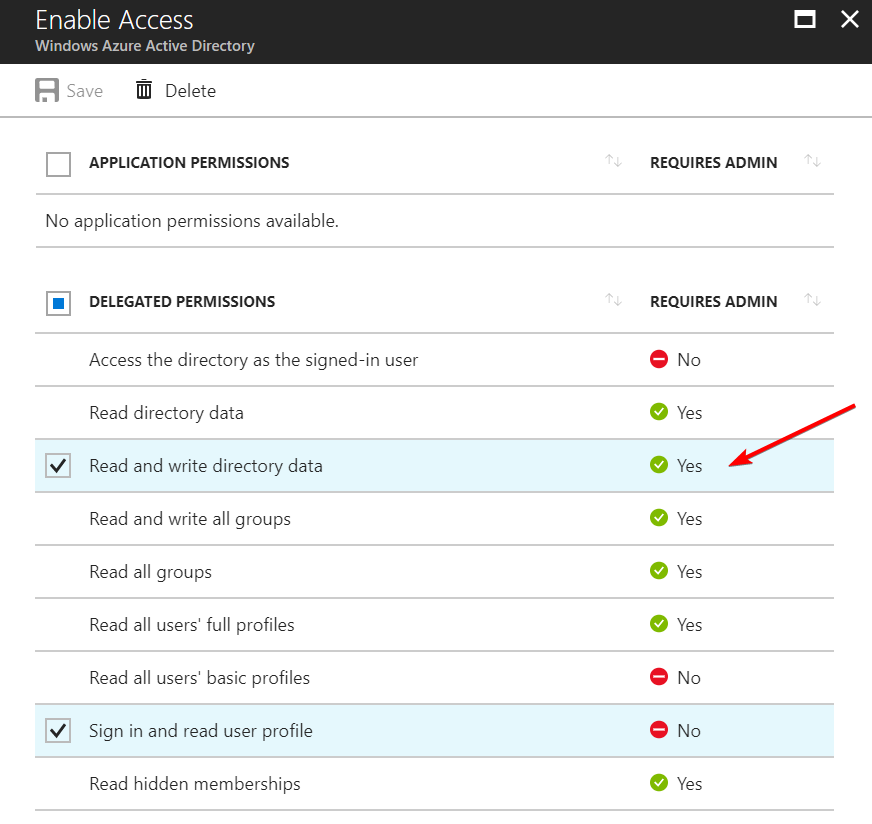
2. Assigning permissions to the registered application
The registered application must have AAD Read and Write permissions, and Intune Read and Write permissions.

3. Grant permissions (administrator consent)
Finally we grant the selected permissions to the newly registered application.


4. Create Azure Automation Account
Creation of the Azure Automation Account in a existing or new resource group.


5. Add Azure AD module to the Azure Automation Account
To have access to AzuerAD module we add it via the Gallery, choose Browse Gallery


6. Add credentials to the Azure Automation account
Go to Azure AD and create a new user, in my case user automation with Display Name Intune Automation and use a complex password for it.
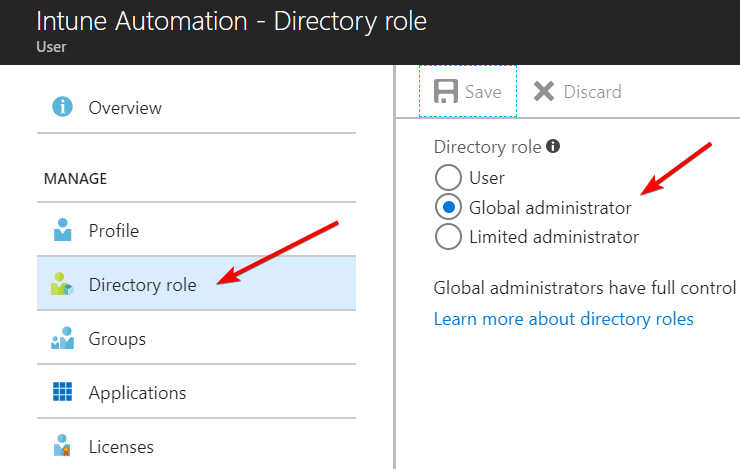
At the moment we need to assign the Global Administrator role as we want to delete devices in Azure AD. This information is based on: https://docs.microsoft.com/en-us/azure/active-directory/device-management-azure-portal#delete-an-azure-ad-device
After user creation we add the credential to the Azure Automation account.


7. Add variables to the Azure Automation account
The following PowerShell needs the native registered application ID also called Client ID. Therefore we create a Azure Automation variable IntuneClientId and we need the tenant ID as a variable, we use Tenant as identifier.

Below an example for IntuneClientId and add your Application ID from above, do the same for Tenant variable and add your tenant ID.

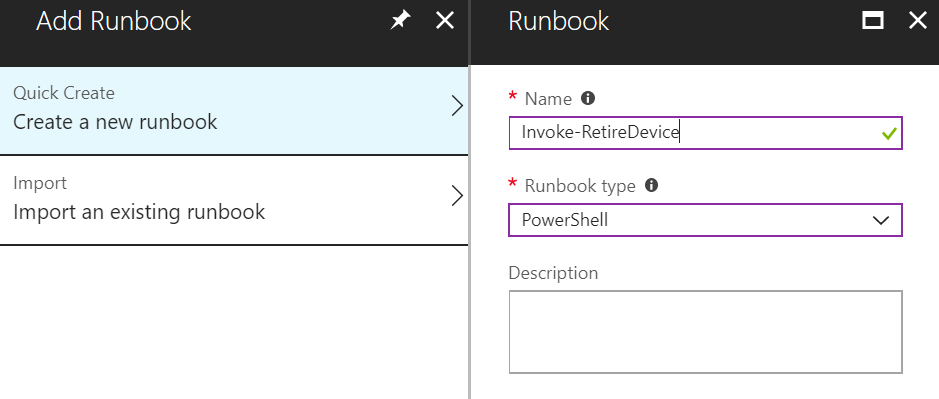
8. Add Runbook to the Azure Automation account
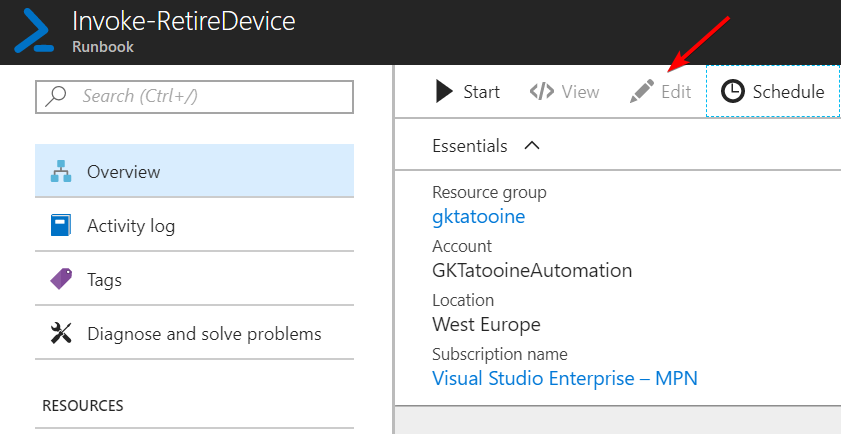
Adding a Runbook with the name Invoke-RetireDevice

9. Edit Runbook
We verify if the Runbook sees all our important information like AzureAD module, Variables and Credentials. After adding the PowerShell script we need to publish it.

PowerShell script for the Runbook is based on the GitHub samples with the modification to allow non-interactive usage of credentials via Get-AutomationPSCredential and Get-AutomationVariable
$intuneAutomationCredential = Get-AutomationPSCredential -Name automation
$intuneAutomationAppId = Get-AutomationVariable -Name IntuneClientId
$tenant = Get-AutomationVariable -Name Tenant
Now follows the actual PowerShell script with the logic to get the device of the user and delete it form Intune with usage of the automation credentials and variables for client id and tenant. In the end it will use the same credentials to delete the device from AAD also.
| <# | |
| Version: 1.0 | |
| Author: Oliver Kieselbach | |
| Runbook: Invoke-RetireDevice | |
| Description: | |
| Delete device from Intune via Intune API and AAD from a Azure Automation runbook. | |
| Release notes: | |
| Version 1.0: Original published version. | |
| Version 1.1: Bugfix, escaped ' on delete request, thanks Sandy! | |
| The script is provided "AS IS" with no warranties. | |
| #> | |
| param( | |
| [Parameter(Mandatory=$True)] | |
| $DeviceName, | |
| [Parameter(Mandatory=$True)] | |
| $UserPrincipalName | |
| ) | |
| # ------------------------------------------------------------------------------------------- | |
| # Intune cleanup | |
| try { | |
| $AadModule = Import-Module -Name AzureAD -ErrorAction Stop -PassThru | |
| } | |
| catch { | |
| throw 'AzureAD PowerShell module is not installed!' | |
| } | |
| $intuneAutomationCredential = Get-AutomationPSCredential -Name automation | |
| $intuneAutomationAppId = Get-AutomationVariable -Name IntuneClientId | |
| $tenant = Get-AutomationVariable -Name Tenant | |
| $adal = Join-Path $AadModule.ModuleBase "Microsoft.IdentityModel.Clients.ActiveDirectory.dll" | |
| $adalforms = Join-Path $AadModule.ModuleBase "Microsoft.IdentityModel.Clients.ActiveDirectory.Platform.dll" | |
| [System.Reflection.Assembly]::LoadFrom($adal) | Out-Null | |
| [System.Reflection.Assembly]::LoadFrom($adalforms) | Out-Null | |
| $redirectUri = "urn:ietf:wg:oauth:2.0:oob" | |
| $resourceAppIdURI = "https://graph.microsoft.com" | |
| $authority = "https://login.microsoftonline.com/$tenant" | |
| try { | |
| $authContext = New-Object "Microsoft.IdentityModel.Clients.ActiveDirectory.AuthenticationContext" -ArgumentList $authority | |
| $platformParameters = New-Object "Microsoft.IdentityModel.Clients.ActiveDirectory.PlatformParameters" -ArgumentList "Auto" | |
| $userId = New-Object "Microsoft.IdentityModel.Clients.ActiveDirectory.UserIdentifier" -ArgumentList ($intuneAutomationCredential.Username, "OptionalDisplayableId") | |
| $userCredentials = New-Object Microsoft.IdentityModel.Clients.ActiveDirectory.UserPasswordCredential -ArgumentList $intuneAutomationCredential.Username, $intuneAutomationCredential.Password | |
| $authResult = [Microsoft.IdentityModel.Clients.ActiveDirectory.AuthenticationContextIntegratedAuthExtensions]::AcquireTokenAsync($authContext, $resourceAppIdURI, $intuneAutomationAppId, $userCredentials); | |
| if ($authResult.Result.AccessToken) { | |
| $authHeader = @{ | |
| 'Content-Type' = 'application/json' | |
| 'Authorization' = "Bearer " + $authResult.Result.AccessToken | |
| 'ExpiresOn' = $authResult.Result.ExpiresOn | |
| } | |
| } | |
| elseif ($authResult.Exception) { | |
| throw "An error occured getting access token: $($authResult.Exception.InnerException)" | |
| } | |
| } | |
| catch { | |
| throw $_.Exception.Message | |
| } | |
| $graphApiVersion = "Beta" | |
| try { | |
| $Resource = "deviceManagement/managedDevices?filter=DeviceName eq '$DeviceName' and userPrincipalName eq '$UserPrincipalName'" | |
| $uri = "https://graph.microsoft.com/$graphApiVersion/$Resource" | |
| $managedDevice = (Invoke-RestMethod -Uri $uri -Headers $authHeader -Method Get).Value | |
| Write-Output "Found Intune managed device '$($managedDevice.deviceName)' with device id: $($managedDevice.id)" | |
| } | |
| catch { | |
| $ex = $_.Exception | |
| $errorResponse = $ex.Response.GetResponseStream() | |
| $reader = New-Object System.IO.StreamReader($errorResponse) | |
| $reader.BaseStream.Position = 0 | |
| $reader.DiscardBufferedData() | |
| $responseBody = $reader.ReadToEnd(); | |
| Write-Output "Response content: $responseBody" -f Red | |
| Write-Output "GET request to $Uri failed with HTTP Status $($ex.Response.StatusCode) $($ex.Response.StatusDescription)" | |
| } | |
| try { | |
| $Resource = "deviceManagement/managedDevices/$($managedDevice.id)/retire" | |
| $uri = "https://graph.microsoft.com/$graphApiVersion/$($resource)" | |
| Invoke-RestMethod -Uri $uri -Headers $authHeader -Method Post | |
| Write-Output "=> retired Intune managed device with id: $($managedDevice.id)" | |
| } | |
| catch { | |
| $ex = $_.Exception | |
| $errorResponse = $ex.Response.GetResponseStream() | |
| $reader = New-Object System.IO.StreamReader($errorResponse) | |
| $reader.BaseStream.Position = 0 | |
| $reader.DiscardBufferedData() | |
| $responseBody = $reader.ReadToEnd(); | |
| Write-Output "Response content: $responseBody" -f Red | |
| Write-Output "POST request to $Uri failed with HTTP Status $($ex.Response.StatusCode) $($ex.Response.StatusDescription)" | |
| } | |
| try { | |
| $Resource = "deviceManagement/managedDevices(`'$($managedDevice.id)`')" | |
| $uri = "https://graph.microsoft.com/$graphApiVersion/$($resource)" | |
| Invoke-RestMethod -Uri $uri -Headers $authHeader -Method Delete | |
| Write-Output "=> deleted Intune managed device with id: $($managedDevice.id)" | |
| } | |
| catch { | |
| $ex = $_.Exception | |
| $errorResponse = $ex.Response.GetResponseStream() | |
| $reader = New-Object System.IO.StreamReader($errorResponse) | |
| $reader.BaseStream.Position = 0 | |
| $reader.DiscardBufferedData() | |
| $responseBody = $reader.ReadToEnd(); | |
| Write-Output "Response content: $responseBody" -f Red | |
| Write-Output "DELETE request to $Uri failed with HTTP Status $($ex.Response.StatusCode) $($ex.Response.StatusDescription)" | |
| } | |
| # ------------------------------------------------------------------------------------------- | |
| # Azure AD cleanup | |
| $intuneAutomationCredential = Get-AutomationPSCredential -Name automation | |
| Import-Module -Name AzureAD | |
| Connect-AzureAd -Credential $intuneAutomationCredential | |
| try { | |
| $aadDevices = Get-AzureADDevice -SearchString "$DeviceName" | |
| $aadDevice = $aadDevices | ? { $_.DeviceId -eq $managedDevice.azureADDeviceId } | |
| Write-Output "Found AAD device '$($aadDevice.DisplayName)' with device id: $($aadDevice.DeviceId)" | |
| if ($aadDevice) { | |
| Remove-AzureADDevice -ObjectId $aadDevice.ObjectId | |
| Write-Output "=> deleted AAD device '$($aadDevice.DisplayName)'" | |
| } | |
| } | |
| catch { | |
| throw $_.Exception.Message | |
| } |
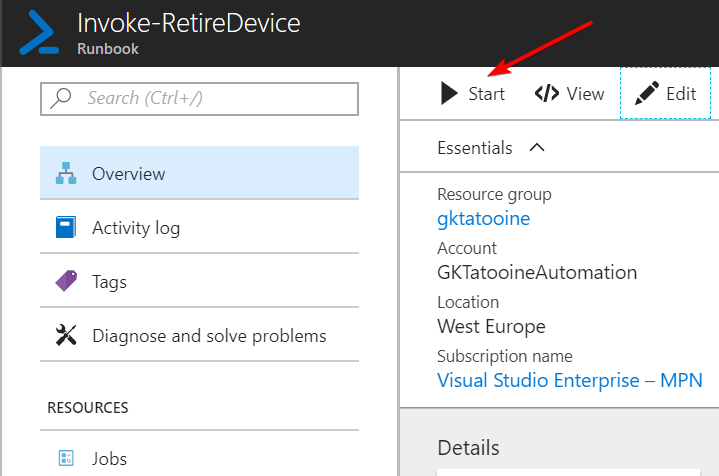
10. Start and test Runbook
Everything is setup, now it’s time for the first run. Get a stale Intune device you like to retire and start the Runbook.
The Runbook has two input parameters DeviceName and UserPrincipalName. This is needed to avoid getting duplicate entries for DeviceName. A user should only have a device once. If not we might rethink the PowerShell logic to address this.

After start of the job we can click on Output
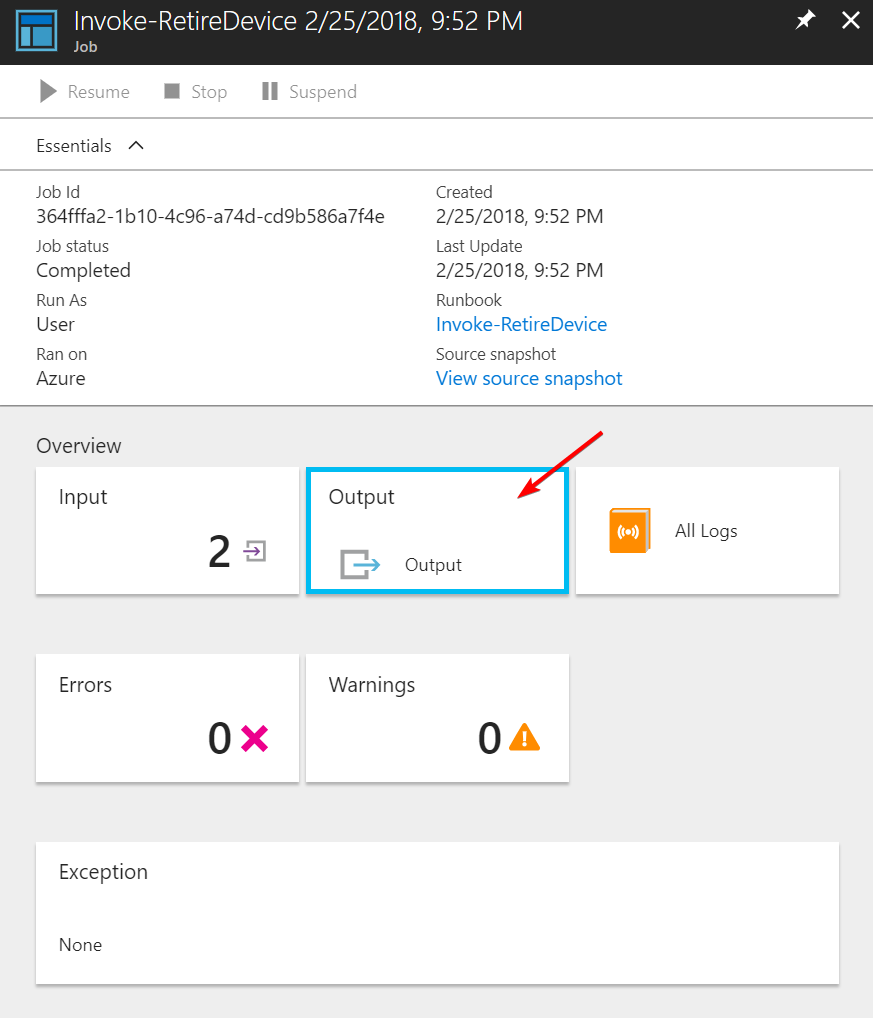
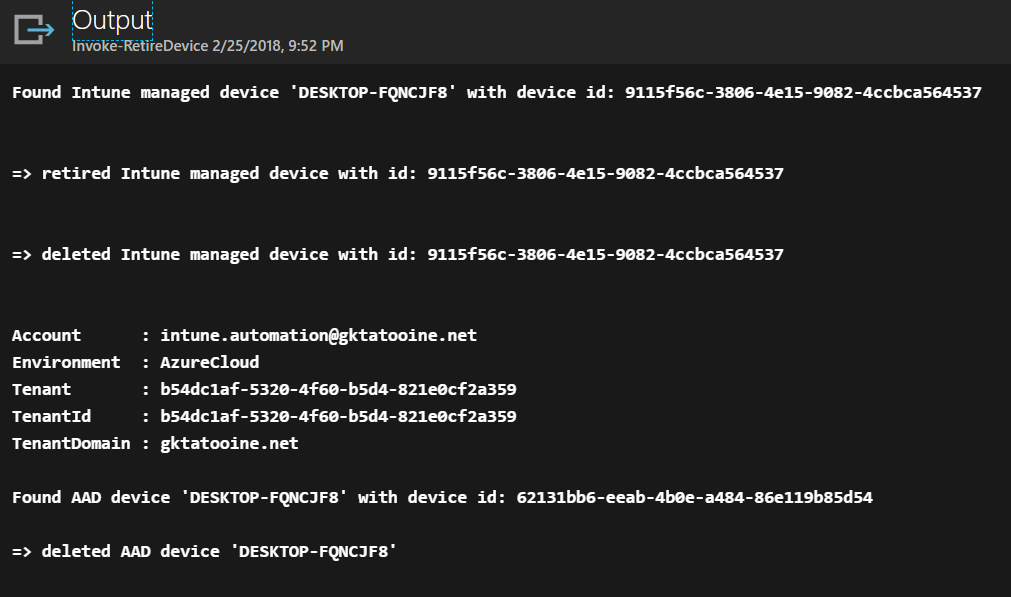
and get details as defined in our PowerShell script. If everything runs fine you will get the following output:
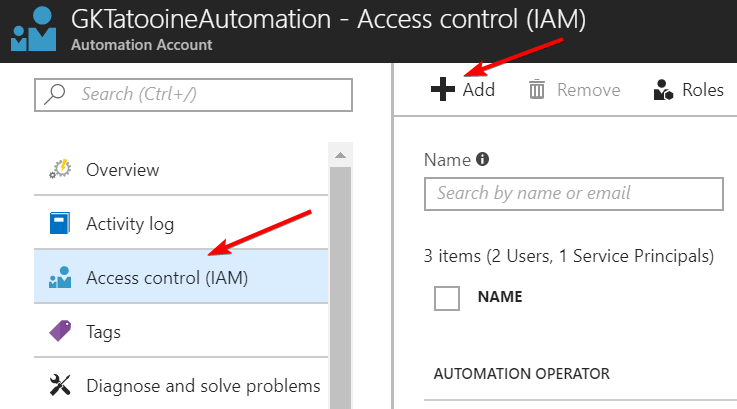
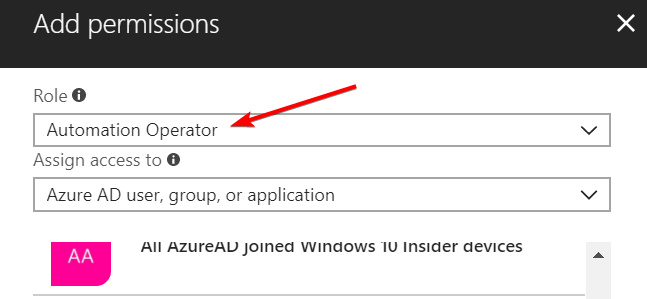
11. Add Automation Operator
We add a different user (e.g. service desk operator) to our Runbook as an Automation Operator. This provides the user the possibility to log on to portal.azure.com and start the Runbook but it’s protected from modifications as shown below.
Recap what we achieved
We have setup Azure Automation to host our PowerShell script in a managed cloud environment which is able to run as job to delete an Intune device and AAD device. In addition we learned the basics of Azure Automation and how to add modules, work with credentials and variables. Usage of unattended authentication to the Intune API is the basis for Intune API usage in Azure Automation.
Enhancements
- Microsoft Flow
- Source Control
Microsoft Flow
I thought it would be nice to enhance the Runbook with a Microsoft Flow to trigger it from my mobile phone. I found the following article which is describing how to do that:
Azure Automation new Microsoft Flow Service
https://blogs.technet.microsoft.com/stefan_stranger/2017/03/30/azure-automation-new-microsoft-flow-service/
Unfortunately as soon as I tried to use it I found that Microsoft Flow does not provide any trigger at the moment for it. The manual trigger as shown in the blog post above is not available for me. Maybe we can provide a nice interface for the runbook in the future via Microsoft Flow.
Microsoft Flow – Azure Automation
https://flow.microsoft.com/en-us/connectors/shared_azureautomation/azure-automation/
Source Control
When working with code it’s important to have a good versioning and a code storage place. For this Azure Automation provides integration with GitHub to link your Runbook source code. How to setup this follow the guide below. I can really recommend it.
Source control integration in Azure Automation
https://docs.microsoft.com/en-us/azure/automation/automation-source-control-integration
Further information
Azure Automation User Documentation
https://docs.microsoft.com/en-us/azure/automation/
UPDATE 22 July 2019: Intune PowerShell SDK – works with Azure Automation now and supports app-only auth read operations!
How to use Azure AD to access the Intune APIs in Microsoft Graph
https://docs.microsoft.com/en-us/intune/intune-graph-apis
Credential assets in Azure Automation
https://docs.microsoft.com/en-us/azure/automation/automation-credentials
Intune Device Management permissions
https://developer.microsoft.com/en-us/graph/docs/concepts/permissions_reference#intune-device-management-permissions
Graph Explorer – Microsoft Graph
https://developer.microsoft.com/en-us/graph/graph-explorer
Another very good guide using Azure Automation with Intune and AAD is here:
Unattended authentication against the Microsoft Graph API from PowerShell
http://www.powershell.no/azure,graph,api/2017/10/30/unattended-ms-graph-api-authentication.html
You want to learn more about Intune Housekeeping with scheduled Azure Automation PowerShell scripts then visit Ronny’s blog:
https://ronnydejong.com/2018/04/11/keep-your-microsoft-intune-tenant-clean-and-tidy-w-azure-automation-graph-api
Have fun in automation. Feel free to post your process automation ideas in the comment area below! Thanks for reading!

Should first remote wipe the device or fresh start the device then remove it. This offcourse can be build in 🙂
Nice find to use automation for deprovision. Maybe the script can be used to deprovision devices not contacted longer then 60 days or so.
Yes you can easily adapt to your needs and execute a remote wipe or fresh start.
Wipe can be done via: https://graph.microsoft.com/beta/deviceManagement/managedDevices/$DeviceID/wipe
Runbooks can even be scheduled to run in a recurring schedule. With recurring schedule it should be fairly easy to get devices with last contact longer than 60 days ago and delete them.
Oliver,
Congrats with your promotion on scconfigmgr.com Looking forward for your blogs!
Greetings.