
A month ago, I published a new version of the SyncML Viewer to support MMP-C. With this release I came to the idea of integrating some SyncML requests functionality. Sending local SyncML requests to the Windows OS and letting it process the OMA DM commands and get results back. After quite some research how to do that, I stumbled across Michael Niehaus blog Send MDM commands without an MDM service using PowerShell. I actually read it back then but wasn’t aware of it at the moment of research. But anyway, finally his idea is the basis of my development work for the new SyncML Viewer with Local MDM requests support. Big kudos 💪 to Michael for that! Thankfully 🙏 he released his module under CC by 4.0. This is what a great community and also open source is about. This means I could use and adapt his approach in my tool. I reviewed his approach to adaptation. Finally, I found the official “documentation” of the relevant API information in the Windows SDK: C:\Program Files (x86)\Windows Kits\10\Include\10.0.22621.0\um\mdmlocalmanagement.h. This is really nice, as C++ header files contain declarations and necessary information for using the functions or classes without providing their actual implementations. So basically, this is the exact instruction on how to interact with this API and this knowledge can be used not only in C++ as Michael demonstrated with his PowerShell approach, but also in C#, the language I use for SyncML Viewer.
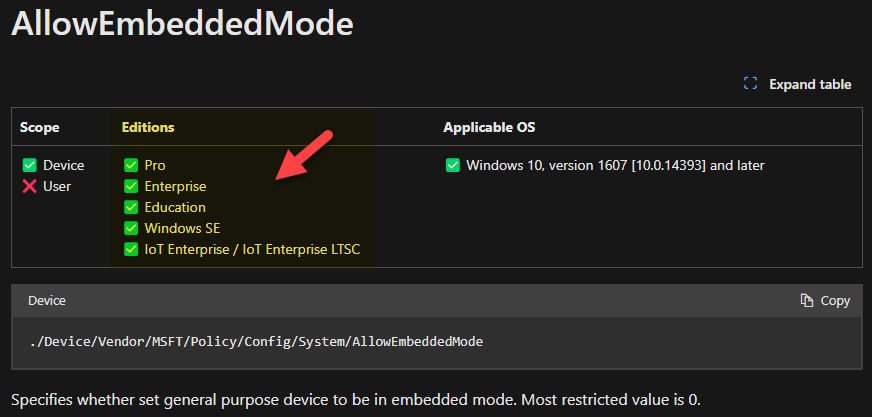
Interesting fact about the mdmdlocalmanagement API is that it needs AllowEmbeddedMode to be set. The official IoT documentation says this is supported on IoT Core and Enterprise. But hey it doesn’t tell explicitly that it is not supported on other editions. The Policy CSP for example has an AllowEmbeddedMode setting which is supported on all Editions 😉🤷♂️
Okay research done; I finally developed some functionality (with quite some issues to overcome 🫣 during development) for SyncML Viewer to interact with this “mdmlocalmanagement.dll” API (beginning with version 1.2.0). The result is a graphical user interface to do local MDM management now:

Some details of the inner workings
The tool is constructing all necessary prerequisites (SHA265 hash of SMBIOS UUID) for AllowEmbeddedMode and sets the value temporarily in registry: HKLM\SYSTEM\CurrentControlSet\Services\EmbeddedMode\Parameters\Flags. The flag is reverted after execution of a SyncML Request command to leave no change on the device. If you want to play around further, there is an option to set and clear it explicitly:

REMINDER: This tool and its functionality are intended to dig into the inner workings of the MDM stack. Especially when tampering with the device in a way like this (setting MDM settings) you can easily break the device. So be careful and use it on a dev or test devices preferably! Simple GET requests should not harm the device or leave any leftovers.
The basic flow of the API is 1. Allowing EmbeddedMode, 2. Register to MDM Local Management then 3. apply some local management SyncML and then optionally 4. Unregister. The register call will enroll and generate a new MDM enrollment (Local_Management) in registry, see the new enrollment GUID and the new enrollment type = 20 with a ProviderID named Local_Management:

The GUID on the left represents the enrollment ID of the mdmlocalmanagement.dll. Same way the MS DM Server gets registered during enrollment of a device but with a different enrollment type = 6.
I’ve chosen the default flow to trigger unregister by default at the end to have no leftovers on the device after playing around. There is an option to change this, demonstrated later in the article. The default I’ve chosen is especially useful if a request was made on a non-test device. I want to make sure regular devices are not broken in the end when using the tool. But keep in mind not every setting might be reversed after calling unregister. There are settings which are getting tattooed, so they will still be active even after calling unregister. So be careful where you play around with this!
Usage and further details
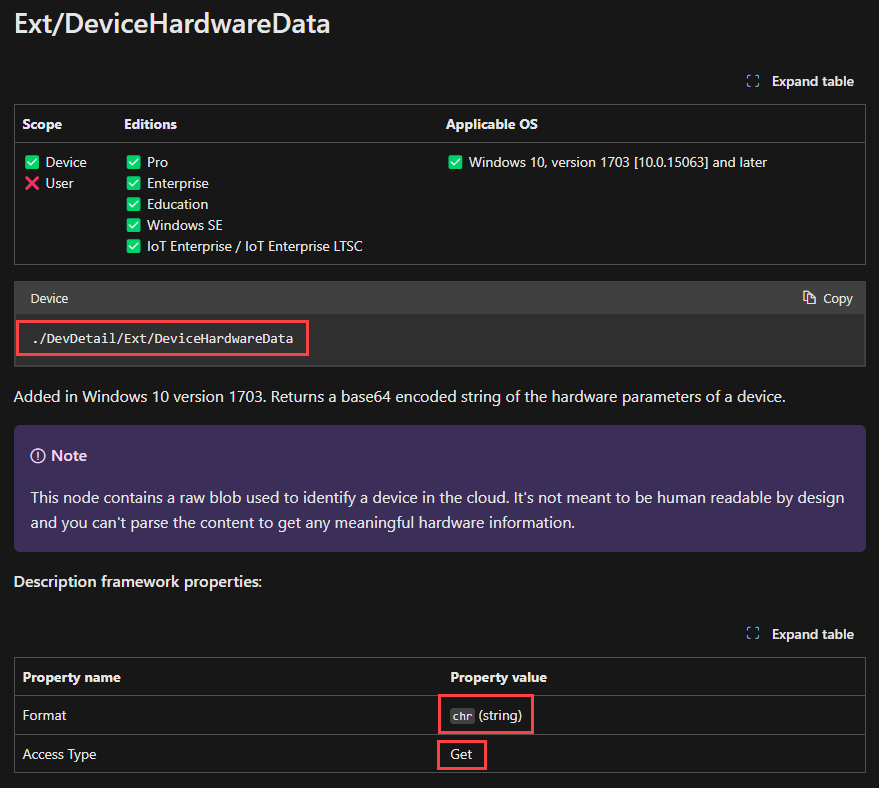
I hope the user interface is easy enough to use as soon as you have looked into the Configuration Service Provider reference documentation in the past (hint there is a key combo Ctrl+F1 to open the CSP docs). With the upper section in the SyncML Requests tab, you can build the request by using the dropdowns and input fields to construct an OMA-URI and the tool will build the SyncML request in the background automatically and shows it on the left after request:

This is an easy way to try documented CSPs via OMA DM commands (I refer as SyncML requests here and in the tool). In the example above I used the given information from the CSP documentation below (watch out for the Copy buttons on the docs 👌):
The result for all the requests and responses are kept on the right textbox:

If you prefer to do your own editing you can use the SyncML editor and write the SyncML xml yourself. The assisted part on the top will then be disabled and you have to get it correct by editing it directly:

In the example above I’ve constructed the SyncML xml to set the LockScreenImageUrl and DesktopImageUrl via one request and two individual Replace commands. The final result looks like this:

To demonstrate further the inner workings, I will use another example and set the AllowBuildPreview:

In this case I’ve set the additional option under Advanced “Keep local MDM enrollment (SyncML Requests)“:

This prevents the tool from calling Unregister API at the end of a SyncML request. Leaving the enrollment of the “mdmlocalmanagement.dll” in the registry and we can view our setting result:
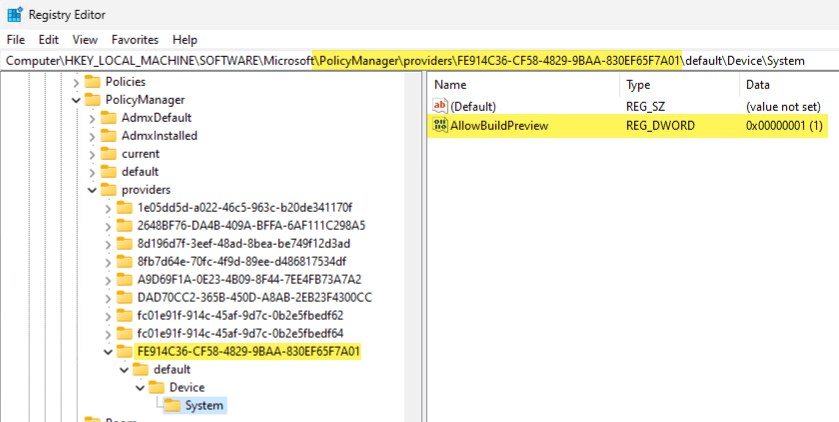
The GUID represents the enrollment ID of the mdmlocalmanagement.dll and due to the setting “Keep local MDM enrollment (SyncML Requests)” we prevented the call for unregister and everything we have set is kept in the registry.
Reminder: I’ve chosen the default to unregister by default to have no leftovers on the device after playing around. This is especially useful if a request was made on a non-test device. I want to make sure regular devices are not broken in the end when using the tool. But keep in mind not every setting might be reversed after calling unregister. There are settings which are getting tattooed, so they will still be active even after calling unregister. So be careful where you play around with this!
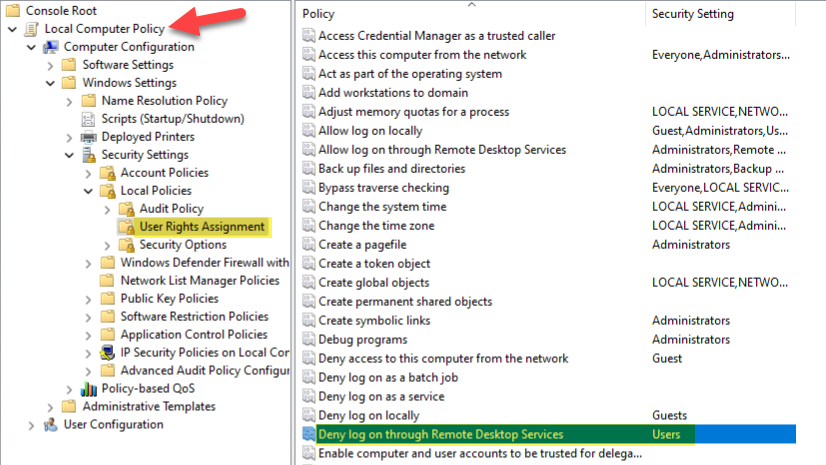
For more complex requests, where you have to build bigger data structures as input data, I’ve added a Data Editor as well for easy editing and formatting. The following example denies the RDP logon for the Users Group (SID = S-1-5-32-545) by utilizing the DenyRemoteDesktopServicesLogOn setting:

The result is shown below in the registry:

and here in the local Group Policy it is also reflected:
If you like to play around a little more in a standalone manner, it might be of interest, there is an option to keep the Executer process after exiting SyncML Viewer. You have to uncheck the Option > Advanced > Cleanup working folder after exit:

This will result in the Executer process (SyncMLViewer.Executer.exe) staying side-by-side with the SyncML Viewer. Without this option the binary will be generated on-the-fly and verified for integrity out of the SyncML Viewer. The binary is then used for executing the requests and deleted after tool usage:

The Executer can be used standalone and has some help. Check the command line help -? for correct usage:

Further improvements
While the release focused on SyncML Requests I’ve added or extended here and there some functionality, check the Change log on GitHub for details. Here some of them which are good to mention:
Data Editor used for Base64 Decoding
When selecting a text, you can hit Ctrl+B to try decode the selection from base64 encoding. I’ll try to format it correctly if it is xml or json content as shown below. The Ctrl+B is also supported on the Data Editor window itself to call another instance and decode further embedded base64 content. Nested calling so to say. The result is still copied to the clipboard automatically as well:

Data Editor used for HTML Decoding
If you use the Ctrl+H key combination, you can invoke HTML decoding on any selected text. In the example below I decoded the encoded HTML text between the <Data></Data> tags and used the [Format Document] to format it nicly.

Key combinations for most actions
I’ve added key combinations for most actions, have a look in the menus:

Reset Sync trigger status
I’ve also added an Action > Advanced > Reset Sync trigger status. As it may happen that the SyncML Viewer UI doesn’t recognize an interrupted sync. So instead of closing the tool and re-open you can simply reset the status and the Sync buttons are enabled again 👌

Download and feedback
I’ll hope this will help research and dig into the MDM stack, driving understanding and maybe coming up with solutions for various problems. As always if there is feedback leave a comment or open an issue on GitHub.
The project is maintained on GitHub here:
https://github.com/okieselbach/SyncMLViewer
Here a direct link to the zip archived program:
https://github.com/okieselbach/SyncMLViewer/tree/master/SyncMLViewer/dist
Finally special thanks to Michael Niehaus for his initial research and as always Rudy Ooms for various feedback on the tool.

Good stuff. (For the record, everything I did was in PowerShell, so no C++, just PowerShell calling a little inline C# and P/Invoke APIs.)
Thanks, and absolutely true!!! It is a bit misleading formulated from my side 🤦♂️, your approach was PowerShell indeed. I wanted to explain the API and the .h file and that it is the way it is used in C++. […] knowledge can be used not only in C++ as Michael demonstrated with his PowerShell approach.
Great stuff, thanks!! Quite new to whole SyncML “thing” – currently I’m trying to understand whether the “Message length” number refers to bytes and also, in case receiving the data truncated, whether this number presents the truncated “Message length”; In the end, I’m trying to calculate the full data size of a complete sync (which is going over the network) and asked myself whether I can simply add together the length of all SyncML messages (which doesn’t make sense if I add up truncated numbers 🙂 ). Hopefully, that makes sense.
Hi,
I’m just counting the characters of a message, this is the number shown there. The truncated message will be by roughfly 60k chars. as the ETW buffer has 64KB in total but the message gets broken/truncated if a bit more than 60k chars are packed in. I guess this is due to some overhead which is also present in the buffer data. So, if you count all messages you could receive a rough number of the overall size of transferred data. But the easier way you’d be to sync one session and then use the stream log and count all chars there. That would give you the approx number without gouging through every individual message and adding up.
Thank you for the swift response :-). I just followed your hint to count the total amount of chars within the stream log – in my case the result would be 427131 chars. Now the question would be how this translates to bytes? I guess that depends on the char and the encoding itself, but nor sure how to calculate. Any idea?! In the end, I’d like to be able to say something along the lines of “this sync transfers 3 MB of data”. Thanks again!
Correct the encoding does play a role here, but there are xml tags for encoding which tell UTF-8, so I think the data is mostly UTF-8 and there the most common ones (the first 128 chars) are one byte encoded. For an approx. calculation I guess you can say in your case approx. 500KB of data was exchanged. If nothing was truncated.
Perfect, thank you so much! Just by chance – do you know if there’re options out there to get the full message length in case of being truncated due to ETW limitation? Anyway, really appreciate your help and wish you a nice evening/day/morning (whatever your timezone is 🙂 )!
Sadly there is no real size information so nothing to construct… I’m based in Germany 👍 so evening right now.