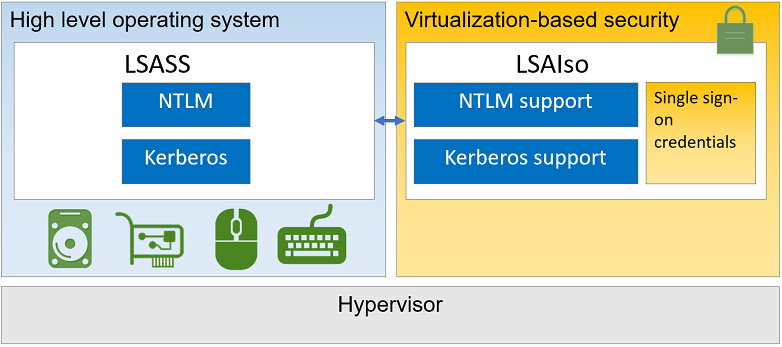
The Windows Defender Credential Guard is a feature to protect NTLM, Kerberos and Sign-on credentials. Windows 10 Enterprise provides the capability to isolate certain Operating System (OS) pieces via so called virtualization-based security (VBS). NTLM and Kerberos credentials are normally stored in the Local Security Authority (LSA). Once VBS is enabled the LSASS process will be split into an isolated process (protected by virtualization based security) called LSAiso and the LSASS process. The LSAiso process can not be accessed by other OS components than the LSASS. This approach protects credentials from malicious tools which gained system context access. A well known tool to accomplish extraction of credentials from LSASS in system context is Mimikatz. This will not work after enabling Windows Defender Credential Guard as the only process validated to gain access to LSAiso process is LSASS.
With that in mind Credential Guard can protect an attack vector used by a lot of bad guys trying to steal sensitive information. It’s really worth considering to turn this protection on for Windows 10 Enterprise x64 (no support for x86) devices.
Further information of Credential Guard:
https://docs.microsoft.com/en-us/windows/access-protection/credential-guard/credential-guard-how-it-works
How do we configure this via Modern Management in Intune?
Since Windows 10 Version 1709 Microsoft provides Policy CSP support to configure Credential Guard via custom OMA-URIs. We can create a custom device profile:

and then choose Profile type: custom

Here we add the following OMA-URIs to configure Credential Guard with default settings and additional DMA Protection:
Name: DeviceGuard/EnableVirtualizationBasedSecurity
OMA-URI: ./Vendor/MSFT/Policy/Config/DeviceGuard/EnableVirtualizationBasedSecurity
Data type: integer
Value: 1 (enable virtualization based security)

Name: DeviceGuard/LsaCfgFlags
OMA-URI: ./Vendor/MSFT/Policy/Config/DeviceGuard/LsaCfgFlags
Data type: integer
Value: 1 (Enabled with UEFI lock)

Name: DeviceGuard/RequirePlatformSecurityFeatures
OMA-URI: ./Vendor/MSFT/Policy/Config/DeviceGuard/RequirePlatformSecurityFeatures
Data type: integer
Value: 3 (Turns on VBS with Secure Boot and direct memory access (DMA). DMA requires hardware support.)
Further information regarding Policy CSP values:
https://docs.microsoft.com/en-us/windows/client-management/mdm/policy-csp-deviceguard
As a last step we assign the new device configuration profile to our user group we want to provide the additional Credential Guard protection.
UPDATE:
It is now possible to configure Credential Guard with the built in “Endpoint protection” configuration profile see screenshot below. The described way is still possible but a much easier way is to use the Endpoint protection configuration profile for Windows 10 now.

How to verify successful configuration?
First of all we verify if Intune applied the configuration successfully:

Then you can verify the applied registry settings on the target device of the user:

Further information regarding registry settings:
https://docs.microsoft.com/en-us/windows/access-protection/credential-guard/credential-guard-manage
Make sure the device was restarted after successful configuration! This is needed as Credential Guard relies on Hyper-V technology for virtualization-based security and therefore it will enable the feature Hyper-V Hypervisor component.
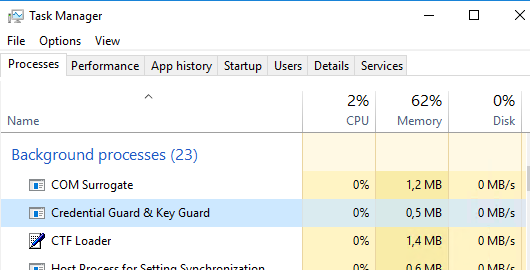
We can have a look for the LsaIso.exe process in task manager:
Finally we open up msinfo32.exe and verify if virtualization-based security is running and Credential Guard is activated:

If everything went well your machine is now protected against stealing of password secrets (hashes) which can be used by attackers for Pass-The-Hash (PTH) attacks. Keep in mind that this will not protect against attacks like key loggers. The solution is an effective way to protect credential stealing from memory.
How to test this in a Hyper-V Virtual Machine?
When using Microsoft Hyper-V you can enable nested virtualization on the VM and enable the Trusted Platform Module. Now you can test Credential Guard in your Hyper-V VM.
Enabling nested virtualization on Hyper-V VM:
Set-VMProcessor -VMName <VMName> -ExposeVirtualizationExtensions $true
Further information on nested virtualization:
https://docs.microsoft.com/en-us/virtualization/hyper-v-on-windows/user-guide/nested-virtualization
Enabling the TPM on Hyper-V VM:

Additional things to consider?
The target hardware must support Credential Guard
https://docs.microsoft.com/en-us/windows/access-protection/credential-guard/credential-guard-requirements
Compatibility problems
https://docs.microsoft.com/en-us/windows/access-protection/credential-guard/credential-guard-considerations
Limitation in protection
https://docs.microsoft.com/en-us/windows/access-protection/credential-guard/credential-guard-protection-limits
UPDATE
Virtualization based security (VBS) will be available for non-Enterprise SKUs and starting with RS4+ VBS will be automatically enabled for clean installs!
If you are using Windows 10 please try Credential Guard in your environment as it is a really big security enhancement of Windows 10 Enterprise.

Awesome blog once again. So again a feature that works on Enterprise edition and not Pro? And do we need Azure Ad premium and E3 or E5?
Thanks! Yes Enterprise and Education Edition no Pro! AzureAD is not necessary at all you could configure Credential Guard via GPO and on-premises Active Directory also. My scenario is a Cloud Client joined to AAD with auto-enrollment to Intune. So I used AAD and Intune for management (Modern Management). Same can be done with AD + GPO (Traditional Management).
Hi Olivier,
Thanks for your interesting posts. However none of your images are showing in my Chrome or Edge browsers and I’ve checked everything that looks like the causes like Java or images. Any ideas why this is happening?
Hey Roy,
it’s working for me, I don’t see any issues in loading. I guess it is a client side issue on your side. Can you test from other internet breakout and device?
best,
Oliver
Hi and thank you very much for this article. I have a question please.
If all my devices and users are joined only to AAD and intune, would it still make any sense to enable credential guard?
Credential Guard makes always sense, go for it! If you have new devices installed with Windows 11 22H2 it is enabled by default.