

In this guide I will have a look at an easy way to deploy device certificates to modern cloud managed clients. Even without an Microsoft on-premises PKI your devices will get device certificates. These certificates can be used for Wi-Fi authentication for example.
Normally if you want to deploy certificates to mobile devices you are looking at the Simple Certificate Enrollment Protocol (SCEP). To configure this you need to follow this guide Configure and use SCEP certificates with Intune which is fairly long and even takes about 30 min. to read. It involves various on-premises components like AD, CA, NDES Server, Microsoft Intune Certificate Connector and an Azure AD Application Proxy or WAP. A typical setup would look like this:

You might have most of the components in your infrastructure but often I see customers without all of these or they want to get rid of the technical PKI which is used for just a few workloads like 802.1x certificates and move on to a cloud infrastructure.
How do we achieve device certificate deployment the easy way?

There is a solution called SCEPman | Intune SCEP-as-a-Service build by Glück & Kanja Consulting AG available in the Azure Marketplace. All it needs is an active Azure Subscription.
A little background from the product description:
Microsoft Intune allows third-party certificate authorities (CA) to issue and validate certificates using the Simple Certificate Enrollment Protocol (SCEP). SCEPman is a fully unattended Certificate Authority using Azure Key Vault for Microsoft Intune based device certificate deployment. (UPDATE: with SCEPman 1.3 user certificates are supported in a limited fashion) SCEPman is a .net core C# based Azure Web App providing the SCEP and Intune API. It uses an Azure Key Vault based Root CA and certificate signing. No other component is involved, neither a database nor any other stateful storage except the Azure Key Vault. That said, SCEPman will not need any backup procedures.
SCEPman is an Azure Web App with the following features:
- A SCEP interface that is compatible with the Intune SCEP open-source API in particular
- SCEPman signs machine authentication certificates with a CA key stored in Azure Key Vault
- SCEPman contains an OCSP responder to provide certificate validity in real-time. A certificate is valid if its corresponding AAD device exists and is enabled
A simple post request to SCEPman service creates the CA certificate.
However, if for whatever reason an alternative CA key material shall be used it is possible to replace this CA key and certificate with your own in Azure Key Vault. For example, if you want to use a Sub CA certificate signed by an existing internal Root CA.
SCEPman issues authentication certificates that are compatible with Intune’s internally used authentication certificates. They contain Intune’s extensions determining the tenant and the machine. Additionally, the tenant ID and machine ID is stored in the certificate subject to allow common Radius servers like Cisco ISE, FreeRADIUS, RADIUS-as-a-Service and others to use these certificates for authentication.
! Please read carefully – Warning about user certificates
SCEPman is intended to use for authentication and transport encryption certificates. That said, you can deploy user and device certificates used for network authentication, WiFi, VPN, RADIUS and similar services. Do not use SCEPman for email-encyrption or digital signatures (without a separate technology for key management). The nature of the SCEP protocol does not include a mechanism to backup or archive private key material. If you would use SCEP for email-encryption or digital signatures you may loose the keys to decrypt or verify at a later time.
How does the exact workflow look like?
As we already know it is a cloud service and uses an Azure Web App. Let’s look at the detailed certificate request workflow:

- In Intune you create and assign a new SCEP certificate profile and target it to a user or device group.
- The device (Windows, iOS, Android, macOS) checks in and requests a certificate from SCEPman (the Azure Web App)
- SCEPman requests validation of the request from Intune by comparing a unique challenge (this prevents tampering)
- Intune validates the CSR and sends back a response
- If the challenge is verified successfully, SCEPman will request certificate signing from the Azure Key Vault
- SCEPman will receive the signed certificate
- SCEPman will issue the certificate to the device
A more detailed technical certificate workflow can be found here Add partner certification authority in Intune using SCEP
SCEPman will act as an OCSP responder and the detailed workflow looks like this:

- The device sends an OCSP request for the certificate to SCEPman
- SCEPman checks if the device exists in Azure AD and is enabled
- SCEPman receives the results and if the AAD device is not available or disabled the OCSP response for the certificate is send as “not valid”
- For existing and enabled AAD devices SCEPman will verify the certificate with the Azure Key Vault
- The result is send back to SCEPman
- On successful verification it will send an OCSP response as “valid”, otherwise as “not valid”
How to deploy SCEPman now?
16.06.2021 Attention(!) there might be an issue with the App registration due to an introduced change to some tenants. In case your SCEPman instance does not deliver certificates since a few days. Have a look at this support article:
https://glueckkanja.zendesk.com/hc/en-us/articles/4402360224530-SCEPman-does-not-issue-certificates
Step 1: Azure AD App registration
First, we need some preparations upfront to allow SCEPman to talk to the Azure AD. This is achieved by registering an App for SCEPman in Azure AD.
- Login to your Azure Portal with an Admin Account
- Navigate to Azure Active Directory
- Choose App registrations
- Click New registration
- Set display name to SCEPman
- Set supported account types to Accounts in this organizational directory only
- Click Register

Next we need to copy and save the created Application (client) ID for the newly registered app SCEPman somewhere (e.g. notepad):

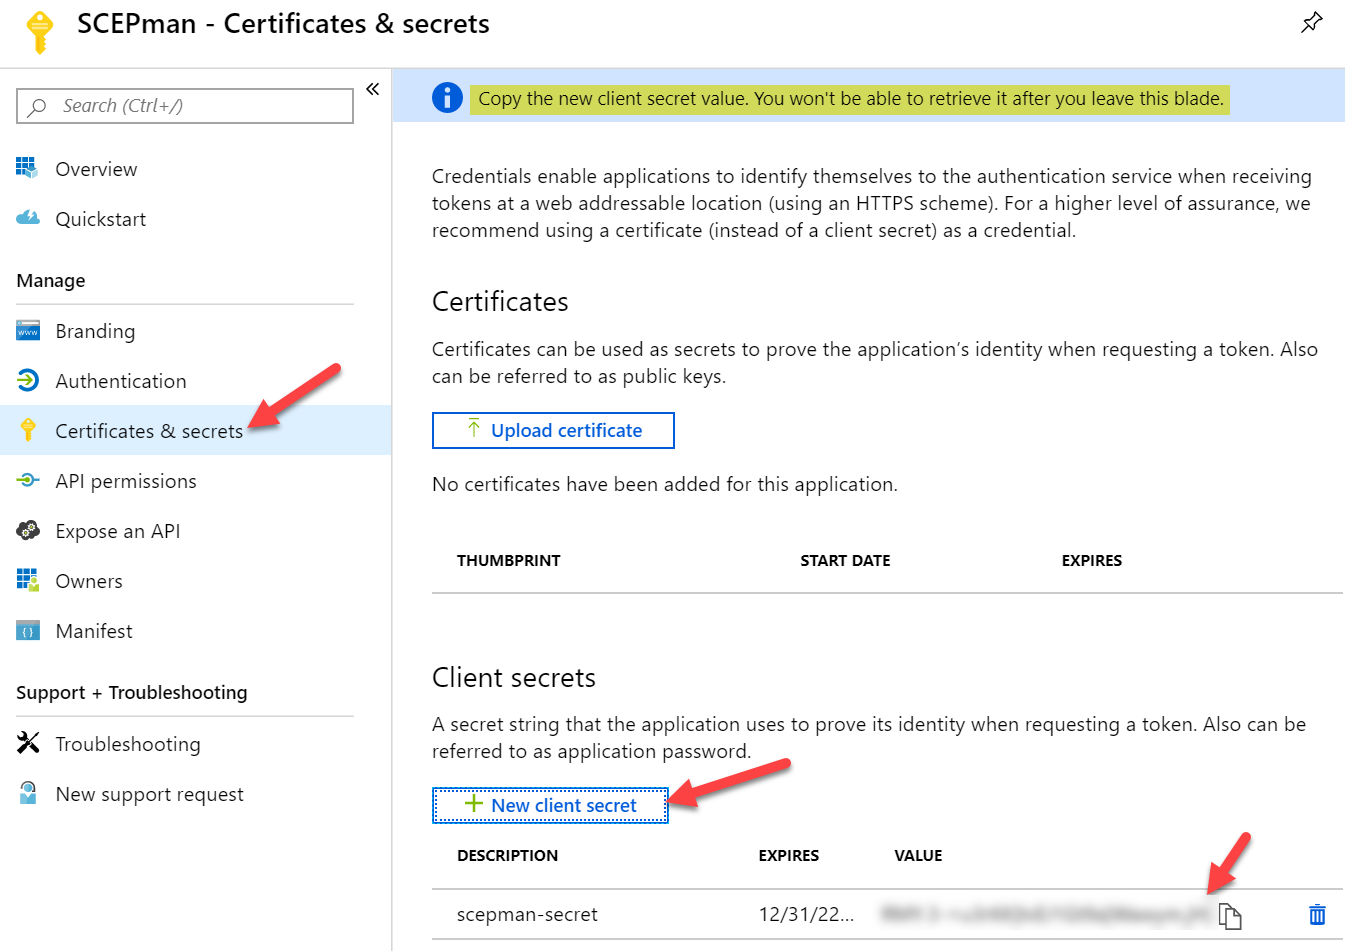
Now we need to create a client secret
- Select the Certificates & secrets blade
- Add a new client secret with New client secret
- Define a Description and set expiration to
Never24 months (configuring never is not possible anymore, so create immediately a recurring calendar entry to refresh the secret after ~1,5 year) - Save the generated secret somewhere because you are not able to look it up again
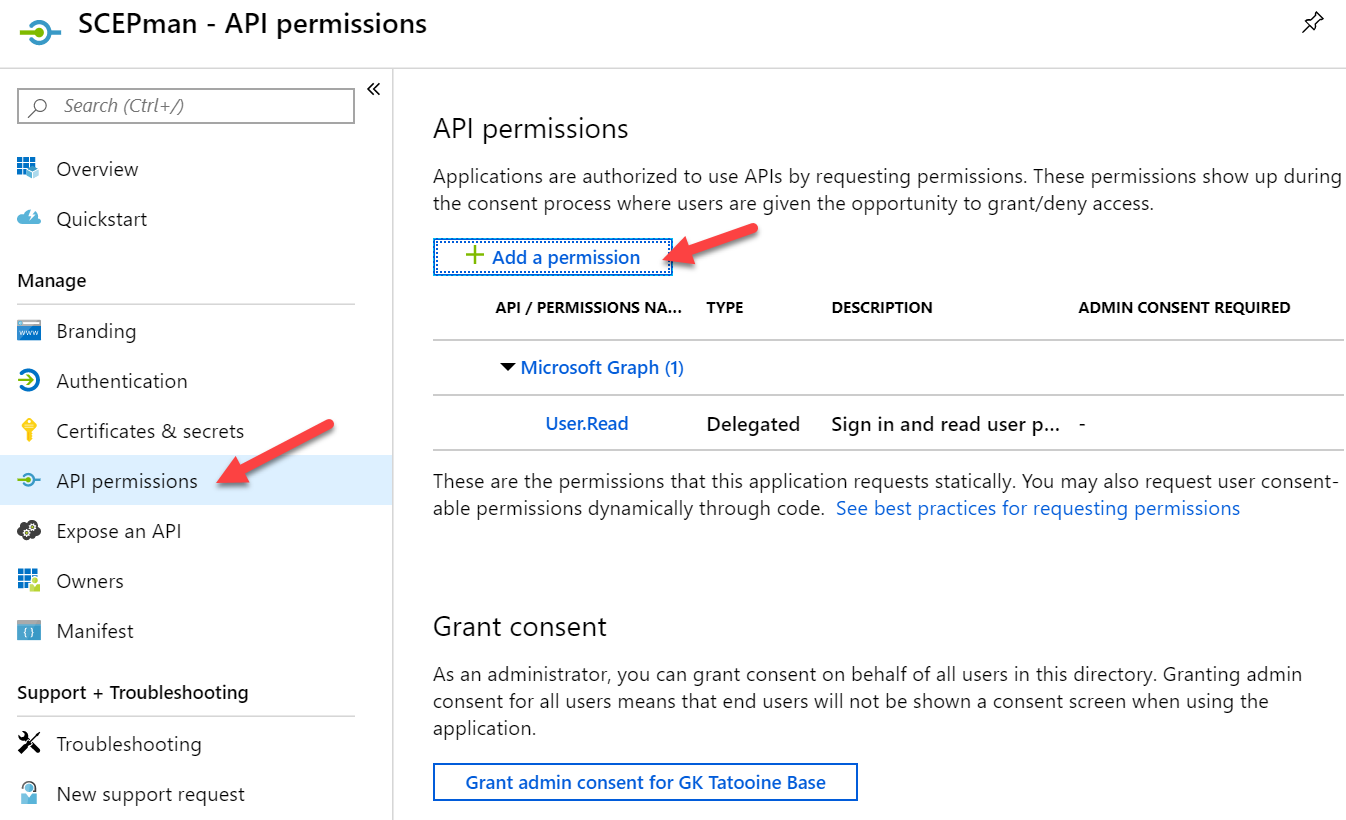
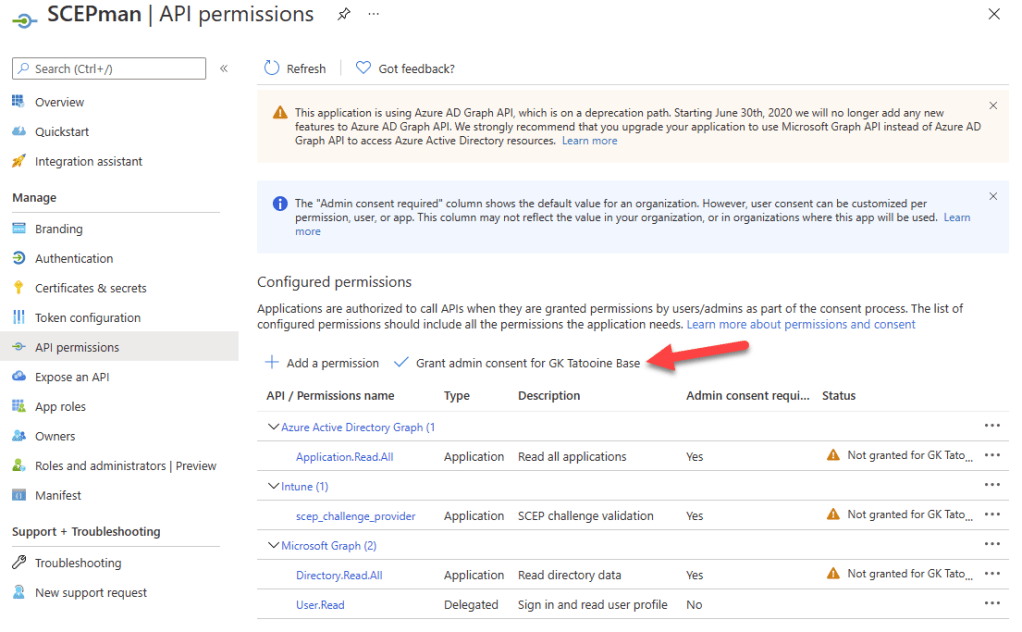
The registered Azure AD app SCEPman now needs to have API permissions which we will grant now:
- Select the API permissions blade
- Click Add a permission to grant required permissions
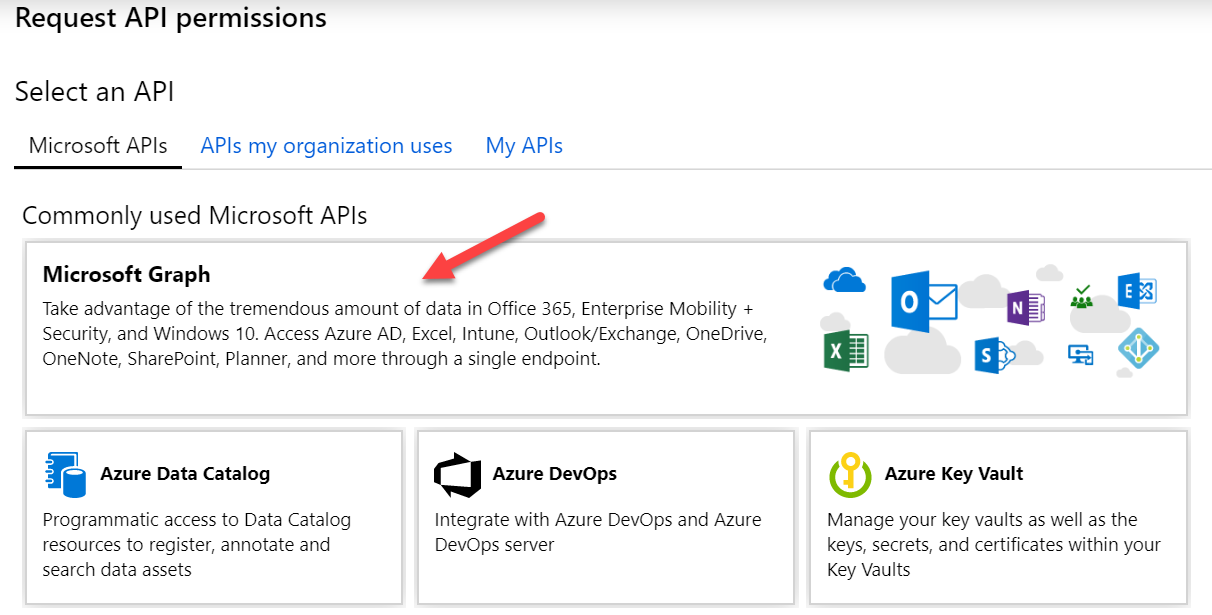
- Select Intune
- Choose Application permissions as the permission type
- Click scep_challenge_provider and confirm with Add permission


- Click Add a permission once again
- Now select Microsoft Graph
- Choose Application permissions as the permission type
- Expand Directory and check Directory.Read.All and confirm with Add permission

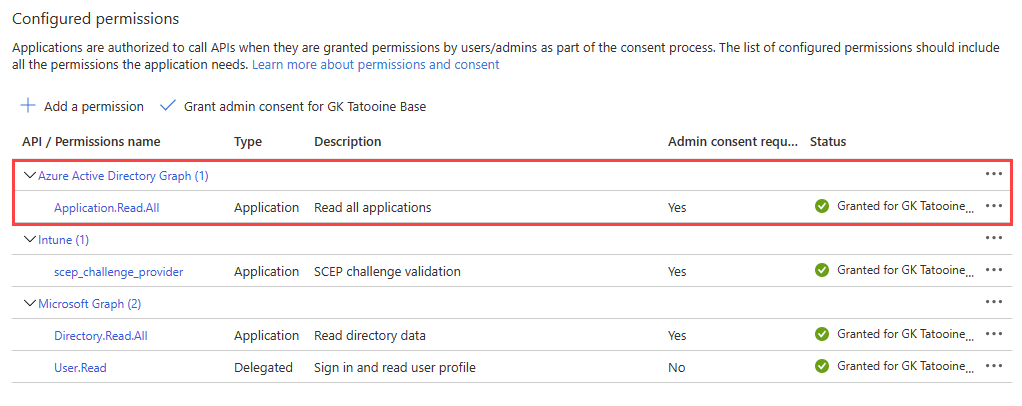
And really important as some tenants have already issues and on January 2022 you will need to have the additional API permission Application.Read.All for Azure Active Directory Graph. Please read carefully, not Microsoft Graph the API needed API permission is for the old graph API called Azure Active Directory Graph. This is how it must look like in the end:
- Click Add a permission once again
- Now select Azure Active Directory Graph
- Choose Application permissions as the permission type
- Expand Directory and check Application.Read.All and confirm with Add permission

Finally Click Grant admin consent for <your tenant name> and confirm the displayed dialog with Yes

The Azure AD app registration is finished now.
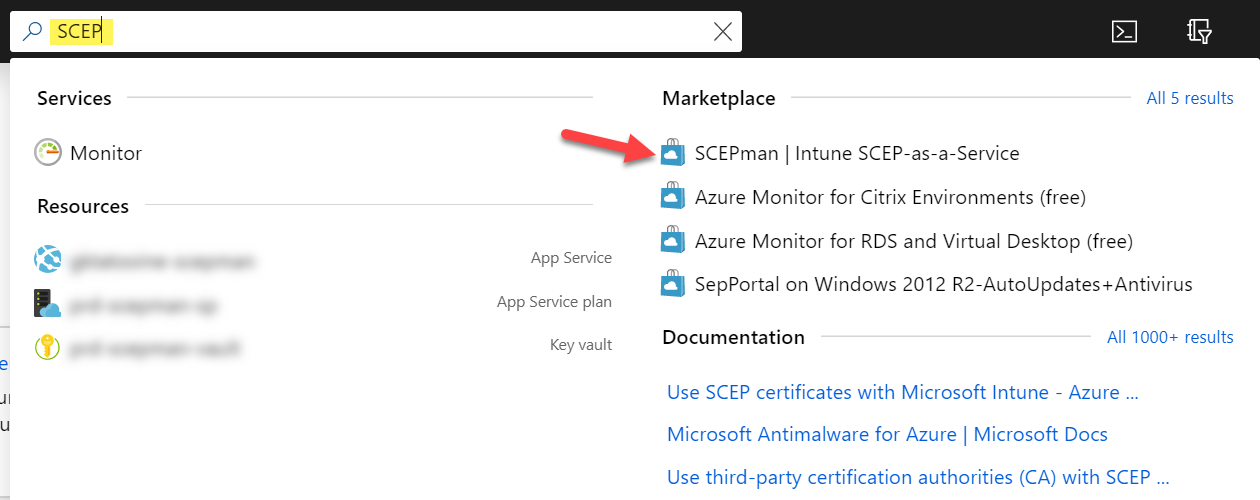
Step 2: SCEPman Deployment – Azure Marketplace
As already said SCEPman is an Azure Marketplace solution and can be easily deployed from there. Just search for SCEP and use the link for SCEPman:
Click on the Create button

Follow the Wizard and fill in the required fields for section Basics:

Fill in the Azure AD app registration details for SCEPman (copied earlier):

Wait for validation passed and click OK

Click on Create and wait for the deployment


Check if SCEPman is running by navigating to Azure AD > App services > scepman-<a-random-string> and click on Browse to see the SCEPman website:


If everything went well you should see the Vault, Intune and Graph as connected. As this is our first and single node in this deployment we can click on “click here to start” to create the Azure Key Vault RootCA certificate (this takes one or two minutes):

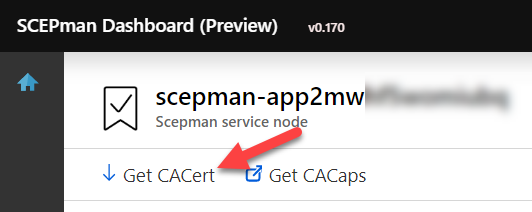
Remember this can also be changed to a custom RootCA certificate (not described in this guide). If there is no need, you can create the new RootCA certificate now (SCEPman-Device-Root-CA-V1). If you plan to use the certificates for Wi-Fi authentication, your RADIUS must trust the public root certificate. The public root certificate can be easily downloaded from the SCEPman website by clicking on Get CACert:
To get continuous updates for SCEPman you can point a configuration variable to the maintained GitHub repository of SCEPman. During every restart the Azure Web App will do a check and a copy deployment if necessary. To configure this, go to SCEPman in Azure AD > App services > scepman-<a-random-string> and click on Configuration:
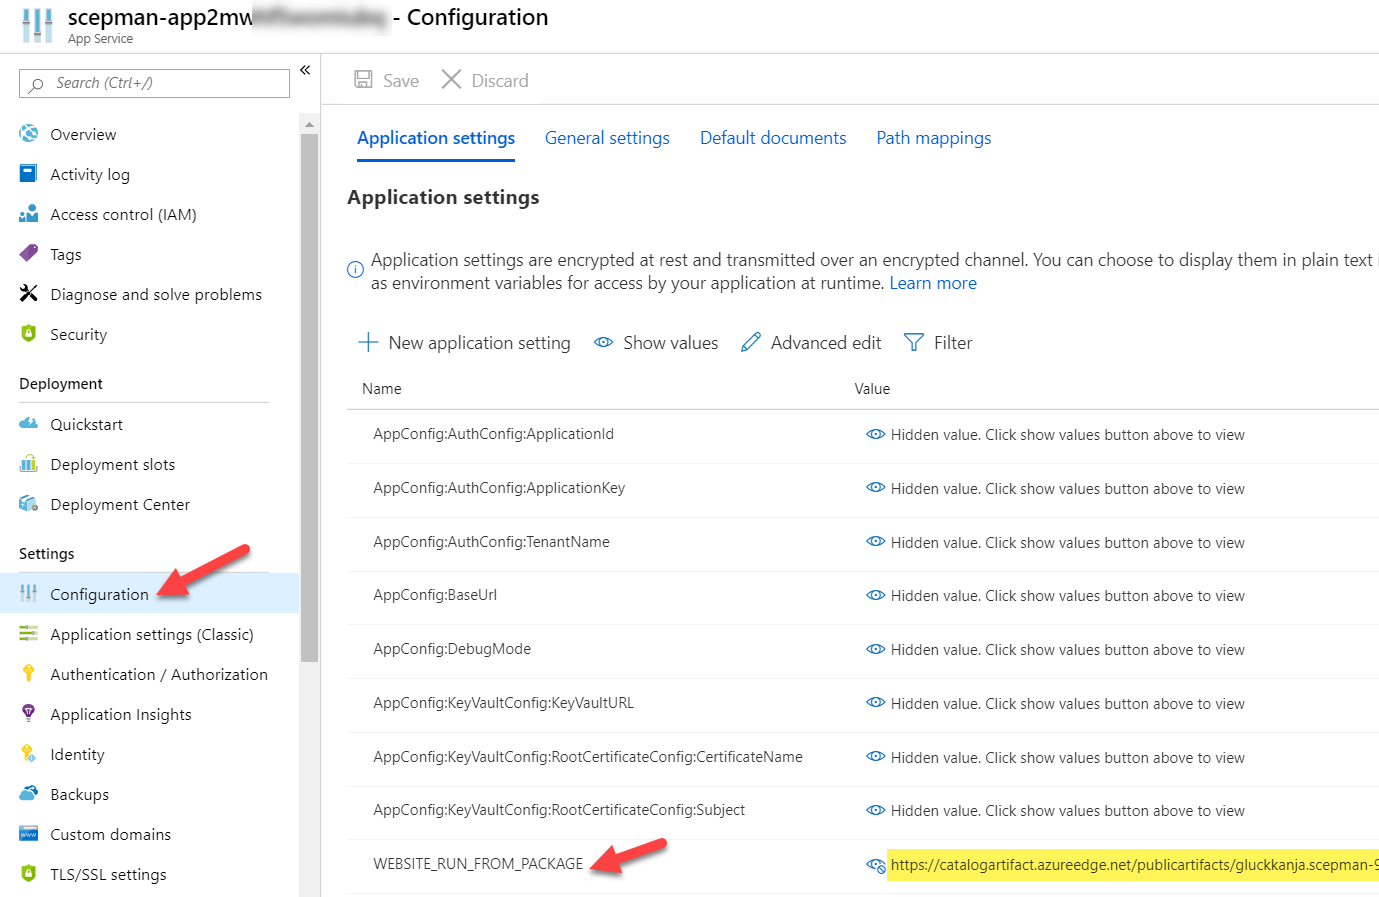
Look for WEBSITE_RUN_FROM_PACKAGE and replace the URL with the SCEPman GitHub URL:
https://raw.githubusercontent.com/glueckkanja/gk-scepman/master/dist/Artifacts.zip
Step 3: Deploying device certificates via Intune Certificate profile
First, we need to trust the public root certificate from SCEPman. Therefore, we download the CA certificate (shown above) and deploy it via a trusted certificate profile in Microsoft Intune:

When finished we can deploy this to our devices.
Second, we need to create a SCEP certificate profile to deploy the device certificates. To fill the properties of the SCEP certificate profile we need the SCEP Server URL. The base SCEP Server URL can be found on the Overview of the App Service of SCEPman:

To complete the URL, append /certsrv/mscep/mscep.dll (compare SCEP certificate profile picture above). The final URL should look similar like this (xxx is a random string), copy this URL to a notepad for example:
https://scepman-xxx.azurewebsites.net/certsrv/mscep/mscep.dll
Now we create a SCEP certificate profile in Intune to finally deploy the device certificates:

You should have two configuration profiles now:

Assign them to the same AAD user or device group to make sure the user or device overlaps and both profiles are targeted to the device. Don’t mix user and device groups. If you see pending as status for the configurations profiles in Intune for a long time, the assignment is probably wrong!
Verify device certificate deployment on a mobile client
Once we configured Windows configuration profiles, we verify successful deployment on an Azure AD joined Windows 10 device. Of course, you can create iOS, macOS, and Android profiles as well. All platforms are supported by the SCEP Server – SCEPman. Let’s verify if a client received successfully the trusted root certificate and the device certificate:

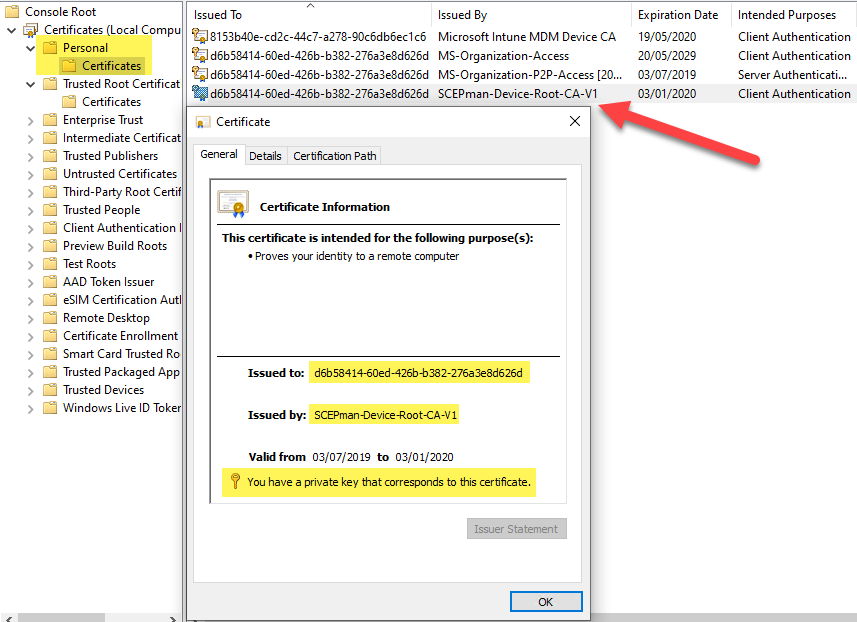
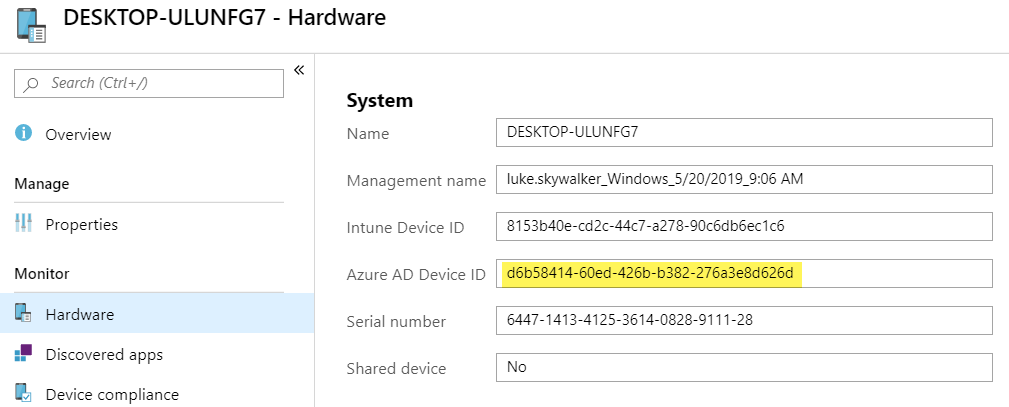
As you can see the device certificate is issued to a GUID and this GUID is the device ID of the Azure AD device object. Same principle and properties like Microsoft is deploying the MS-Organization-Access certificate to the device:
Additionally to show the iOS compatibility I created and deployed two policies for iOS (trusted root and SCEP profile). Here is a screenshot of a successful deployment via SCEPman on an iOS device:

If you want to deploy Android Enterprise Work Profile and SCEP profiles for certificate usage with Wi-Fi, you should use the SAN attributes UPN in the SCEP profile otherwise Android will not find successfully the certificate for Wi-Fi usage. It is important to use the domain part of your logon user of the Company Portal:

Tip: To check if the certificate is successful deployed and available in the Android Enterprise Work profile you have to download the “My Certificates” app from the Google Play store within the work profile, otherwise you will not see the certificate.
What about revocation of a device certificate?
First, we need to check the validity of the device certificate. Therefore, open a command prompt as Administrator and type the following command:
certutil -verifyStore MY

Look at the certificate with the device id issued by the SCEPman-Device-Root-CA-V1 and verify if the certificate is valid (see last line).
To verify that the OCSP responder is working, we can look at the OCSP url cache with the following command:
certutil -urlcache OCSP

Now if we want to revoke a device certificate, we have two options: deleting the device from Azure AD or just disabling it. I’m disabling it and verify again to see if the certificate will be revoked:


Now type again the following command:
certutil -verifyStore MY
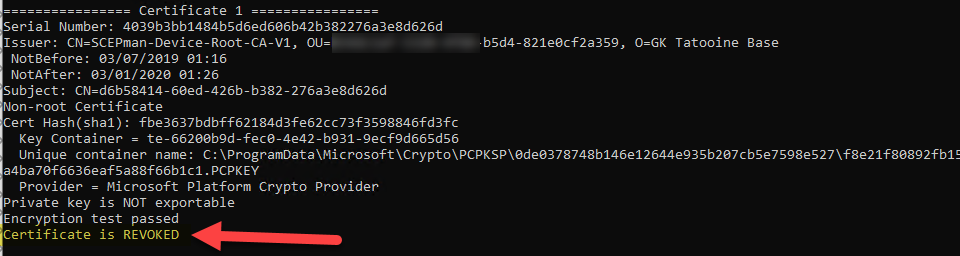
If we enable the device in Azure AD again the device certificate should be marked as valid again. This can take up to 5 min.
An alternative method is to export the device certificate and use certutil to display a small certutil UI for the OSCP check:
certutil -url <path-to-exported-device-certificate>

Troubleshooting
Following a few steps for troubleshooting I used during evaluation. I really recommend to have a look at the official SCEPman Docs as well, as everything about SCEPman is documented there (design, architecture and so on) and also a good troubleshooting section. See SCEPman Docs
My trusted root certificate is deployed but my device certificate via SCEP profile results in an error?
The SCEP profile will result in an error if the certificate deployment wasn’t successful. This can have several reasons:
- SCEP certificate profile is configured with an error. For example, a wrong trusted root certificate was selected in the SCEP certificate profile. This is also shown in the event log under Events > Applications and Services Logs > Microsoft > Windows > DeviceManagement-Enterprise-Diagnostics-Provider > Admin, EventID 32, SCEP: Certificate enroll failed. Result: (hash value is not correct.).

- SCEPman Azure Web App is not running. Check if the Azure resource is up and running.

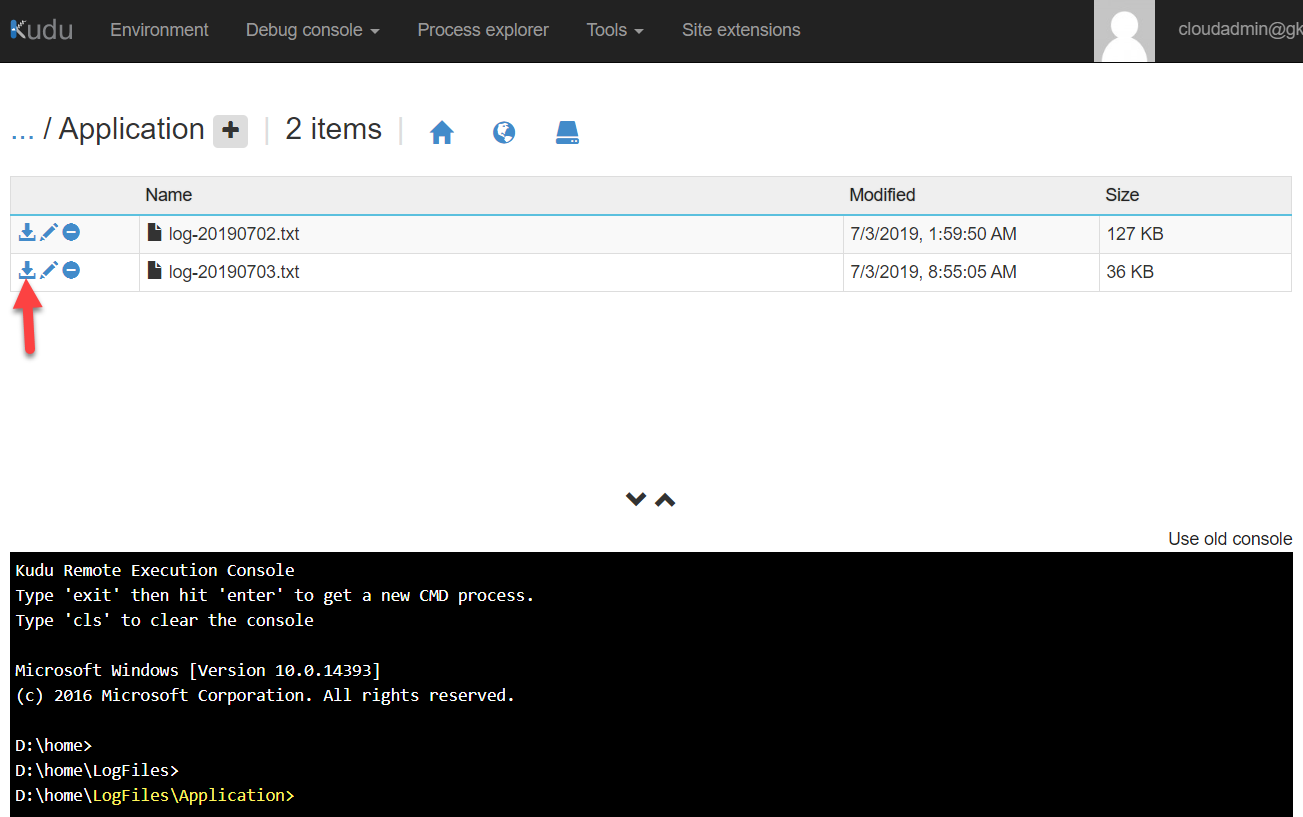
- SCEPman has a configuration or internal problem. Check Azure Web App log files via Advanced Tools > Kudu > Debug Console > CMD > navigate to LogFiles > Application > click on the download icon on the latest .txt file and review it
- Additional way of logging, configure the App Services Logs and check the Log Stream of the App Service. This might be a good way to troubleshoot 500 errors:


My certificate does not have the correct OCSP URL entry?
If the device certificate has a localhost URL for the OCSP entry in the certificate like this:

The App Service is missing an important Application setting with the name AppConfig:BaseUrl set to the azurewebsite URL. To fix this add the variable and save the App Service config:
AppConfig:BaseUrl
https://scepman-XXXXX.azurewebsites.net
Delete the certificate from the device and hit the MDM sync. You should see now a proper URL for the OCSP entry:

My SCEP configuration profile shows pending and is not applied?
The SCEP configuration profile depends on the Trusted Root certificate profile. Assign both profiles to the same AAD user or device group to make sure the user or device overlaps and both profiles are targeted to the device. Don’t mix user and device groups. If you see pending as status for the configurations profiles in Intune for a long time, the assignment is probably wrong!
My SCEP profile settings are not recognized in the deployed certificates?
This is because some settings are mandatory set by SCEPman, the yellow rectangle is automatically set by SCEPman (for better visibility I recommend to set the settings in the yellow rectangle to the SCEPman mandatory settings like shown below). Hereby is the Key usage set to “Digital signature” and “Key encipherment”. The validity period is set to fixed 6 month currently. The red rectangle are settings which are free to modify. Long term all settings will be supported for configuration. There is a dependency on the {{AAD_Device_ID}} in the subject name, which is used as a seed for the certificate serial number generation. Therefore the subject name must include {{AAD_Device_ID}} for device certificates and for user certificates “common name including email”. Keep an eye on the subject name format in regards to the allowed characters, have a look here Create and assign SCEP certificate profiles in Intune for more details.

SCEPman editions
SCEPman is available in two different editions. If you consider a large scale enterprise deployment with professional support and maybe load balanced service you should consider to use the paid SCEPman Enterprise Edition.
If you are a geek or technical pro and you are going to self support the installation there is the free SCEPman Community Edition (CE). The free SCEPman CE is not backed by professional support services. The only technical difference is that SCEPman CE does not support redundancy through Azure Traffic Manager (no support for Azure WebApp custom domains).
Final thoughts
I hope this will lower the burden to move components to the cloud as you are now able to get device certificates easily without complex on-premises PKI infrastructure. Go and start evaluating this great solution which completes the cloud story when using a cloud-only modern management approach.
If you want to learn more of the SCEP request and renewal process see here:
Deep dive of SCEP certificate request/renewal on Intune-managed Windows clients

Awesome guide and solution! Really neat. The question is as you describe about the licensing. Also, it would be awesome if Glück & Kanja have any numbers on the monthly cost for running this. Let’s say you utilize SCEPman for SCEP-certificates for Windows/MacOS/iOS/Android for 100 devices, what would the monthly cost be?
Sorry for my delay, I have a rough calculation for 100k devices. This would result in about 15 million key vault transactions -> 45$/month App service plan. If the App service uses a Premium P2 for example this would be additional 290$/month… so if you have less devices (100 :-)) the transactions are far less and a smaller service plan can be used and the cost will go down. my initial calculation can handle 100k devices. In addition you would need to get a license for SCEPman which is currently not finalized how it is licensed. I’ll update the blog post as soon as I have this information.
great article! looking forward to get more information about licensing.
Thanks a lot
But not working with NPS (as we know now) for wifi auth 🙂
Great solution and article.
Yes, as NPS relies on AD for its work. Good to know. 👍
Does NPS WiFi device authentication work if the device is in on-premises AD and AzureAD is synced via AADConnect?
Yes, I think so, as it is a normal domain joined device then. I never tested this out.
Hi Oliver,
How can we export the root certificate of SCEPman/keyvault?
Great article, thanx!
Hi,
that’s actually very easy. If you only want to have the root certificate with public key, use the SCEPman website and the button “GetCACert”. The root with public key is all you need for distribution to your clients. Compare my blog post where the SCEPman website is shown.
If you need the certificate with public and private key, you need to have enough permissions first. First, go to the Azure Key Vault and open Access Policies > Add New > add principal (your GA user) select permission template “Key, Secret & Certificate Management” and add. After this you can open section Certificates > click on the SCEPman-Root certificate, click again on the certificate > click Download in PFX/PEM Format.
That’s all.
best,
Oliver
You wrote in your blog the following: “SCEPman is a fully unattended Certificate Authority […]”. So it is also possible to use S/MIME certificate? Because the requirements are a cloud PKI for VPN authentication, user / machine certificates and S/MIME certificates. Now I’m not sure if this is all possible with SCEPman. So maybe you can help?
Hi,
fully unattended means there a no other requirements except SCEPman and Azure Key Vault. No NEDS or other on-premises components are involved. VPN and Wi-Fi auth with device certificates is the use case for which SCEPman is designed for. No user certificates and no S/MIME certificates. So we can easily say it will solve the common access strategy issue where enterprises like to use device certificates for access (Wi-Fi, VPN). Nothing more.
best,
Oliver
I’m getting 502.5 errors when deploying Scepman. Is this something in my environment or in the marketplace app?
Hi Daniel,
I verified the marketplace package and did a deployment right now to confirm if it is working. It is working flawlessly. All resources getting provisioned and the App service is running. So I assume that there is something on your environment which causes the problem. Maybe drop the resource group and deploy SCEPman again. Verify the Variables if they are set correctly and try to restart the App service after deployment. See if this helps..
best,
Oliver
I’m trying to setup SCEPman, deploying the thing from the marketplace works perfectly. Deploying the root CA through Intune works too. When trying to get the SCEP part up and running I’m seeing HTTP error 500 in my event viewer and when checking the logs in Kudu I see the following error message. Something seems to go wrong while interacting with Intune within our tenant. I already redeployed SCEPman and created a brand new app registration with the correct permissions. The logging states that the request ‘was unauthorized’…
Any thoughts on this one?
2019-08-09 09:21:03.240 +00:00 [Information] (Scepman.Server.Middleware.RequestResponseLoggingMiddleware.) Request [x.x.x.x]: https://scepman-xxxxxxxx.azurewebsites.net/certsrv/mscep/mscep.dll/pkiclient.exe?operation=PKIOperation
2019-08-09 09:21:05.927 +00:00 [Information] (Scepman.Server.Controllers.ScepController.) Request validation unsuccesful, as Intune validation threw an exception
2019-08-09 09:21:05.931 +00:00 [Error] (Microsoft.AspNetCore.Server.Kestrel.) Connection id “”0HLOSLB7G7UHL””, Request id “”0HLOSLB7G7UHL:00000007″”: An unhandled exception was thrown by the application.
System.Exception: The request was unauthorized
at Scepman.Server.Controllers.ScepController.PerformPkiOperation(Byte[] requestData) in /builds/gk-scepman/scepman/source/Scepman.Server/Controllers/ScepController.cs:line 208
at Scepman.Server.Controllers.ScepController.PostAsync(String operation) in /builds/gk-scepman/scepman/source/Scepman.Server/Controllers/ScepController.cs:line 140
at lambda_method(Closure , Object , Object[] )
at Microsoft.Extensions.Internal.ObjectMethodExecutor.Execute(Object target, Object[] parameters)
at Microsoft.AspNetCore.Mvc.Internal.ActionMethodExecutor.SyncActionResultExecutor.Execute(IActionResultTypeMapper mapper, ObjectMethodExecutor executor, Object controller, Object[] arguments)
at Microsoft.AspNetCore.Mvc.Internal.ControllerActionInvoker.InvokeActionMethodAsync()
at Microsoft.AspNetCore.Mvc.Internal.ControllerActionInvoker.InvokeNextActionFilterAsync()
at Microsoft.AspNetCore.Mvc.Internal.ControllerActionInvoker.Rethrow(ActionExecutedContext context)
at Microsoft.AspNetCore.Mvc.Internal.ControllerActionInvoker.Next(State& next, Scope& scope, Object& state, Boolean& isCompleted)
at Microsoft.AspNetCore.Mvc.Internal.ControllerActionInvoker.InvokeInnerFilterAsync()
at Microsoft.AspNetCore.Mvc.Internal.ResourceInvoker.InvokeNextResourceFilter()
at Microsoft.AspNetCore.Mvc.Internal.ResourceInvoker.Rethrow(ResourceExecutedContext context)
at Microsoft.AspNetCore.Mvc.Internal.ResourceInvoker.Next(State& next, Scope& scope, Object& state, Boolean& isCompleted)
at Microsoft.AspNetCore.Mvc.Internal.ResourceInvoker.InvokeFilterPipelineAsync()
at Microsoft.AspNetCore.Mvc.Internal.ResourceInvoker.InvokeAsync()
at Microsoft.AspNetCore.Routing.EndpointMiddleware.Invoke(HttpContext httpContext)
at Microsoft.AspNetCore.Routing.EndpointRoutingMiddleware.Invoke(HttpContext httpContext)
at Scepman.Server.Middleware.RequestResponseLoggingMiddleware.Invoke(HttpContext context) in /builds/gk-scepman/scepman/source/Scepman.Server/Middleware/RequestResponseLoggingMiddleware.cs:line 32
at Microsoft.AspNetCore.StaticFiles.StaticFileMiddleware.Invoke(HttpContext context)
at Microsoft.AspNetCore.Server.IISIntegration.IISMiddleware.Invoke(HttpContext httpContext)
at Microsoft.AspNetCore.Server.Kestrel.Core.Internal.Http.HttpProtocol.ProcessRequests[TContext](IHttpApplication`1 application)
Hi Remco,
in my opinion there are two possible areas where something went wrong and causes this error. First re-check the App service > configuration > AppConfig:AuthConfig:ApplicationId and AppConfig:AuthConfig:ApplicationKey. These variables store the app registration auth data. Just create a new secret on the registered app and replace the secret within the config variable on the app service. Here there might be a config issue. the next thing is that your registered app might not have the admin grant? Are all API permissions there and granted (admin grant) and showing the green check mark icons with the text granted for tenant XYZ?
These are the possible issue areas which result in unauthorized errors if there is something wrong. The SCEP profile seems to be okay, otherwise you wouldn’t see the request to SCEPman https://scepman-xxxxxxxx.azurewebsites.net/certsrv/mscep/mscep.dll/pkiclient.exe?operation=PKIOperation
Can you verify this once again? I have seen this several times, also in my own test environment and it was always related to one of these things.
best,
Oliver
Everything is green as I admin-granted the permissions. I created a new key and confiugred it in the app service. Restarted the app service afterwards and triggered my notebook to perform a SCEP request again. I’m still seeing the same error message in the logfile and no client certificate is deployed on my notebook.
Any other thoughts?
I had problems one time as I used a wrong trusted root. I was using a root from a different instance. I re-downloaded the root again, uploaded it again and connected it again in the SCEP profile. Did you also verified that the trusted root and the linked trusted root in the SCEP profile is correct?
All services are listed as connected right? Vault, Intune, and Graph?
In my opinion it must be related to the API permission scep_challenge_provider as the logfiles says “Request validation unsuccesful, as Intune validation threw an exception”. The scep_challenge_provider has no other properties as the appid and key for authentication. It the code tells us not valid authentication, it seems to be related to that… I’ve done quite a lot deployments and auth error could always be fixed by checking this.
Did you check the other variables like AppConfig:BaseUrl and AppConfig:KeyVaultConfig:KeyVaultURL, are they correct?
I created a new configuration profile to deploy the root certificate and assigned it to my devices. After that I linked the SCEP profile to this newly created root certificate.
All services are shown as connected. The URL’s are correct as well.
I wanted to check if I could manually do a request to the ‘scep_challenge_provider’-URL through Postman. If I’m right this request doesn’t use the Microsoft Graph API but uses https://api.manage.microsoft.com as API endpoint for this specific request. When I try to access this URL from my notebook it doesn’t even resolve to an IP address. Could this be a cause for this problem / do you experiencing this problem as well?
Why there is NO SAN in the certificate ?? Noting that SAN configured in the Intune Profile, this is a big problem because in android devices if you have the EAP-TLS wifi for android the wifi will not pick up the SCEP certificate if SAN attributes is not there !
https://developer.android.com/about/versions/pie/android-9.0-changes-all#certificate-common-name
Hey Sam,
thank you for the information. I will verify this with the developers and make sure Android – Wi-Fi is working correctly. I’ll get back to you as soon as I can confirm correct working with Android. I’ll try to solve this as fast as possible. Thanks again for pointing this out.
best,
Oliver
Hi Oliver,
Any update regarding the SAN attribute ?
Hey SAM,
we are currently working on a fix for this. We started code working at it and doing validation tests. But it needs some additional time for completion. I’ll let you know as soon as this is fixed.
best,
Oliver
Hey Sam.
I’ve implemented support for SAN attributes and tested Android for Work successfully in-house with device certificates from SCEPman and Wi-Fi auth against our Wi-Fi. So you should be able to do the same now with Android. I’ve also updated the blog article with the steps which are necessary to achieve successful Wi-Fi auth with the device certificates.
best,
Oliver
I’m having the same issues as described by Remco. The eventlog shows the following error: SCEP: Certificate enroll failed. Result: (Internal server error (500).). Remco were you able to resolve this issue? If so, could you explain how?
It’s really a wonderful concept without any dependency on on-prem resources. after deploying the service, the intune automatically deployed the profile to the devices with the Root and Client certificate. My actual plan is to implement P2S using SCEP As a Service, everything seems to work as expected. In addition to my comment here, I would like to know how to renew the device certificate when it expires, please share if there a document for the same
Hi Sujithkumar,
thanks for the praise :-). There is a certificate “Renewal threshold (%)” in the SCEP profile which is by default set to 20%.
Further explanation is:
Enter the percentage (between 1 and 99 percent) of remaining certificate lifetime that is allowed before a device can request renewal of the certificate. The recommended amount in Intune is 20%. (1-99)
With that said, the client does an automatic renew of the certificate. How does Windows handle this? There is a scheduled task for that which runs every 7 days:
· Open up Task Scheduler
· Navigate to Task Scheduler Library -> Microsoft -> Windows -> EnterpriseMgmt -> {GUID}
· Right click the task “Schedule created by enrollment client for renewal of certificate warning” and select run.
best,
Oliver
Hello Oliver
How does the renewal process work on IOS? I do have a device where the certificate is expired. And im not getting a new one.
The device does still have the Scep profile assign.
Anders
Hey Anders,
the renewal threshold is specified in the SCEP profile in % and transmitted to the iOS device. iOS devices do not support the validity period. Only server side validity is used on iOS (see reference here for config: https://glueckkanja.gitbook.io/scepman/deployment-optional/02_application_configuration#adding-additonal-configuration-values). Meaning if you configure SCEPman to have a validity period of max 180, iOS will get a certificate of 180 days, even if you specified 60 days in the iOS profile. I’ve tested the scenario about renewal and configured 1 day validity on SCEPman server side, and renewal threshold of 99%, meaning in approx. 15min. after certificate deployment the iOS device should get a new certificate, if I click on check settings in Company Portal. Why? Becasue 1% means approx. 15min. when 1 day validity specified. My setup did exactly this, after 15min. I got a new certificate from SCEPman. I will validate to see if the iOS device will get the new certificate after the regular 8h check-in interval (MS docs reference about check-in behavior: https://docs.microsoft.com/en-us/mem/intune/configuration/device-profile-troubleshoot), but I guess this will give me the same result.
So in your case you might have a timing issue and you have to wait just a little bit longer or maybe force it once, via clicking on Company Portal Check settings.
best,
Oliver
After a long time I am back to ask you a question because the simplicity of your product makes me come back again. Is there a possibility to use user certificate(Deployed using SCEP As a Service) as authentication method in Intune Email Profile. Therefore the user wont be prompted for sign from an iOS device.
Microsoft: Authentication method: Choose how users to authenticate to the email server. Your options:
Certificate: Select a client SCEP or PKCS certificate profile you previously created to authenticate the Exchange connection. This option provides the most secure and seamless experience for your users.
Ref: https://docs.microsoft.com/en-us/mem/intune/configuration/email-settings-ios
please confirm if this is possible.
Hey Sujithkumar,
From my perspective this should work. I never implemented it myself but there is no reason why it shouldn’t work. Exchange must trust the SCEPman Root CA and the device must have the user certificate (which is possible to deploy) which holds Client-Authentication. There is only one thing which might be different from a on-prem published PKI, we only support OCSP for validation we don’t have a CRL. If Exchange relies only on CRL checks it won’t work, but I can’t imagine that this is true.
best,
Oliver
Today, I tried creating an Email Profile using (SCEPman) certificate as an authentication method in Intune but it seems not working. Profiles are getting applied properly and I am able to see the certificate on the device (here I am testing iOS device) and I do not see any errors but when I open the EAS account under Settings–>Passwords&Account, it shows “Account not Authenticated” & “Re-enter Password”, if the authentication is certificate based then it should not prompt for user & password, this shows that EAS Profile does not recognize the certificate while placing authentication request to Azure AD.
Not sure why but its not working. I even tried with all subject name format from “https://docs.microsoft.com/en-us/mem/intune/protect/certificates-profile-scep” but no luck. please advice.
In this scenario, I have used user certificate because of the EAS Profile.
https://docs.microsoft.com/en-us/azure/active-directory/authentication/active-directory-certificate-based-authentication-get-started
According to this docs everything seems possible except the CRL, SCEPman does not provide a CRL, only OCSP endpoint… so I think CBA is actually not working with SCEPman 😦
But in other situations I have seen docs referencing a need for CRL and it was working with OCSP only as well, so I guess to be really sure ask an Exchange expert about it 👍
Hi Oliver
Thanks for the quick response!
As per my underdtanding, you are referring to “SCEPman-Device Certificate –> Settings –>Configure–> Certificate validity period” here it shows a drop-down to choose “days months years” with a text box next to it. please confirm is this the option to set certificate expiry
Rest all looks good to me and thanks for the sharing light on auto-enrolling the certificate.
Yes that’s the expiry 👍. Currently it is set fixed to 6 month by us, regardless what is set in the profile. This is work in progress and in an upcoming SCEPman release we will support setting the expiry in the profile and we will set it accordingly.
Thanks a lot 🙂
Hi, thx for this awesome guide. Worked like a charm. We use it for AzureVPN authentication and it works really well for Windows. I also figured it out for macOS but I’m failing to get it to work for iOS. The certs seems to be deployed to my iOS device but the connection to the VPN fails (unexpected error). I know, maybe it’s not a SCEPman problem but I am wondering, if you have/had a similar need or have a recommendation for me. We use ikev2 and wanted to use the OpenVPN Client or the built in iOS client. Any idea?
First of all thanks and good question. On Android and Wi-Fi we ran into an issue which resulted that we had to set the UPN as a SAN attribute, otherwise it was also not working. Maybe something similar? Can you try to set SAN attribute to the UPN for something like {{AAD_Device_ID}}@yourdomain.tld ? That is necessary as Google deprecated hostname verification with the CN and is looking explicitly for the SAN attribute. Maybe that’s the same for iOS.
best,
Oliver
Thanks for your suggestions. I’ve done some tests and it was not something with the UPN but I think with the Beta iOS version.. On my iPad Pro I have installed the iOS version 13.1 Public Beta and there is an “Unexpected Error”. Then I made some tests on a iPhone X with Software version 12.4.1 and there I can establish the connection! (With or without UPN SAN attribute). So I think it’s a iOS bug for the moment.. But can I set these settings with an Intune device profile? For the moment I have done this manually. I am wondering, if it is possible to configure the native iOS VPN through a device profile. Thanks a lot!
Hi Adri,
you can try it with the Intune build in custom VPN profile (profile type=VPN connection type=custom VPN) for iOS (never done that myself). Or you could have a look at the Apple MDM payloads here https://developer.apple.com/business/documentation/Configuration-Profile-Reference.pdf and design your own iOS MDM payload via a Custom Profile (profile type=custom).
best,
Oliver
hi oliver, thanks for sharing. as a newbie, will this work with both Intune MAM (MDM-less) and MDM enrolled devices?
Hi,
this is only working with MDM enrolled devices. You need to have support to push down the SCEP profile to the device which is not possible with MAM.
best,
Oliver
Hi Oliver
Thanks for the guide.
I have also tried to setup this in test and followed all steps, but i cannot get it to work.
After i tried to restart, under “Overview”, I get this error when choosing “Browse”:
HTTP Error 502.5 – Process Failure
Common causes of this issue:
The application process failed to start
The application process started but then stopped
The application process started but failed to listen on the configured port
Troubleshooting steps:
Check the system event log for error messages
Enable logging the application process’ stdout messages
Attach a debugger to the application process and inspect
and in the event log on the client, i get an error:
SCEP: Certificate enroll failed. Result: (Bad gateway (502).)..
I am really unsure on two steps:
Under the step with AppConfig:BaseUrl, should i write the Value, as you show in the picture:
https://scepman-appxxxxxxxxx.azurewebsites.net AppConfig:BaseUrl ?
And under the step with setting up the SCEP profile, you do not write which of the two option we should take in “Key storage provider (KSP)”, as the screenshot don’t show?
– Enroll to Trusted Platform Module (TPM) KSP if present, otherwise Software KSP ?
– Enroll to Trusted Platform Module (TPM) KSP, otherwise fail ?
Thanks, in advance.
Martin
Hey Martin,
thanks for the comment. You are right this was a failure in the screenshot. I replaced it with a better one 👍. You fixed it correctly by yourself. Regarding your KSP it doesn’t matter at the time as we are using by default “Enroll to Trusted Platform Module (TPM) KSP if present, otherwise Software KSP” regardless what is configured. See the troubleshooting section. Currently not all properties are supported, we are working on that to support them in future releases. Stay tuned.
best,
Oliver
Hi Oliver
Thanks for the answer. 🙂
I am still not having it up and running, and is not aware of the fix you wrote i solved myself? 🙂
I have tried with and without this below settings:
With this setting in the AppConfig:BaseUrl:
– https://scepman-appxxxxxxxxx.azurewebsites.net AppConfig:BaseUrl
— I get the error in the “Browse” = error 502.5 showned in the last message.
— Client Event log error: SCEP: Certificate enroll failed. Result: (Bad gateway (502).).
With this setting in the AppConfig:BaseUrl:
– https://scepman-appxxxxxxxxx.azurewebsites.net
— Then the “Browse” option is working, and i can come in.
— Client Event log error: SCEP: Certificate enroll failed. Result: (Internal server error (500).).
I am still not having a clue of what i do wrong, and hope you can help me figuring it out? 🙂
I also have another important question for you, that you may have the answer to? 🙂
Today in my on-prem setup, i am using MS Direct Access and having a secure VPN connection as soon as the client computer is turned on external, and i can secure computer policies is also coming out to my external clients when on the road for a longer period of time.
But with the new setup i am trying to test in Azure, i am testing with using the “Azure Domain Services”, and the client is Azure joined, and not “normal” domain joined. And if the article is right from MS (See under requirements) on Always on VPN with device tunnel, it has to be domain joined.
https://docs.microsoft.com/en-us/windows-server/remote/remote-access/vpn/vpn-device-tunnel-config
Can you confirm that it will work or not with the SCEPman, Always on VPN to device tunnel, and into an Azure Virtual Network Gateway with Point to Site activated?
If you have the time, please feel free to contact me on my e-mail, and i am more than willing to buy some consultant hours from you, to get this up and running? 🙂
Thanks, in advance.
Martin
Hi Martin,
for the AppConfig:BaseUrl you should use your individual URL: https://scepman-appxxxxxxxxx.azurewebsites.net, the xxxx is normally a random string like https://scepman-app2jkd7dj7ikkd.azurewebsites.net. Did you add your own url there? As soon as you do, you should not see Bad gateway etc. errors. In the SCEP certificate template you should configure the same url https://scepman-app2jkd7dj7ikkd.azurewebsites.net with the addition /certsrv/mscep/mscep.dll at the end, so in my example: https://scepman-app2jkd7dj7ikkd.azurewebsites.net/certsrv/mscep/mscep.dll. If your problem still persists we might have to check your tenant together.
For your setup I would recommend to use Azure VPN with Conditional Access which will check device compliance and then gives you based on the result short lifetime VPN certificates from an Azure PKI. MS has his own certificate instance (CA) for doing that. Check article: https://docs.microsoft.com/en-us/windows/security/identity-protection/vpn/vpn-conditional-access. The VPN Server can also be in Azure hosted and then via Site-2-Site connection you get back to on-prem. My company I’m working for, has a blueprint for this setup. If you are interested in consulting here, feel free to reach out to me on that via the contact form.
best,
Oliver
Hello Oliver,
i get the Internal error 500 messages too.
It’s a Windows 10 machine.
When i enable the App service logging i see the following log :
Acquiring ADAL token : HTML code (Text only)
Detailed Error Information:
Module AspNetCoreModule
Notification ExecuteRequestHandler
Handler aspNetCore
Error Code 0x00000000
Requested URL https://scepman-appv4XXXXXXXXXXXX:80/certsrv/mscep/mscep.dll/pkiclient.exe?operation=PKIOperation
Physical Path D:\home\site\wwwroot\certsrv\mscep\mscep.dll\pkiclient.exe
Logon Method Anonymous
Logon User Anonymous
Isn’t https and port 80 a bit strange ?
After that
[Fatal] (Scepman.Core.AbstractCABackend.) Unable to find/parse UPN from SAN
I have tried all other mentioned solutions.
KR,
Martien
Hi Martien,
I think this is easy to solve as the “Unable to find/parse UPN from SAN” indicates, that your SCEP certificate profile does not has the SAN attribute correctly configured. You have to add {{AAD_Device_ID}}@yourdomain.tld as UPN. As soon as you configure that it should work as expected. Why you see port 80 is a bit strange, we are using https everywhere without any exception… verify again after the SAN fix.
This requirement was added in the latest version and is not documented on my article now. I will fix this. This requirement was added because Apple and Google do not allow certificates without the SAN attribute anyway. There is a changed code path now how we validate and we are using SAN now like Apple and Google is doing it and requiring.
best,
Oliver
Yes, working again. Thank you
Hi Oliver
We are trying to set this up to use for our wifi authentication. I’ve been able to deploy SCEP profiles to Android and Win 10 devices, I’ve been able to use the certutil on win10 to verify the certificates that the devices have from enrolment are valid. But we are seeing unsuccessful authentications on our Cisco ISE server “12993 User Auth failed because OCSP is unreachable”
OpenSSLErrorMessage SSL alert: code=0x22A=554 ; source=local ; type=fatal ; message=”X509 bad certificate – error certificate rejected”
OpenSSLErrorStack 12223:error:27076072:OCSP routines:PARSE_HTTP_LINE1:server response error:ocsp_ht.c:314:Code=404,Reason=Not Found
I can see from packet capture the ISE server does go out to the IP 51.140.146.131 which is for our xxxxx.azurewebsites.net
Where can I find logs for SCEPman app service?
Hi,
I guess this is because of our OCSP responder was HTTPS until latest version. We identified this as an issue and changed it to the recommendation to HTTP for OCSP requests. Please make sure your SCEPman instance has the TLS/SSL setting “HTTPS only” set to “off”.
In addition go and use the latest version of SCEPman, this one changed the OSCP responder to http. point your app service configuration variable “WEBSITE_RUN_FROM_PACKAGE” to “https://github.com/glueckkanja/gk-scepman/raw/master/dist/Artifacts.zip” and restart the app service to get the latest version. It might be needed that you delete the certificate for the device and let the client get a new one which includes the new OCSP responder as an http URL.
For logging configure the “app service logs” on the app service to “on” and “filesystem”. Then open the “Log stream” on the app service to see realtime log entries.
best,
Oliver
Trying to integrate this with my RADIUS server, but need to generate a host certificate and key for the server. I can’t seem to find how to do this? Any help would be awesome.
Hi Ryan,
we do not provide full PKI functionality. The product is designed to issue client certificates (user or device). In the case of RADIUS server you need a certificate for the server itself. Therefore you can use a self signed certificate (only for testing purpose recommended) or a certificate like “Let’s encrypt” (https://letsencrypt.org). I really recommend to use let’s encrypt for the Radius server.
best,
Oliver
Hi Oliver. We seem to get this error in our installation; Signing certificate thumbprint does not match the one in the token.Intune Signing cert thumbprint(s): B5B8C6DA8F82Axxxxxxxxxxxxx0AC2F792E do not match the signing cert thumbrpint in the CSR: 9dcc50xxxxxxxxxx845f8e9aa9c7f2
Do you have a pointer on what it could be.
Hey beamex,
I’ve seen this error exactly 2 times and tried to investigate heavily, sadly I didn’t came to a conclusion. One instance fixed the issue by itself. The customer reached out to me and told me suddenly it started to work, and the other instance still faces this issue. I’m still committed to find the root cause of this issue but I didn’t had the chance to. I’m happy to assist your further by mail. I’ll reach out to you directly.
best,
Oliver
That sounds great I will be glad to provide further log files and information.
Did you get to the bottom of this? I am seeing this also.
Hi,
we have seen similar log file entries since yesterday. It looked like something on the MS service side (API) was changed yesterday. Since yesterday evening (latest today) all environments where I experienced this, are back to normal. So it was more or less something on MS API side and everything is back to normal now. Did you try to re-start the app service?
best,
Oliver
Thanks for the quick reply!
We use a third party SCEP service rather than NDES. That depends on an Azure app registration to authenticate the clients. Do you mean we can restart that Azure app in some way?
My assumption was you are using SCEPman and if though I would just stop and start the Azure Web App which is created during SCEPman deployment.
Thanks, yeah it’s one of the supported third parties. I will check the Azure app side of to see if it can be stopped and started.
Hi,
Ours is working now too, I just didn’t realise it when we resumed searching for the error message this morning. Microsoft called me back and advised that they did have an issue that is now fixed as of last night which ties in with your timeline.
Microsoft incident ref: IT219554
“All users unable to receive new or renewed Simple Certificate Enrollment Protocol (SCEP) certificates on their devices User Impact: Users may be unable to receive new or renewed SCEP certificates on their devices. More info: This issue only impacts users who are using third-party SCEP integration. “
Can’t access to SCEPMan website created to App Service. Always get IIS 502.5 Error, and tried every fix found from this post. Is the Marketplace installation package still valid?
Hi artoroth,
I did a deployment to verify the package right now and everything is fine. SCEPman was deployed successfully and I can access the website and the app service responded to requests. I guess there is something blocking you, maybe the app registration consent is missing or something else. Can you have a look at the SCEPman app service log files like described in the article via advanced tools > Kudu. I guess there you should be able to pinpoint the problem and get it fixed.
best,
Oliver
Did you add the configuration AppConfig:BaseUrl? This is not needed since SCEPman version 1.3 and later. If you added it, can you remove it and test again?
I checked the process 37th time, and I found my mistake. MS Graph Directory.ReadAll permission must be pointed to Application, not Delegated. Thanks for your help Oliver and Happy Holidays!
Great article. How do I deploy other certificates with this? For use with Azure Always On VPN for example…
You can deploy authentication certificates. These can be used for Wi-Fi or VPN. But for VPN there is a MS out of the box solution with short live time certs issues by MS in the customer tenant, have a look here: https://docs.microsoft.com/en-us/windows/security/identity-protection/vpn/vpn-conditional-access
But again you can also use SCEPman to issue a cert for a VPN profile
OK, thanks. But I don’t understand how I would deploy a certificate with a private key (as required by a Azure point to site vpn) using scepman?
Actually this is not in scope. So a VPN gateway would need to use Let’s encrypt or something. SCEPman is issuing only client authentication certificates via SCEP. So if your VPN gateway needs somethign like this I would look for Let’s encrypt. Or as already said, I would go for the Azure VPN solution with the built in Azure Mini CA and their short-lived certificates… That’s what we do if we need VPN.
Can this solution create user certs for iOS to be used for certificate based authentication against activesync for on prem exchange?
Hi David,
you are able to deploy user or device certs to iOS. I’m unsure what is exactly needed for active sync on-prem. You can control things like subject name or the SAN attribute which might help you. I guess you have to try it out and study the docs for exchange on-prem.
best,
Oliver
Hello Oliver,
Great service!
I can access scepman web app and my computer(Win10) got Trusted cert.
But my computer didn’t get device cert.
I see 2 type of events in Application event log.
My computer is trying to get device certificate, but fails.
1. “SCEP: Certificate enroll failed. Result: (Internal Server Error(500))”
2.SCEP: InstallFromRegEntries。CorrelationGuid: ({206BBA84-C859-4071-BFB0-9C4212899C8A})、UniqueId: (ModelName_AC_ab94ec85-2f0f-4b2e-b088-7b76f7ba5f8f_LogicalName_cd08043b_2633_4293_a2be_8ec7e95070c7_Hash_1989059924)、証明書の拇印: ()、回答者のサーバー: (https://scepman-appzvwmhrqsd3is4.azurewebsites.net/certsrv/mscep/mscep.dll/pkiclient.exe)、インストール ステータス: (0x10)、現在の再試行回数: (0x2)、結果: (内部サーバー エラーです (500)。)。
And here is Appplicaion/log.txt from Kudo.
It would be appreciated if you could point out cause.
———————
2020-02-29 10:28:04.607 +00:00 [Error] (Scepman.Core.Services.ScepServerService.) Error sending failure notification to intune
System.ArgumentException: An item with the same key has already been added. Key: deviceenrollmentfeservicebackup
at System.Collections.Generic.Dictionary`2.TryInsert(TKey key, TValue value, InsertionBehavior behavior)
at Microsoft.Intune.IntuneServiceLocationProvider.RefreshServiceMapAsync() in /builds/gk-scepman/scepman/source/ScepValidation/IntuneServiceLocationProvider.cs:line 225
at Microsoft.Intune.IntuneServiceLocationProvider.GetServiceEndpointAsync(String serviceName) in /builds/gk-scepman/scepman/source/ScepValidation/IntuneServiceLocationProvider.cs:line 156
at Microsoft.Intune.IntuneClient.PostAsync(String serviceName, String urlSuffix, String apiVersion, JObject json, Guid activityId, Dictionary`2 additionalHeaders) in /builds/gk-scepman/scepman/source/ScepValidation/IntuneClient.cs:line 140
at Microsoft.Intune.IntuneScepValidator.PostAsync(JObject requestBody, String urlSuffix, String transactionId) in /builds/gk-scepman/scepman/source/ScepValidation/IntuneScepValidator.cs:line 291
at Microsoft.Intune.IntuneScepValidator.SendFailureNotificationAsync(String transactionId, String certificateRequest, Int64 hResult, String errorDescription) in /builds/gk-scepman/scepman/source/ScepValidation/IntuneScepValidator.cs:line 283
at Scepman.Core.Services.ScepServerService.SendCertificateNotIssuedNotificationInIntuneAsync(Byte[] csr, String transactionId, String error) in /builds/gk-scepman/scepman/source/Scepman.Core/Services/ScepServerService.cs:line 87
2020-02-29 10:28:04.612 +00:00 [Error] (Microsoft.AspNetCore.Server.Kestrel.) Connection id “”0HLTSUN0IE543″”, Request id “”0HLTSUN0IE543:00000012″”: An unhandled exception was thrown by the application.
System.ArgumentException: An item with the same key has already been added. Key: deviceenrollmentfeservicebackup
at System.Collections.Generic.Dictionary`2.TryInsert(TKey key, TValue value, InsertionBehavior behavior)
at Microsoft.Intune.IntuneServiceLocationProvider.RefreshServiceMapAsync() in /builds/gk-scepman/scepman/source/ScepValidation/IntuneServiceLocationProvider.cs:line 225
at Microsoft.Intune.IntuneServiceLocationProvider.GetServiceEndpointAsync(String serviceName) in /builds/gk-scepman/scepman/source/ScepValidation/IntuneServiceLocationProvider.cs:line 156
at Microsoft.Intune.IntuneClient.PostAsync(String serviceName, String urlSuffix, String apiVersion, JObject json, Guid activityId, Dictionary`2 additionalHeaders) in /builds/gk-scepman/scepman/source/ScepValidation/IntuneClient.cs:line 140
at Microsoft.Intune.IntuneScepValidator.PostAsync(JObject requestBody, String urlSuffix, String transactionId) in /builds/gk-scepman/scepman/source/ScepValidation/IntuneScepValidator.cs:line 291
at Microsoft.Intune.IntuneScepValidator.SendFailureNotificationAsync(String transactionId, String certificateRequest, Int64 hResult, String errorDescription) in /builds/gk-scepman/scepman/source/ScepValidation/IntuneScepValidator.cs:line 283
at Scepman.Core.Services.ScepServerService.SendCertificateNotIssuedNotificationInIntuneAsync(Byte[] csr, String transactionId, String error) in /builds/gk-scepman/scepman/source/Scepman.Core/Services/ScepServerService.cs:line 87
at Scepman.Server.Controllers.ScepController.SendNotificationToIntuneAsync(Byte[] encodedPkcs10, Byte[] certificate, String transactionId, Boolean intuneValidationSuccessful, String error) in /builds/gk-scepman/scepman/source/Scepman.Server/Controllers/ScepController.cs:line 273
at Scepman.Server.Controllers.ScepController.PerformPkiOperation(Byte[] requestData) in /builds/gk-scepman/scepman/source/Scepman.Server/Controllers/ScepController.cs:line 213
at Scepman.Server.Controllers.ScepController.PostAsync(String operation) in /builds/gk-scepman/scepman/source/Scepman.Server/Controllers/ScepController.cs:line 140
at lambda_method(Closure , Object , Object[] )
at Microsoft.Extensions.Internal.ObjectMethodExecutor.Execute(Object target, Object[] parameters)
at Microsoft.AspNetCore.Mvc.Internal.ActionMethodExecutor.SyncActionResultExecutor.Execute(IActionResultTypeMapper mapper, ObjectMethodExecutor executor, Object controller, Object[] arguments)
at Microsoft.AspNetCore.Mvc.Internal.ControllerActionInvoker.InvokeActionMethodAsync()
at Microsoft.AspNetCore.Mvc.Internal.ControllerActionInvoker.InvokeNextActionFilterAsync()
at Microsoft.AspNetCore.Mvc.Internal.ControllerActionInvoker.Rethrow(ActionExecutedContext context)
at Microsoft.AspNetCore.Mvc.Internal.ControllerActionInvoker.Next(State& next, Scope& scope, Object& state, Boolean& isCompleted)
at Microsoft.AspNetCore.Mvc.Internal.ControllerActionInvoker.InvokeInnerFilterAsync()
at Microsoft.AspNetCore.Mvc.Internal.ResourceInvoker.InvokeNextResourceFilter()
at Microsoft.AspNetCore.Mvc.Internal.ResourceInvoker.Rethrow(ResourceExecutedContext context)
at Microsoft.AspNetCore.Mvc.Internal.ResourceInvoker.Next(State& next, Scope& scope, Object& state, Boolean& isCompleted)
at Microsoft.AspNetCore.Mvc.Internal.ResourceInvoker.InvokeFilterPipelineAsync()
at Microsoft.AspNetCore.Mvc.Internal.ResourceInvoker.InvokeAsync()
at Microsoft.AspNetCore.Routing.EndpointMiddleware.Invoke(HttpContext httpContext)
at Microsoft.AspNetCore.Routing.EndpointRoutingMiddleware.Invoke(HttpContext httpContext)
at Scepman.Server.Middleware.RequestResponseLoggingMiddleware.Invoke(HttpContext context) in /builds/gk-scepman/scepman/source/Scepman.Server/Middleware/RequestResponseLoggingMiddleware.cs:line 32
at Microsoft.AspNetCore.StaticFiles.StaticFileMiddleware.Invoke(HttpContext context)
at Microsoft.AspNetCore.Server.IISIntegration.IISMiddleware.Invoke(HttpContext httpContext)
at Microsoft.AspNetCore.Server.Kestrel.Core.Internal.Http.HttpProtocol.ProcessRequests[TContext](IHttpApplication`1 application)
Hi Hiroshi,
this is an actual issue which I have seen very rare times now. We have investigated and in our latest release we have implemented a fix for this. If you try our Beta release you get the fix, the fix is currently not released as final version but will be soon. In the meantime just look for the configuraiton WEBSITE_RUN_FROM_PACKAGE and replace the URL with the SCEPman GitHub URL:
https://github.com/glueckkanja/gk-scepman/raw/master/dist/Artifacts-Beta.zip
and then restart the app service. It will get the latest edition and you will have a working SCEPman instance then.
best,
Oliver
Thank you for prompt action!!
My computer(Win10) and iPhone got device cert successfully, after changing “WEBSITE_RUN_FROM_PACKAGE” value.
I will try to create user cert.
Hi Oliver,
cool article and and even cooler solution to the “I have no longer any servers/pki at home”.
I read it from a to z, so I saw it is not built for the S/MIME certificates. What will be your answer if I need to solve this one completely without any on-premises servers/pki?
Send my greetings to Michael B. 🙂
Looking forward to your answer,
Ludwig
I would suggest to get rid of S/MIME and switch to AIP maybe :-). No, if you really depend on S/MIME you might need some kind of PKI then. I don’t have any solution to recommend for S/MIME right now. I will let Michal know 👍
Thanks for the answer.
This is what I tell my customers as well. Just thought there is maybe something on the horizon to use S/MIME in an easy way with a Glück & Kanja Solution as well.
We all know it’s much better to have the security on the document and not somewhere else 😀
HI Oliver,
first of all I would like to thank you for the very well documented steps here. Everything is detailed to the last detail and up to date… Well Done!
I have managed to set up everything correctly however I am having issues with my pushed mail profile.
So I have created two configuration profiles in Intune, one for the Trusted cert and the other for SCEP and assigned them to my user. Those have been succesfully pushed to my devices. I have done created another profile which is Mail and I chose ‘Certificate’ as the authentication method, choosing the SCEP one.
The mail profile has pushed successfully however when I enroll my device with Intune, the first time the mail profile is generated, it asks me for a password. I just press OK without giving in nothing. Afterwards every time I try to access my mail, I get an error ‘Cannot get mail – The connection to the server failed’
Any ideas of what the issue could be please?
Hi Justin,
I suspect that the email profile and the underlying mail server are not using the certificate, most likely that is because certificate attributes are not correct and the certificate selection fails. That would explain also the initial password prompt. Certificates are normally selected by the OS by searching for it with certain attributes like subjectname or dns name in SAN attribute etc. I guess your problem is based on this fact.
best,
Oliver
Hi Oliver,
Thanks for this fantastic guide.
I have successfully managed to deploy trusted root and device certificates via InTune, however, I am struggling to get user certs to deploy, these are resulting in 500 errors. I pulled these logs from the webapps log stream:
“HTTP Error 500.0 – Internal Server Error
The page cannot be displayed because an internal server error has occurred
IIS received the request; however, an internal error occurred during the processing of the request. The root cause of this error depends on which module handles the request and what was happening in the worker process when this error occurred
IIS was not able to process configuration for the Web site or application. The authenticated user does not have permission to use this DLL.
The request is mapped to a managed handler but the .NET Extensibility Feature is not installed.
Ensure that the NTFS permissions for the web.config file are correct and allow access to the Web server’s machine account.”
I also get “SCEP: Certificate enroll failed. Result: (Internal server error (500).).” in the Microsoft-Windows-DeviceManagement-Enterprise-Diagnostics-Provider logs.
Would you have any idea on why this is? seems to be permissions error?
Follow up by mail…
Just for other readers… finding for this error was application consent for Microsoft Graph > Directory.Read.All has to be type Application not Delegated.
Can you upload Sub CA signed by on-premise CA to Scepman to be used as root certificate or does it need to be generated by Scepman?
Actually this is possible if you can fulfill the following requirements:
Can SCEPman be used with an intermediate root?
Yes, but SCEP needs the “key encipherment” and “certificate signing” as key usage. If your existing PKI cannot create such a certificate it will not work. Our recommendation is that you create a SCEPman instance and test this scenario.
To use such a intermediate root just switch the certificate in the Azure Key Vault and update two application settings in your app service.
AppConfig:KeyVaultConfig:RootCertificateConfig:CertificateName
AppConfig:KeyVaultConfig:RootCertificateConfig:Subject
Reference here:
https://glueckkanja.gitbook.io/scepman/troubleshooting/faq#can-scepman-be-used-with-an-intermediate-root
best,
Oliver
Hi Oliver,
Really love the concept of your tool which will be a big step for our business towards being cloud native.
Unfortunately, like some others I have a 500.0 error which I can’t resolve.
* I am running ver 1.4.4 (Community edition)
* Deploying to Win10 1909 (or higher)
* I have confirmed that the AAD app permissions are set for Application and have green ticks.
– (Intune) scep_challenge_provider & (Graph) Directory.Read.All
* I have imported and replaced the root CA, updated the config variables and confirmed that this is being deployed to devices. Note, I do not know how to confirm if the root CA meets the dependencies stated ( “key encipherment” and “certificate signing” as key usage).
* The App reports that Vault, Vault URL, Intune and Graph are connected
* I have double checked SCEP profiles in Intune (device and user), and made sure that device UPN is set to {{AAD_Device_ID}}@ourdomain.name
* Neither device or user certificates are being generated on the device
* Device event log reports “SCEP: Certificate enroll failed. Result: (Internal server error (500).).”
* Log stream does not give much more insight other than requested URL of “https://scepman-appxxxxxxx:80/certsrv/mscep/mscep.dll/pkiclient.exe?operation=PKIOperation” – random string removed.
* There is no Kudu /home/logfiles/application folder, however logs under w3svc…. folder highlight the following warning. MODULE_SET_RESPONSE_ERROR_STATUS: ModuleName=”AspNetCoreModule”, Notification=”EXECUTE_REQUEST_HANDLER”, HttpStatus=”500″, HttpReason=”Internal Server Error”, HttpSubStatus=”0″, ErrorCode=”The operation completed successfully. (0x0)”, ConfigExceptionInfo=””
*Other things I have done include
– deleted the app/kv/sp and reinstalled, installed the root cert, and changed variables before starting the application.
– generated a new app client secret and updated the config variable.
– added the beta source code link to the config variable. Not sure if this applied because app still reporting version 1.4.4.
It would be fantastic if you could offer some direction on how to proceed with our evaluation.
Many thanks,
James
Hi Oliver,
I have confirmed that our root cert has the key usage values of “Digital Signature, Certificate Signing, Off-line CRL Signing, CRL Signing (86)”, but not “key encipherment”. Would this be a likely cause for the problem stated?
Hey James,
yes that is exactly the problem. We need “key encipherment” for SCEPman to work. Without it it will not work. I have filed a change to generate a warning if that key usage is missing. An upcoming version will give clear guidance if it is missing.
best,
Oliver
Thanks so much for the super quick response. Amazing service!
Hi,
Great post. We are having issues with certificate deployed to our Android devices (Android device administrator platform) whereby the certificates are successful being deployed from intune, however are being deployed to the user store and not trusted. So in order to authenticate via WIFI we are required to manualy trust the SCEPman device root certificate. Once we manually trust the cert WIFI access works as expected.
Thoughts? Note that cert profile deployment to Windows, iOS and macOS works as expected.
Thanks!
Hey Brodie,
honestly I don’t know what causes this behavior. But maybe you try the same scenario with Android Enterprise to see if it is working there. Android device administrator is deprecated anyway. I’ll try to investigate a bit more with some folks I know who might have some insights into Android here but right now I don’t have a real idea what’s the problem here.
best,
Oliver
Great guide.
If we have < 100 devices there is only the base fee of 300, right? And if we decide we need support there is also an extra license fee, right?
Hey Mike,
did you have a look here: https://scepman.com/pricing/ and used the slider?
Basically it is per user licensing on the Enterprise Edition.
Best,
Oliver
Hi Oliver, Are there any issues creating other Root CA certs from the deployed SCEPman key vault to deploy additional Trusted Certificate profiles to devices?
Hey Stefan,
I don’t know if I understand your question correct. Are you trying to replace the Root Cert from SCEPman with another one from your infrastructure for example? If yes, the certificate needs to support the “key encipherment” and “certificate signing” as key usage.
If I misunderstood and you just want to deploy additional trusted certificates, then you should go for a simple profile in Intune and upload the .cer file and let Intune distribute it.
best,
Oliver
Exactly wanted to know if I could deploy additional trusted certificates and also use them to sign SCEP client certificates for various applications I might use them for OR can I only use one Trusted Certificate configured with SCEPman at the one time?
SCEPman does only support one Root Cert. But you could install a second instance with a different root cert. This way you would have two different certs. In one SCEP profile you would need to point to the first instance and in another one you would need to point to the second instance. That way you would get two certs based on different Root certs. A kind of workaround.
That’ll work. Thanks!
Hi Oliver,
AzureAD trusted certificate authority doesn’t support OCSP yet, how can I get the CRL from SCEPman instead?
Cheers,
Mathieu
Hi Mathieu,
I think I don’t understand your question. What do you exactly mean by Azure AD trusted CA doesn’t support OCSP yet? Which Azure AD trusted CA? I don’t know a Azure AD trusted CA. SCEPman does not has a relationship to an Azure AD trusted CA. SCEPman is acting like a CA for authentication certificates and does provide (only for that purpose) an OCSP endpoint. We do not have a CRL for “our” certs and we for sure do not have a CRL for a Azure AD trusted CA (which is an unknown CA for me :-), I’m not aware of the existence of it).
best,
Oliver
Hi Oliver, sorry I should have expended on this. AzureAD trusted CA allows you to upload your Root CA (and intermediate CA) to Azure so it is trusted for CBA with Exchange Online for example. However, when you upload a Root CA to Azure it asks for a CRL and there is no option to provide a OCSP instead.
MS guide on how to add a cert to Azure: https://docs.microsoft.com/en-us/azure/active-directory/authentication/active-directory-certificate-based-authentication-get-started
Hey Mathieu,
thank you for pointing me to the right direction 👍. So currently we do not have any CRL support and this scenario we can’t handle. I’ll get in touch with our Developers to see what their opinion is on that. I’ll come back as soon as I have talked to them.
best,
Oliver
OSCP check show “Expired”, how to solve this?
certutil -url
Hey Edvinas,
I’m assuming you are talking about Windows 10 client and you used the certutil to verify the state of the cert. The expiration is handled by the SCEP profile definition and the threshold for renewal. The client has to request a new one within the timeframe. So renewals is basically a client side thing and the server side (in this case SCEPman) does only get a regular SCEP request and issues a new certificate. I assume your client did not follow the threshold or didn’t sync successfully in the last time. Try to MDM sync manually and maybe lower the threshold in the SCEP profile to give clients more time to request a new certificate.
best,
Oliver
Hi Oliver
do I understand correctly, that is it possible to use SCEPman without any RADIUS (e.g. RADIUSaaS) for Wi-Fi authentication via Intune?
Hey Sam,
No that‘s not possible SCEPman takes only care of distributing certificates. For Wi-Fi you need to have a instance which checks certs against an Wi-Fi Controller. Therefore you need to have a Radius Server. Wi-Fi Controller gets a Radius Server configured for Authentication and the RADIUS Server will then use certificate checks to make the decision if you are allowed to connect to the Wi-Fi or not. SCEPman would just provide the certs in that scenario. So use a Cisco ISE or RADIUSaaS to get Wi-Fi auth to work. BTW RADIUSaaS is also very simple, I suggest to request a demo for it 👍
Best,
Oliver
Hi,
Have you ever had an issue with dmcertinst.exe failing to send the enrolment request from the client to the SCEP server via a proxy?
I have a pac file configured in IE. There is no proxy bypass for the SCEP server URL. Browsing to the URL in IE goes through the proxy.
However, the enrolment traffic tries to go direct to the URL and not via the proxy. I have verified this behaviour using Wireshark.
The enrolment fails with an HTTP timeout message due to the only network route allowed out to the internet being through the proxy.
Hey BleepingComputer,
I really try to avoid proxies in my projects and if we need to have one then we always set bypass exclusions for MS services. From what we learned in the past, this is the only reliable way for us to get everything working in a stable and future proof situation. Therefore I never had to route the SCEP requests through a proxy… I guess you might end up in a support case and trying to clarify if maybe the dmcertinst binary really does not support proxies or maybe some configuration is needed to instruct proxy usage…
best,
Oliver
Hi,
I have successfully deployed device certificate via Intune to Azure Ad joined devices.
However with User certificates it also gets generated and deployed but Intune config policy fails to see it as a successful deployment and errors out. As a result it tries again after some time and another user certificate gets generated and it just goes on and on like this.
Intune never marks it as a successful deployment.
Please advise ?
Hey Rajeev,
I’ve never seen this exact scenario but I’ve seen failing user certs. In that case it was often the assignment. What is important in the assignment, you have to use the same group you use for assignment for the user cert which you are using for the root cert. If both certs, the root and user cert are using the same AAD group I got always successful user cert deployments. MS explained it because of the evaluation in the backend. the backend must know that the user or device is in both assignments (root and user cert), otherwise the backend might error out. Can you try this and let us know your results?
best,
Oliver
Hi Oliver,
first of all, great article! I´m testing a bit around with this and have got a question.
You say that it is also possible to use your own root certificate instead of the root certificate generated by SCEPman. Is there a manual or documentation for this? Unfortunately I did not find any information about this and failed to deposit my own certificate in the key vault.
Regards,
Bene
Hey Benedikt,
see here the documentation for using a different Root Certificate: https://glueckkanja.gitbook.io/scepman/scepman-configuration/optional/intermediate-certificate
best,
Oliver
Hi Oliver,
We know that there’s a known issue for SCEP and PKCS certificate requests that include a Subject Name (CN) with one or more of the following special characters as an escaped character. Subject names that include one of the special characters as an escaped character result in a CSR with an incorrect subject name. An incorrect subject name results in the Intune SCEP challenge validation failing and no certificate issued.
https://docs.microsoft.com/en-us/mem/intune/protect/certificates-profile-scep#avoid-certificate-signing-requests-with-escaped-special-characters
If you look at the event log, you may find the error message :
SCEP: Certificate enroll failed. Result: (Unknown Win32 Error code: 0x87d00905).
Is there any other log on device level that we can obtain that specifically points to such certificate push issue?
Hey Jayesh,
I’m looking at the registry: HKLM\SOFTWARE\Microsoft\SCEP\MS DM Server
and the event log: DeviceManagement-Enterprise-Diagnistics-Provider
these are my typical areas of interest. Other areas I’m not really aware of.
best,
Oliver
Hello Jayesh,
At my company we are seeing a few computers error code 0x87d00905.
Did you eventually get a resolution for this?
Thank you,
Adrian R
Oh, this is hard to say without more context. It really might be the case of characters sometimes but if you only see it on some devices, it is probably something else. Maybe you consider to get in touch with the SCEPman support (https://www.scepman.com/) to have them a look deeper into it via RemoveDebugging.
@Oliver,
Actually I didn’t do my homework properly. This was a general isssue affecting all devices. I raised a case with MS suppport and we got a hint that it might be network related. Eventually this is what it turned out to be. On the NDES server in the NDES Connector our proxy address was not entered in the following format “http://” but “” only .
Hi Oliver,
I’ve made a couple attempts at deploying SCEPman CE following the Github “Deploy to Azure” link, but I haven’t been able to get everything working yet. In some of the instructions, there is a mention of “xxx” being a random string in the URLs such as “https://scepman-xxx.azurewebsites.net/certsrv/mscep/mscep.dll”. Is it only random if I deploy from Azure Marketplace? Otherwise, it seems it’s whatever I name the App Service.
In any case, I end up with SCEP certs that fail to deploy to devices, and HTTP Error 500 if I browse to the “https://scepman-myappssvcname.azurewebsites.net/certsrv/mscep/mscep.dll” URL. Should that be a 403 error instead (same as I would get from NDES on Windows if everything was working)?
Hey Kevin,
the 500 is normal as the URL is not meant to be called like this. But to avoid confusion in future we changed this in v1.6 which was released right now, and bring a meaningful page when accessing this url.
So I guess your service is working and yes you are right, if you deployed it form GitHub ARM template you can specify. If you deploy it from the marketplace it will generate the url for you automatically.
Why you don’t get your certificates deployed needs to be looked at. I’ll follow up separately.
best,
Oliver
event log: DeviceManagement-Enterprise-Diagnistics-Provider gives the error SCEP: Certificate enroll failed. Result: (Unknown Win32 Error code: 0x87d00905).
Is there a list of SCEP error codes? If you look at the once mentioned above, the error code 0x87d00905, it gives the below meaning, but nothing referencing specials characters .
0x87d00905 -2016409339 CCM_E_CERTENROLL_SCEP_CERTREQUEST_BADTRANSACTION ccmerror.h
Hi Oliver,
I saw a comment above regarding the lack of an “Application” folder in Kudu under “LogFiles”, but did not see a response advising why this might be so. While trying to deploy SCEPman and checking the logs, I too noticed that an “Application” folder does not exist, nor any log files with name format similar to “log-yyyymmdd.txt” in any other folders.
Are you able to advise how to enable the “Application” folder and generate these log files?
Regards,
Adam
Hey Adam,
The deployment does not enable logging by default. Did you enable the logging on the app service like described here: https://docs.microsoft.com/en-us/azure/app-service/troubleshoot-diagnostic-logs
Best,
Oliver
Hi Oliver,
Application logging to filesystem was already enabled in App Service Logs, however it appears that the ASP.NET core extension required by application logging was not set-up. After setting the extension up and intentionally causing a 500 error by browsing to “/certsrv/mscep/mscep.dll”, the diagnostics “txt” file was created.
Thank you for the response,
Adam
Hello Oliver,
I have deployed scepman from the azure marketplace, and all of the vault server, vault url, intune, and graph are connected.
when creating the scep certificate profile, it is failing with a 500 error.
I tried to access directly: https://scepman-appxxxxxxx.azurewebsites.net/certsrv/mscep/mscep.dll/ i am have the same 500 error. though when i access the same url without the “/certsrv/mscep/mscep.dll/” i am able to see a 200 OK
i have enabled the logging under the “app service logs”, but nothing really relevant showing the reason why the server is throwing a 500 error code. here is a snipet from the logs.
appreciate your support to help me figure out what is causing this.
Thank you
Sean
Hey Sean,
actually the log snippet is not shown :-(…
SCEPman pre version 1.6 returned a 500 on accessing the path /certsrv/mscep/mscep.dll via normal browser GET. The endpoint is not meant for simple GET, it’s an API. Anyway, SCEPman version 1.6 gives a better feedback here. I think I need some log files. I’ll follow up by mail.
best,
Oliver
Thank you so much Oliver for your great support!
for the sake of documentation, when we click on get “CACert” we should download a filename “scepman-root.cer” and not “pkiclient.exe.cer”. now i was able to create my scep profile
Sean
Hello! Great Blog! Works fine!
one question : is there a way to show the certificates which are deployed ?
Hey John,
yes there is. On the configuration profile in Intune under the Monitor section, right below the Properties where you normally configure the SCEP profile settings. is a Monitor section and there is the Certificates node. Here you find information about published certificates. In addition under Devices > Monitor > Configuration section > Certificates is another list which has all profiles and issued certificated cumulated into this single view.
best,
Oliver
ok, expected this overview in Azure Key Vaults. Thanks for the quick response 🙂
Hello, thanks for the awesome guide! But got this problem when I tried following it, any suggestions?
https://github.com/glueckkanja/gk-scepman/issues/7
Hey AlienET,
It is hard to tell anything just from the screenshot. It could have several reasons. Maybe the resources like key vault is not created, did you check your resource group, is the key vault deployed there? What about the configurations are all configurations on the App Service set? What does the log stream tell you when you turn on application logging? I’ll try to ping you via the provided mail.
best,
Oliver
Hi,
Our previously working deployment stopped working a few days before Christmas and started to give us HTTP Error 500.0 – Internal Server Error on every certificate request. After a lot of testing we deployed a new SCEPman just to find that this new deployment gives the same error.
The registered issue no 8 on GitHub describes the problem and shows log stream output.
Thanks for reaching out, I will follow up on the GitHub issue.
Hi Oliver,
thanks for this great article.
Would you please be so kind and help me with an issue.
I managed deploying Device Certificates, but I get an error when I try to do it with User Certificates.
In your SCEPMan Docs it is written that for User Certificates Subject Name format must include “common name including email”
In screenshots I found, a dropdown menu with this option is shown.
I assume these are from earlier version of Intune / Endpoint Manager. Actually the Subject Name format is a free text field and the value has to start with CN=
How shalll the Subject Name Format look like in the actual Endpoint Manager deployment?
Thank you!
Hi Marcel,
Use CN={{UserName}} for subject name format and for SAN choose user principal name which is then {{UserPrincipalNqme}}.
I will update the screenshots to reflect this better.
Best,
Oliver
Hello!
What is the URL of the OCSP responder, where can I find this ?
Thanks
Hi John,
OCSP information is in the certificate itself, certificates have properties and one field is the Authority Information Access (AIA) there you will find you OCSP address listed.
best,
Oliver
Hi Oliver,
I have the SCEPMan running in my environment, it works fine for Windows, iOS and MacOS devices, but I cant make it work on Android devices. We have Android Enterprise with Personal Device Work Profiles. I have tried all combinations on docs and I get an error on all of them. Also this is happening on two different tenants, not sure what I am doing Wrong.
Hi Nikunj Bhalotia,
first of all, which Android Version are you using?
For Android in general it is important to have the SAN (Subject Alternative Name) set. It should be the UPN you used to enroll the device. In addition to check if the device received the device use the My Certificates app (https://play.google.com/store/apps/details?id=com.wesbunton.projects.mycertificates&hl=en).
best,
Oliver
Hi Oliver,
It Seems the issue happens only when we try to use an intermidideate certificate. Are there any specific requirements for android devices when using an intermediate certificate.
Thanks,
Nikunj
Hey Nikunj,
somehow the comment slipped through. I’m not aware of any specific requirements in regards to Android devices. I would suggest to submit a support request, so some of the engineer can look more closely into the problem (https://glueckkanja.zendesk.com/hc/en-us/requests/new).
best,
Oliver
Hey Oliver,
During our testing we have discovered that when deploying a SCEP cert to macOS it is possible export the certificate with the private key. The Mac device (Big Sur / M1 chip) has been manually provisioned.
Is there a way to prevent this?
Regards,
James
Hi James,
honestly, I’m unsure which options we have here. I’m still in investigation right now. As soon as I have more information, I’ll come back to you.
best,
Oliver
Hey James,
I got information now that MS is not using secure enclave for storing the keys and why they are not supporting the control of exportable flag I’m not sure, I didn’t get any info. But if you create a custom profile for SCEP with the MS Store app “iMazing Profile Editor” for example, you are able to set the flag in the apple profile “key is extractable”. This way you might end up in key chain protecting the key from export. Maybe give it a try and let us know.
best,
Oliver
Hi Oliver,
As always, thanks so much for the prompt response. We will do some testing and I will report back.
Regards,
James
Hey James,
the work to prevent key export on Mac is rolling out in Intune 2104. So, you might want to test it again and verify if it is now protected.
best,
Oliver
Hi Oliver,
Thanks so much for sharing this excellent news (and for remembering). Outstanding customer service.